Use Endless Embroidery  to add markers to an embroidery so it can be stitched out in a continuous, regularly spaced, sequence as many times as desired. After each stitchout, the fabric is re-hooped and the markers are used to align the new stitchout to the previous stitchout. Hence, the embroidery can be stitched out as a single, endless embroidery in a band.
After changing settings, the effect is automatically updated in the preview area.
The Endless Embroidery settings are reset to their defaults when mySewnet™ Embroidery is closed.
Note: When embroideries inside the hoop are made Endless, any embroideries placed outside the hoop are removed.
Create an Endless design
-
In the Design window
 of the Control Panel
  click Endless
  .
. -
Choose Design > Endless.
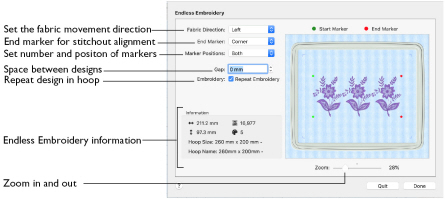
Fabric Direction
The Fabric Direction is the direction the fabric is moved in the hoop for each repeat. The direction depends on the size and orientation of the hoop as it is shown in the Preview area. Select from:
-
Up
-
Down
-
Left
-
Right
When the Fabric Direction is changed, the preview is updated. The Fabric Direction affects which sides of the embroidery will be the Start and End of the Endless Embroidery. The Start marker is always on the side of the embroidery that matches the Fabric Direction. Hence, the Start Marker 'points' in the direction the fabric will be moved.
The default direction is Up for vertical hoops and Left for horizontal hoops.
End Marker
The end marker is used to line up the next stitchout of the embroidery. End marker positions are shown by red dots on the preview. Choose from four types:
Corner: A small L-shaped corner of three long loose stitches. The alignment point is the corner of the L. This is the default choice for the end marker.
Single Stitch: A long stitch that moves to the corners, placing only one needle point at each corner. This is ideal if you are stitching onto a fabric that you are concerned about marking, such as leather or a very light weight fabric.
Tie Off: A few stitches in the same place, centered on the alignment point. The Tie Off marker is very secure, but may be difficult to remove after stitching.
Line: A line of three long stitches. The alignment point is at the outside end of the line, closest to the edge of the hoop.
The Corner and Line markers are particularly helpful for checking that you have re-hooped your fabric straight enough for the next embroidery repeat, especially when both marker positions are stitched.
Note: There is no choice for start markers because they are always movement stitches. The start markers are used to move the needle into position so that it can be aligned with the end markers. Hence, only the single 'jump point' is needed for a start marker. The start marker positions are shown by green dots on the preview.
Marker Positions
Select the positions of the markers. "Both" is recommended for most situations. You may wish to have markers on only one side if:
-
You have fabric that may be easily marked
-
You have a fabric edge that can be easily followed each time you re-hoop the fabric
-
You have an embroidery with a lot of open space on one side and you do not want to have any stitches in the open space, which may also partly conceal the presence of the marker stitches
Both: Select Both for movement stitches to both start corners and end markers on both end corners. This is the default choice for the marker position.
Left/Bottom: When the Fabric Direction is Up or Down, the markers are on the left edge. When the Fabric Direction is Left or Right, the markers are on the bottom edge.
Right/Top: When the Fabric Direction is Up or Down, the markers are on the right edge. When the Fabric Direction is Left or Right, the markers are on the top edge.
Gap
Use Gap to change the spacing between each stitchout of an embroidery. Gap changes the position of the start and end markers, as shown in the preview. The Gap is split evenly on each side of the stitchout.
Increase the Gap to move the embroideries further apart. Decrease the Gap to move the embroideries closer together. The Gap can be increased until the embroidery plus the Gap equals the full height or width of the selected hoop. Use negative Gap to overlap embroideries by up to 50%.
Set the Gap in steps of 0.1mm. The default Gap is 0mm.
Embroidery
Repeat Embroidery
Repeat the embroidery as many times as possible within the current hoop size. This saves having to re-hoop the fabric for each stitchout of a small embroidery.
When Repeat Embroidery is selected, the preview will show how many times the embroidery can be repeated. The number of repeats is also affected by the Gap and the direction the fabric will be moved in the hoop.
Repeat Embroidery is selected by default.
Note: You may wish to save a single version of an endless embroidery as well as a repeated version. This will allow you to stitch out as many repeats as necessary. Use the repeated embroidery to stitch out the majority of the endless design, then use the single embroidery to stitch the remainder if the repeats do not give an exact fit. This works best if you move the single version of the embroidery to the center of the hoop before it is saved.
Remove Overlap
Use the Remove Overlap option to prevent areas of stitches building up when the repeated embroideries overlap.
Note: It is only recommended to deselect this option if, for example, you have a low density embroidery and you wish to have a blend effect where the repeats overlap or if the repeats only just overlap or have touching edges.
ColorSort
Use ColorSort to automatically ColorSort the embroidery when Repeat Embroidery is used.
ColorSort is only available when Repeat Embroidery is selected. This option is selected by default. The preview is not affected by the ColorSort option, although the Number of Colors in the Information area may change.
Preview
The preview shows how the embroidery will be made endless. The embroidery is shown in 3D, with the hoop shown as a blue outline. The current hoop size is shown in the Information area. The start and end marker positions are indicated by the green and red dots, respectively.
Note: To change the 3D background color or texture, use mySewnet™ Configure.
When Repeat Embroidery is selected, the maximum number of repeated copies of the embroidery that will fit will be shown in the preview. The number of embroideries will change according to the size of the original embroidery, the orientation of the hoop, the direction in which the embroidery is made endless and the Gap.
Note: The red dot showing the end marker position is not affected by the choice of end marker type.
Information
Preview
The Information area shows the current hoop size set for mySewnet™ Embroidery, and the stitch count

, width

, height

and number of color blocks
of the endless embroidery shown in the preview.
Zoom Bar
Use the Zoom bar to change the view of the embroidery. Zoom in (drag the slider to the right) to magnify the view. Zoom out (drag the slider to the left) to shrink the view.
When zoomed in, use the scroll bars or swipe to move around.
Done
Click Done to make the embroidery endless. The work area is updated automatically.
If Repeat Embroidery was selected and two or more repeated embroideries will fit, the repeated embroideries are connected with movement stitches and then ColorSorted. The endless embroidery is also centered in the hoop.
Note: If the embroideries are overlapped, they may not ColorSort to the smallest expected number of colors.
Start markers are inserted at the beginning of the embroidery as long movement stitches to the start marker positions. Movement stitches are added at the end of the embroidery to the end marker positions, which are then stitched according to the choice of end marker.
Note: To reload an Endless embroidery in the Endless Embroidery window, open it in mySewnet™ Embroidery and choose Endless  . The Endless Embroidery window is opened, and the alignment stitches are removed. Adjust it as desired, for example change the End Marker type, then close it again and save it.