Use the Frame page to choose whether to use frames, and to select a frame, corners, side pieces or a flourish for each individual. Change the color and stitch options for the frame.
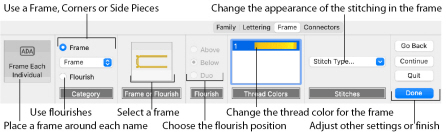
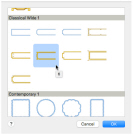
Choose from the categories of corners, frames and side pieces. Then choose a frame set, and select a design. Alternatively, select Flourish and choose a flourish to be placed above, below or as a duo above and below the selected name.
Note: In the text below corners, flourishes, frames and side pieces are referred to collectively as frames.
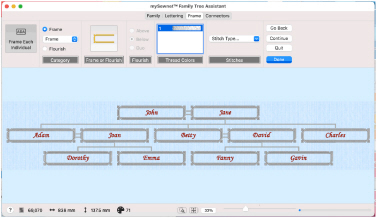
As the frames are changed, the preview below reflects the changes made.
Frame Each Individual
Choose whether to use a frame, corners, side pieces, or a flourish for each individual’s name, or to use the name alone.
Note: Frames and flourishes are placed at a size to suit the names.
Category
Frames, corners, flourishes or side pieces are placed around the names. Click Frame and select one of corners, frames or side pieces from the Category pop-up menu, or click Flourish.
Frame or Flourish
Select a frame or flourish from one of the sets in the Frames dialog.
Flourish
Choose a position for the Flourish:
Above: Place the flourish above the name.
Below: Place the flourish below the name.
Duo: Place vertically mirrored flourishes above and below the name.
Thread Colors
Set the Thread Color to use when embroidering the frame. Click one of the thread color blocks to open the Color Selection dialog. See Color Selection Dialog.
Stitch Type
Use the Stitch Type pop-up menu to alter the appearance of the stitching used in the frame.
Note: Changes made to the stitch properties for a frame set are retained until a new frame set is selected.
-
To change the Stitch Type, select a stitch type from the pop-up menu to open the properties dialog for the stitch type. See Choosing Stitch Properties.
Go Back
Go to the Lettering page.
Note: Alternatively, click the Lettering tab.
Continue
Go to the Connectors page.
Done
Accept the final family tree and close the Family Tree Assistant.
Cancel
Close the Family Tree Assistant without creating a family tree.