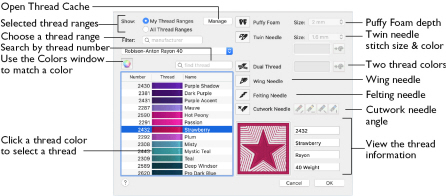
The Color Selection dialog appears when you click a thread color in the Color Select area. You may choose any thread shade from the available thread manufacturers' palettes (for instance, Robison-Anton Rayon 40 or Sulky Rayon 40) or a thread you have added to My Threads.
When you select a new thread color, the Color Select area shows the color change, and the work area shows the block of stitches in the new color.
To Choose a Thread Range
-
Select from the pop-up menu of thread ranges or My Thread Ranges.
-
Search for a manufacturer, then select from the list of thread ranges.
To Select a Thread Color
-
Select colors by visual selection or by entering a shade number.
-

button, and in the Colors window choose a pencil color to select the nearest matching thread color.
Changing a Thread Color
-
Hover the pointer over a color you wish to change in the Color Select area. The color block will be highlighted in the work area.
-
Click to select the color, and the Color Selection dialog appears.
-
Choose a thread range. The available shades for the thread range are shown in the list.
Note: The Abbreviation shows the reference used for the thread range when threads from that range are added to MyThreads. -
Click a color in the list to select a thread shade visually. Scroll to see more threads.
-
If you know the shade number, click in the number search box and enter the shade number.
-
To choose a color visually, click Colors
 to select a color in the Colors window. See Select a Color for a Thread.
 -
Click Manage to manage your thread ranges in mySewnet™ Thread Cache.
-
Click OK to confirm the color selection and close the color selection dialog.
Note: On the Modify tab, click the white area to the right of a color block to select without opening the dialog.
Alternatively, enter a name in the manufacturer search box, then choose a thread range from the manufacturer popup list.
Note: To clear the manufacturer text box, click the Close  button in the box.
Alternatively, enter some numbers in the number search box, and choose a thread from the thread number popup list. The current color is always shown.
This is a quick way to jump to threads of the selected color (for example, click the light yellow pencil to jump to light yellow thread shades).
Effects
Use the Effects area to show the results of using thread effects or special needles.
|
|
Show the effect of stitching over embroidery foam |
|
|
|
Show the effect of using two threads in one needle |
|
|
|
Show the effect of using a twin needle |
|
|
|
Wing Needle |
Show the effect of using a wing needle for hemstitch or heirloom designs |
|
|
Felting Needle |
Show the effect of using a felting needle with a roving fiber |
|
|
Cutwork Needle |
Select a cutwork needle in one of four angles |
Note: Only one thread effect can be used on any thread. In the Modify tab of mySewnet™ Embroidery, most thread effects are not shown in the active subdesign, as it would be difficult to edit the stitches. They are shown in Design Player  and Life View
  , in addition to the other tabs.
To use Thread Effects
-
Click the desired color block in the list, then choose an effect:
-
If you choose Puffy Foam
 , set the foam height.
 -
If you choose Twin Needle
 , set the Twin Needle size. Click the color button for the Second Color if you wish to use a different thread color.
 -
For Dual Thread
 , it is recommended to change the Second Color.
 -
For Felting Needle
 select a color for the roving fiber for felting.
 -
For Cutwork Needle
 , choose the angle for your needles.
Puffy Foam
Use Puffy Foam  to show the three-dimensional effect of stitching over embroidery foam.
-
Choose the height of the puffy foam in the pop-up menu from 2.0mm to 6.0mm.
Dual Thread
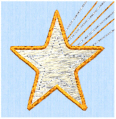
Use Dual Thread  to show the effects of stitching out two threads through the same needle. This is particularly suited to blending threads for special effects, such as mixing a rayon thread with a metallic thread, as in the center of the star.
Twin Needle
Use Twin Needle  to show the effect of stitching out the color block with a twin needle. This creates a horizontal offset between the original thread color in the left-hand needle, and a second thread color in the right-hand needle.

There are several ways that the Twin Needle effect can be used, including:
-
Use with running stitch to create a ribbon effect, typically using the same thread color in both needles
-
Use with a low density fill area to blend two different thread colors and also have a lightly shadowed effect
-
Use with a dense fill area to create a shadow effect
Note: On the screen, the Twin Needle effect is shown horizontally from left to right. If you rotate an embroidery for stitching out, the twin needle stitchout will be different from the effect on screen.
Size: Twin Needle Size is only available if the Twin Needle effect is selected for the current color block. Choose the size of the gap between the twin needles.
Preview the effect of changing the twin needle size to help decide which needles to buy. Ensure that the desired size is recommended for embroidery on your machine.
-
Click the pop-up menu to choose the size of the gap between the twin needles.
Second Color: The second thread color for the twin needle is initially set to the same color as the original color block. Use Second Color  to choose a different thread for the second needle in the Color Selection dialog. The other color is displayed in the Twin Needle area.
-
Click the color change button

to choose a different thread for the second color. Select the desired thread and click OK.
Wing Needle

Use Wing Needle

to show the effect of stitching out the color block with a wing needle and the chosen thread.
The wing needle creates holes in the fabric, for hemstitch and other heirloom techniques.
Note: To see the holes more than the stitch, use a fine thread such as Poly 60 weight. To see the actual stitching, Rayon 40 weight is ideal.
Felting Needle
Use Felting Needle

to show the effect of embellishing the selected color block using a felting needle and a contrasting roving fiber.

Choose a color for the roving fiber for the felting in the Color Selection dialog. In projects without a roving fiber, choose a felting needle color similar to the back of the fabric.
Note: If you select Felting Needle in mySewnet™ Digitizing the stitching will be adjusted. In other modules the effect is purely visual; for example, to see how felting will look in a pre-made design.
When Exporting an embroidery with a Felting Needle effect, the option "Flip design for felting or reverse embroidery" is initially selected in the Export dialog. See Export.
Cutwork Needle
Use Cutwork Needle

to show the line that would be used by cutwork needles to automatically cut holes in your fabric areas, or create appliqué areas. Use cutwork needle lines for reverse appliqué embroideries and free-standing lace, or simply to cut out a shape or design.
Choose the cutting angle for the cutwork needle.
(When creating cutwork needle lines in mySewnet™ Embroidery or mySewnet™ Digitizing, or converting running lines to cutwork needle lines in any mySewnet™ module, you may use two needles, or for more precise work use four needles.)