Use the Family Tree Assistant to create a family tree for an individual. Enter the family members for a Descendants Chart or for an Ancestors Chart, and choose how the names will be presented. Select a font style, thread color, shape and size. Surround the names with a frame or flourish. Choose Connectors to link the partners in the chart.
-
In the Create window

of the Control Panel

click Family Tree Assistant
 .
. -
Choose Assistants > Family Tree Assistant.
Overview
-
In the Create window

of the Control Panel

click Family Tree Assistant
 . Alternatively, choose Assistants > Family Tree Assistant.
 -
In the Family page, select to start a Descendants Chart
 , or an Ancestors Chart
  .
. -
If you have previously created a family tree chart, you are asked if you want to remove the family data that you entered then. Click OK to continue. The First Individual dialog opens.
-
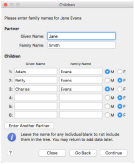
In the First Individual dialog, enter the Given Name and Family Name of the person the tree is for, and indicate if they are Male or Female.
-
Click Continue to enter further individuals in the family tree.

Enter the details for the First Individual in the family tree.
Add the details for the children of the First Individual.
Add the details for grand-children of the First Individual.
-
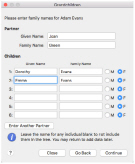
Enter the names and gender of the partner and children of the first individual, adding the oldest first.
-
Click Continue to add grandchildren (the children of the oldest child).
-
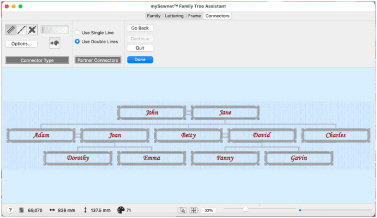
When you have finished entering information for the family tree, click Done to view the tree in the Family page of the assistant.
-
Use the Display Names As options to show only the Given Names, or to also view the Family Names.
-
Click Continue to change the lettering used in the family tree. Alternatively, click the Lettering tab.
-
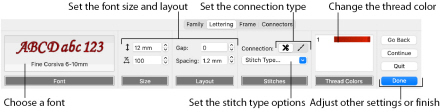
In the Lettering page select the style for the text in the family tree. Choose the font, size, color, spacing and stitch type options for the names.
-
Click Continue to change the frames used in the family tree.
-
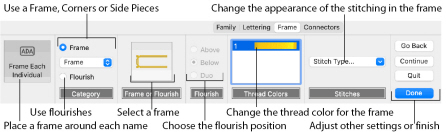
In the Frame page choose whether to use frames, and select a frame, corners, side pieces or a flourish for each individual. Change the color and stitch options for the frame.
-
Click Continue to change the connectors used between partners in the family tree.
-
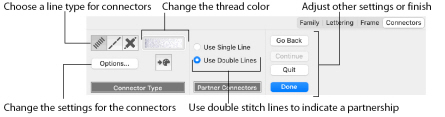
In the Connectors page select satin line or a running stitch line for connectors, or use no connectors.
-
Choose a single or double line connector for partners. Change the thread color used for connectors.
-
Check your work by clicking the tabs or by using Continue and Go Back to view the Family Tree Assistant pages. Adjust your settings as desired.
-
Click Done to place the family tree chart in the work area as a grouped .vp4 file with fixed lettering and frames.
The Family page opens.
A Descendants Chart shows the partner, children, grandchildren and great-grandchildren of the selected individual. This example uses a Descendants Chart.
An Ancestors Chart shows the father and mother, grandparents, and great-grandparents of the selected individual.
Note: To open an existing family tree, click the First Individual button.
Note: The family chart embroidery appears as you enter the data.
Note: Click Continue again to add grandchildren for each of the other children, and then to add great-grandchildren for each of the grandchildren.
Note: Use the First Individual ![]() , Children
, Children ![]() , Grandchildren
, Grandchildren ![]() , and Great-Grandchildren
, and Great-Grandchildren ![]() buttons to change the details for the individuals that you entered. The dialog opens at the oldest; click Continue to view the other siblings.
buttons to change the details for the individuals that you entered. The dialog opens at the oldest; click Continue to view the other siblings.