-
If required, choose File > New.
-
Click the Hoop button

and set the hoop size to 150mm x 150mm - Universal Square Hoop 2. See Hoop Selection.
-
In the Create window

of the Control Panel

click ExpressMonogram Assistant
 . Alternatively, choose Assistants > ExpressMonogram Assistant.
 -
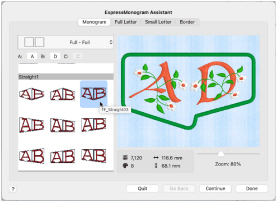
In the pop-up menu at the top left, choose the Full - Full layout. This will produce a monogram with two equal sized characters: full, full (FF).
-
Enter the letters ’A’ and ’D’ in boxes A and B.
-
In the Envelope window, scroll down to the third envelope in the Straight1 category. Its name is FF_Straight03.
-
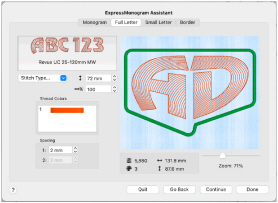
Click Continue, or the Full Letter tab.
-
Click the Font Display, the font Viewer opens.
-
Scroll to the Display section.
-
Click to choose the font Revue UC 25-120mm MW, then click OK.
-
Leave the font size at 72mm.
-
In the Stitch Type pop-up menu, choose MultiWave Fill. The MultiWave Fill options dialog appears.
-
Select the Use Motifs checkbox.
-
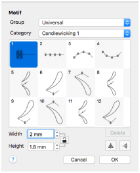
Click the Motif button. The motif dialog appears, with the motif set to a star.
-
Set the Group to Universal and the Category to Candlewicking 1.
-
In the pattern viewer, ensure that Pattern 1 is selected.
-
Check that Non-proportional

is selected (lock open).
-
Set the Height to 1.8mm, and the Width to 2.0mm.
-
Click OK twice to close the Motif dialog and the MultiWave Fill options dialog.
The fill now has a striking candlewick pattern. -
Ensure that Spacing 1 is set to 2mm.
Note: As there are only two letters, Spacing 2 is dimmed (unavailable). -
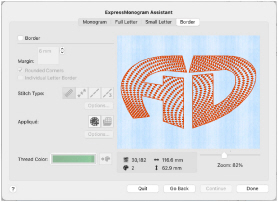
Click Continue. The Border page appears.
Note: As there are no small letters, the Small Letter page is not displayed. -
Deselect the Border checkbox to remove the border around the monogram.
-
Click Done to close the assistant. The monogram is displayed in the mySewnet™ Embroidery work area.
-

on the toolbar and choose Save, or press ⌘S.
-
Save the monogram as the file AD.vp4 in mySewnet/My Designs.
The Monogram page of the ExpressMonogram Assistant appears.
This is for Full-Full, using the third envelope in the Straight1 category.
The MW suffix indicates that this font uses a MultiWave Fill.
Note: Use the MultiWave Fill options dialog to edit the properties of the fill for this font.
Note: This will save the monogram as a multipart .vp4 file. When you open or insert this file in the work area, Control–click and choose Properties to open it in the ExpressMonogram Assistant.
If desired, you can add a frame to the monogram in the Frame window. See Creating Frames, Borders and Underlines .