Use Edit Points  to change the position of the points on the currently selected line or area. Use Edit Points to change points created by any of the drawing tools.
Note: If you edit the points of a filled object, the fill will adjust to the new shape.
Select Edit Points
-
In the Draw Tab
 of the Design Panel
  , click Edit Points
  .
. -
Choose Draw > Edit Points > Edit Points.
-
Press ⌘E
Select and Move Points
-
In the Draw Tab
 of the Design Panel
  , click Edit Points
  .
. -
Click an object in the FilmStrip, or on the canvas, to select it and view its points.
-
Drag the points to change the shape of the object.
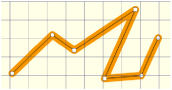
Edit the Points in a Line
-
In the Draw Tab
 of the Design Panel
  , click Edit Points
  .
. -
Click the line that you want to edit. Its points are displayed.
-
Drag a point to change the shape of the line.
-
Lift the pen or release the mouse button to place the point in its new position.
The Edit Points tool is active until another feature is selected, or you use Control–click to deselect.
Note: Moving a round point affects the two sections of line to either side of that point. This ensures line smoothness.
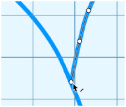
Reshaping a Curved Line
-
Draw a curved line.
-
In the Draw Tab
 of the Design Panel
  , click Edit Points
  .
. -
Click the line you just drew. The line is defined by a series of round points.
-
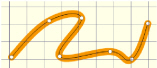
Drag one of the points in the middle of the line.
-
Move the point around freely. The line flexes not only up to the adjoining point, but to the next point on either side. (The line beyond the second point is unaffected.)
-
Release the mouse. The line takes on the new shape.
-
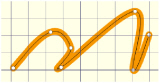
Hold down Shift and click the points to either side of the point you were moving. They become square.
-
Move the point around again. This time the line to the far side of the square points does not flex.
Snap to Line
Snap to Line  is available as an option for Edit Points. When selected, if the mouse pointer is close to an existing line, the pointer will change to a diagonal bar

and the lines snap together.
Using Snap to Line
-
Use Freehand Draw

to draw two separate curved lines.
-
Click Edit Points
 .
. -
Select the Snap to Line option
 .
. -
Click one of the lines you just drew.
-
Drag one of the end points towards the middle of the other line. As it nears the line, the pointer changes to a diagonal bar

.
-
Release the mouse or lift the pen. The two lines are neatly joined.
-
Click one of the round points in the middle of the line. Drag the point towards and over the other line. Note how the pointer changes as you pass over the other line.