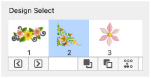
Use the Design Select area to view the different sections of a multipart design. The selected section is displayed in the work area. To move sections within the multipart design, see Select, Move and Merge Designs.
Note: Automatic Ghost Mode is used to show the position of the other parts of the design in the work area.
Select sections of a multipart design
-
Press the up and down arrow keys to view different sections of the design.
-
Choose Design > Display Next Design (
 ) for the next section.
 -
Choose Design > Display Previous Design (
 ) for the previous section.
 -
Press ⌘← to view the previous section, and ⌘→ to view the next section.
Design Information
The dimensions (Height  and Width
  ), Stitch Count
  , and number of colors
  for the active embroidery are shown on the Design window of the control panel.
The Design window also shows the order of the color blocks in the color worksheet and any notes that are included in the embroidery. Click on a color block to change thread colors. Also use the color worksheet to show or hide stitches by color block, and to move and merge color blocks. Edit or add information to the Notes and Settings as desired.
Get Length
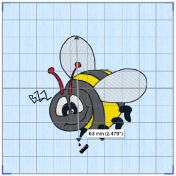
Use Get Length to measure the distance between any two points on an embroidery. For example, use it to obtain the width of a column of stitches or the distance between lines of stitching.
Note: The length is shown in millimeters or inches, according to the setting for Show Measurements in mySewnet™ Configure, with the other unit in parentheses.
To use Get Length
-
Choose View > Get Length.
-
Press ⌘L
Measure a Design with Get Length
-
Open a design.
-
Choose View > Get Length. The pointer changes to the measure pointer

.
-
Drag across the part of the design you want to measure.
A line shows the length you are measuring, and a tooltip displays the distance. -
If desired, make a note of the number.
-
Drag to measure any other distances, as required.
-
Control–click, and choose "Finish Get Length" to deselect the function.
Note: If you hold the Shift key while dragging, only 45 and 90 degree lines can be drawn.