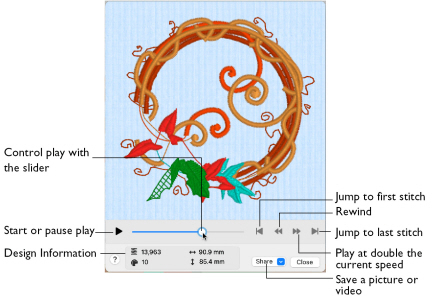
Use Design Player to play through the stitches in the embroidery as if they were being stitched from an exported embroidery. All parts of the embroidery that are within the hoop area are shown, whether or not they are selected.
The current Optimize for Sewing settings from mySewnet™ Configure are used.
Note: All the designs in a multipart embroidery are shown in the Design Player. This is therefore a good way to see the whole project after adjusting stitches in one of the designs.
Embroideries that are outside the hoop are not shown in the Design Player.
Note: If an embroidery contains a felting needle, the project will be shown "flipped", as it would actually be stitched.
Share
Use Share to save a picture or video of your design. See Share Picture and Share Video.
To Select the Design Player
-
Click the Design Player button

on the toolbar.
-
Choose View > Design Player.
-
Press ⌘Y
Using the Design Player
-
Choose Edit > Insert > Insert Design and in the folder mySewnet/Samples/Stitch Editor/Stitch browse to "Dragonfly 2".
-
Click to load the embroidery into the work area.
-
Click Design Player

. Alternatively, choose View > Design Player or press ⌘Y.
The Design Player dialog opens and the embroidery is shown being stitched out. -
Use the Play button

at the bottom left to start playing through the stitches in the embroidery.
-
Use the controls to play forwards or backwards through the embroidery at two different speeds, jump to the start or end of the stitches, and stop at any time.