-
Click the Explorer icon
 in the Status Bar to open Explorer.
 -
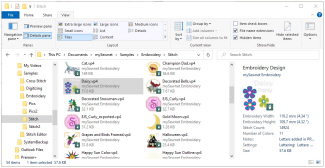
In Explorer, open the Navigation pane and the Details pane.
-
Browse to Documents\mySewnet\Samples\Embroidery\Stitch.
-
Select Tiles; in Layout click Tiles.
-
Click Daisy. On the right, a picture of the Daisy embroidery and full information on it appears, including the number of colors, stitches, the dimensions, and the Notes and Settings.
-
Hover the mouse pointer over the Daisy icon. A tooltip appears.

This tooltip includes most of the information about the embroidery that is present in the Preview pane. The tooltip can also be seen in other view types, such as List view. -
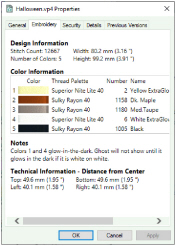
Right-click the Halloween embroidery, and select Properties from the context menu. The Properties dialog box for Halloween opens.

-
Click the Embroidery tab. Full details on the embroidery appear, including the thread name and shade, the design information, and the Notes, Settings and Technical information.
You can search on many properties, and in one or many folders. -
In the Search text box, enter the word ’flower’. Thirteen items are found. Some of these items are highlighted in yellow, for example Purple Flowers.
The highlighted items have ’flower’ in their names. The others include the word in their Notes or Settings. You can also search for words that only occur in the Notes or Settings. -
Browse to the folder Documents\mySewnet\Samples \Plugin\Stitch\Flowers.
There are several embroideries with the word ’flower’ in their name in this folder. -
In the Search text box, enter the phrase:
notes: flower
Only one embroidery is found, Outline Flowers. It uses the word flower in its Notes, as well as its name. -
Delete the last three letters from ’flower’ to make ’flo’. Many more embroideries are now displayed, as they had ’floral’ in their Notes, not ’flower’.
-
Click the Flowers folder to close the search.

-
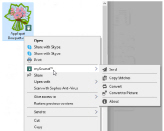
Right-click Buttercup and look at the context menu.
You can print embroidery worksheets from the main menu. See Print Embroideries. -
There is a special mySewnet submenu. Click mySewnet to open it. Several more options appear.
-
Use Send
 to open the Send dialog to send the selected embroidery, or embroideries, to your machine, to the MyFiles or Personal Files folder of the connected embroidery machine, to the mySewnet™ cloud for your mySewnet™ enabled embroidery machine, or to your mySewnet™ enabled embroidery machine via the mySewnet™ cloud.
See Send. -
Use Copy Stitches
 to copy the stitches in the embroidery to the Clipboard. They can then be pasted into other mySewnet™ Embroidery Software modules.
This is a quick way of inserting an existing embroidery into a project.
-
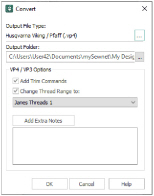
Use Convert
 to create a copy of the embroidery in another embroidery file format, with a different thread range, or with added trims or notes.
 -
Use Convert to Picture
 to create a picture of the embroidery in .jpg, .png, .tif or .bmp graphics format.
Click the View tab, and select Navigation pane and Details pane.
You can now see the .vp4 embroidery files in the Stitch folder as thumbnail pictures.

Use ’Notes:’ and Settings:’ as well as other properties such as ’Stitchcount:’ to search for embroidery information in Explorer.