Use Wave
to move stitches in a wave pattern around the point where you click. The effect of Wave is usually clearest on straight lines of stitch points.
Click Wave, then click the required points on the embroidery to morph stitches around those points. Right-click to deselect.
Shortcuts
-
Morphing, Modify Tab:

-
Keys: Alt, M, W
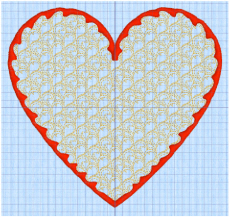
Twirl the Border of a Heart Embroidery
-
Click File, New

to open a new window.
-
Click Change Hoop

. From the Universal Hoop Group, set the Hoop Size to 240mm x 150mm - Universal Large Hoop 2. Set the Orientation to Rotated. Click OK.
-
In the Quick Access toolbar, click Insert

.
-
In the folder Documents\mySewnet\Samples\Stitch Editor\Stitch load the 'Lace Heart' embroidery.
-
In the color worksheet on the Design Panel, click the check box for the first color to hide the thread color for the lace. This ensures the lace will not be affected by the Twirl function.
-
Click the Modify tab.
-
In the Morphing area, click the Twirl

icon.
-
Starting from the central top point of the heart, move the mouse pointer along the inside of the border, about two grid squares up and to the right.
-
Hold down the Shift key on the keyboard. Click once and the border next to the pointer will be twirled into a scallop-like shape. Release the Shift key on the keyboard.
-
Move the pointer horizontally across, so that it is just inside the border on the left, opposite the twirl that you placed on the right.
-
Click once and the border will be twirled into a scallop-like shape on the left side. However, the scallop is created in the opposite direction.


-
Hold down the Shift key. On the right side of the inside of the heart, move the pointer about two grid squares up and around the inside of the border from the first scallop and click again.
-
Keep the Shift key held down, and continue to click around the inside of the right half of the heart border.
It is not important to twirl as frequently as in the example, as this is for practice with using the Twirl function. However, try to space the twirls evenly. -
Click to place the last twirl a few grid squares from the point at the bottom of the heart, then release the Shift key.
If you wish to undo a Twirl you have just made, click Undo
and try again.
-
On the left side of the heart, move the pointer about two grid squares around the inside of the border from the first scallop and click. Continue to click around the inside of the left half of the heart border.
-
Click to place the last twirl a few grid squares from the point at the bottom of the heart.
-
Right-click to deselect the function.
-
Click Draw All Stitches

.
Alternatively, you could use the embroidery you created in Cut a Heart Border Shape from Lace.
See the pictures below for more details.
When you click, the stitches are twirled clockwise. When you hold down Shift and click, the stitches are twirled counter-clockwise. Twirl is the only morphing function that is affected by holding down the Shift key.