A pattern fill area is an area of stitching where the threads all lie parallel to each other, and that has stitch points inserted to create different types of patterns. The density and color can also be changed with single gradient density and multigradient density.
Add new patterns using Manage My Fills in mySewnet™ Digitizing.
The patterns may be simple textures or decorative shapes. A satin-effect pattern (pattern number 36 in Standard 3) is also available.
|
|
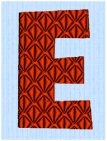
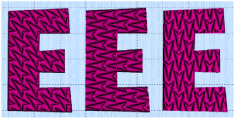
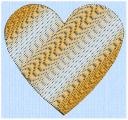
Pattern Fill Area with Pattern 107 from Diamonds |
Constant density creates a uniform fill at the chosen density. Gradient density creates a fill with varying density or color.
Use the Pattern Fill properties dialog box to change the pattern, density and stitch angle used for fill areas.

Use the Pattern area to select the desired pattern category and number.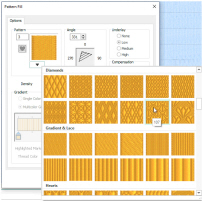
Select the desired pattern number. There are several ways to select patterns:
-
Click the drop-down arrow below the pattern sample and scroll down to choose a pattern Category, and a pattern. Click the desired pattern sample and the Pattern number is shown.
-
Enter a favorite Pattern number directly in the Pattern box. As you type the number, the correct pattern sample is selected immediately.
-
Use a My Fill pattern created with Manage My Fills in mySewnet™ Digitizing.
-
View the patterns in the Pattern Gallery. See Fill and Satin Patterns.
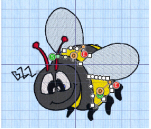
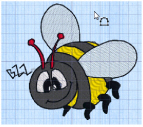
Add a Pattern to a Bumblebee Stripe
-
Click File, New
 to open a new window.
 -
In the Quick Access toolbar, click Insert
 .
. -
In the folder Documents\mySewnet\Samples\Stitch Editor\Stitch load the 'Bumblebee 2' embroidery.
-
Click the Object tab. The pointer changes to the Object Select
 pointer.
 -
Move the pointer until the lower part of the middle yellow stripe on the bumblebee is highlighted, then click to select it.
-
Hold down Ctrl and click to select the upper part of the yellow stripe.
The points defining most of the striped areas appear, together with the colored fill pattern origin marker, and start
  and end
  points.
The front and back stripes are too small to show a pattern, therefore do not select them. -
In Edit Properties, click the Properties button. The Pattern Fill properties dialog box appears.
The Pattern Fill properties dialog enables you to set the properties for the pattern fill. -
The fill pattern is currently set to Pattern 3. Click the drop-down arrow below the sample and in the Patterns gallery scroll down to 'Waves 1' in the list.
-
Click the pattern sample in row 1, column 2. The pattern number will change to 230.
Patterns may also be selected directly by entering the desired pattern number in the Pattern box. -
Click OK to see the new pattern in the bumblebee stripe.
-
Click outside the bumblebee to see the pattern clearly.
All of the icons are unavailable (grayed out) as no area of stitches is selected.
Notice the Pattern Fill icon ![]() in the Edit Properties area. If other parts of stitching, such as lines, are selected, the icon for their stitch type will appear. Click again to select the desired area.
in the Edit Properties area. If other parts of stitching, such as lines, are selected, the icon for their stitch type will appear. Click again to select the desired area.
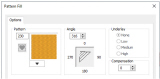
Use the Options area to see and change the settings for fill angle, underlay and compensation.

Angle
The angle of the fill pattern, as shown by the arrow. The thread is at a right angle to the fill pattern. Set the Angle from 0 to 359 degrees. The initial setting is 0.
Alternatively, adjust the angle of the fill pattern with the handle on the Origin marker  .
.

The fill angle will also affect the orientation of the gradient.
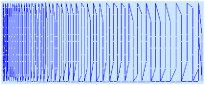
The example shows pattern number 56 with the fill angle set to 315, 270 and 180 degrees.
Choose from None, Low, Medium or High density underlay. Underlay is a low density fill that is perpendicular to the stitches of the actual fill area. Underlay is useful for stabilizing large fill areas. Underlay is initially set to Low.
Underlay stitches are not generated for areas using gradient density, although the property can be selected in case you switch the area back to a standard density area.
Compensation is used to make an area 'bolder' by increasing its relative size. Set Compensation from 0 to 20. The higher the number, the bolder the area appears. The initial setting is 0.
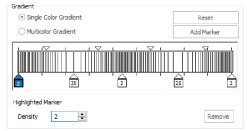
Use the Density area to see and change the density settings and the color Gradient of the fill.
The color on a fill area can change over a range, or have multiple color changes across the fill. This is ideal for gradual color changes such as sunsets, subtle shadow effects and so on.
Gradient is not initially selected.
Embroidery on thicker fabrics usually looks better with more stitch coverage, or a low density setting. Choose a low value such as 2 or 3 for heavy knit fabrics, a higher value such as 5 or 6 for a light material like linen or satin.

Set the standard Density from 2 to 80. The lower the number, the closer together the stitches and the more stitches are produced.
The initial setting is 2.
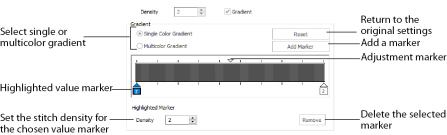
Use Single Color Gradient to change the density across a fill with only one color. Set a value for the start and end density markers for the fill, and the density gradually changes between the two values. Add multiple markers for a more complex pattern.
The markers can each take a value of 2 to 80, which means you can reverse the gradient simply by swapping the start and end values.
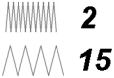
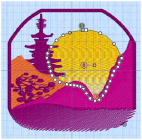
The example shows a Gradient of 2 to 15, with a fill angle of 90°.
Use Density Gradient for loosely stitched areas so that the traveling stitches will go around the outside of the fill area. Set the start and end densities to the same number. If the Density Gradient option was not used the traveling stitches would cross the fill area and show through.
Use the adjustment marker above the gradient bar to change the gradient across the fill.
Reset
Reset your changes and use the initial settings.
Add Marker
Click Add Marker to add a value marker below the gradient bar, and an adjustment marker above the gradient bar. The initial value for the marker will be between the existing markers. Edit the density value, and move the value and adjustment markers as desired.

This means that you can have any combination of density values across the fill area. Remember, a higher value means the fill is less dense.
Density
Density is used to change the density of the stitching. Set Density from 2 to 80. The higher the number, the less dense the fill. The initial start marker setting is 2, and end marker setting is 8.
Remove
Click Remove to delete the highlighted marker.
Use Single Gradient Fill on a Landscape Embroidery
-
Click File, New
 to open a new window.
 -
In the Quick Access toolbar, click Insert
 .
. -
In the folder Documents\mySewnet\Samples\Stitch Editor\Stitch load the 'SunsetGarmentBagOriginal' embroidery.
-
Click the Object tab. The pointer changes to the Object Select
 pointer.
 -
Move the pointer until the sun is highlighted, and click to select it.
-
In Edit Properties, click the Properties button. The Pattern Fill properties dialog box appears.
-
Click (check) the Gradient checkbox. The Gradient box will become available.
-
Select Single Color Gradient.
-
In the Gradient area, ensure that the value marker on the left below the gradient bar is selected.
-
Click the value marker and change the value in the Density box to 2.
-
Click the value marker on the right below the gradient bar and change the value in the Density box to 40.
-
Click OK to view your changes.
-
With the sun still selected, click Properties again to open the Pattern Fill dialog box.
-
Move the adjustment marker above the gradient bar to vary the change in density across the fill.
-
Click OK to view your changes as desired. Open the dialog box again to make further changes.
-
Click Add Marker to add another value marker and adjustment marker.
-
Change the density of the fill as desired.
-
Click OK to close the properties dialog box.
All of the icons are unavailable (grayed out) as no area of stitches is selected.
Notice the Pattern Fill icon ![]() in the Edit Properties area. If other parts of stitching, such as lines, are selected, the icon for their stitch type will appear. Click again to select the desired area.
in the Edit Properties area. If other parts of stitching, such as lines, are selected, the icon for their stitch type will appear. Click again to select the desired area.
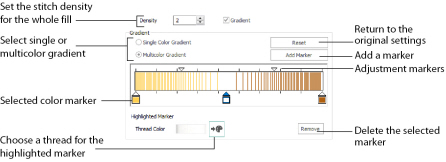
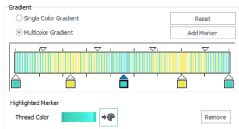
Use Multicolor Gradient to change the color across a fill with only one density. Set colors for the start and end markers for the fill, and the color gradually changes between the two values.
Use the marker above the gradient bar to change the color gradient across the fill.
Reset
Reset your changes and use the initial settings.
Add Marker
Click Add Marker to add a color marker below the gradient bar, and an adjustment marker above the gradient bar. The initial color for the marker will be the same as the currently highlighted marker. Change the color and move the color and adjustment markers as desired.
This means that you can have any combination of colors across the fill area.
Use Thread Color  to change the color of the currently highlighted marker. The Color Selection box will be displayed.
Remove
Click Remove to delete the highlighted marker.
Use a Multicolor Gradient Fill
-
Open an embroidery.
-
Click the Object tab. The pointer changes to the Object Select
 pointer.
 -
Click to select the an area of pattern fill in the embroidery.
-
In Edit Properties, click the Properties button. The Pattern Fill properties dialog box appears.
-
Click the Gradient option. The Gradient box will become available.
-
Select Multicolor Gradient.
-
Click a color marker (the marker below the gradient bar) and click the button to the right of the Thread Color to open the Color Selection dialog box. See Change an Existing Thread Color.
-
Change the color to the required color and click OK.
-
Move the adjustment marker above the gradient bar to vary the change in color across the fill.
-
Click Add Marker to add another color marker and adjustment marker.
-
Change the color of the fill as desired.
-
Click OK to close the properties dialog box.
All of the icons are unavailable (grayed out) as no area of stitches is selected.
Notice the Pattern Fill icon ![]() in the Edit Properties area. If other parts of stitching, such as lines, are selected, the icon for their stitch type will appear. Click again to select the desired area.
in the Edit Properties area. If other parts of stitching, such as lines, are selected, the icon for their stitch type will appear. Click again to select the desired area.