-
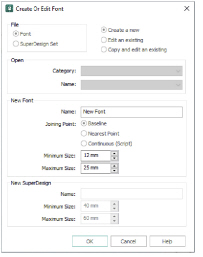
Start mySewnet™ Font Digitizing and the Create or Edit Font dialog box appears. See Create or Edit Font.
Alternatively, you can start or open a font by opening a New Window, or by clicking Create or Edit Font .
. -
In the Font Information dialog box, enter a Name for the font.
-
Ensure the File type is set to Font.
-
Click ’Create a new’. This will create a new font.
Alternatively, you can open an existing font that you created, or open a copy of one of your fonts, or a system font. -
In the New Font section, give the font a name.
-
Select the desired Joining Point method.
Baseline fonts use trims between the characters in a word.
Nearest Point fonts are designed to use running stitch connection between small characters.
Continuous fonts join lowercase letters for a script effect. -
Enter the desired Minimum and Maximum size for characters in the font.
This will be the recommended size range used for the font in mySewnet™ Embroidery. -
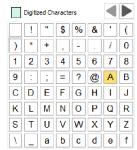
Click OK. The Create or Edit Font dialog closes, and the letter ’A’ (ASCII character 065) of the new font is selected in the Font page of the Design window. See Creating and Editing Fonts.
-
The default thread color can be seen in the FilmStrip on the left of the work area. Right-click this color and select Properties.
-
Select the desired thread color for your font in the Color Selection dialog box.
-
Click one of the Create ribbon bar tabs and select the desired Area and Line type.
Click Options for the selected area or line type to set the pattern, angle, density etc. The options set for the letter ’A’ will be the default settings for all characters in the font. -
Click Save
 to save your color change.
 -
To digitize over a background picture from a TrueType® or OpenType® font character, click Font Background
 . The Font Background dialog box opens. See Font Background.
If there is a warning message about the letter ’A’, click OK to continue.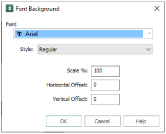
-
Select the desired Font and Style.
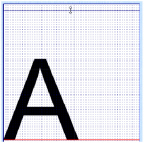
You can use Horizontal and Vertical offset to adjust the position of your letters relative to the red baseline, and use Scale to adjust the size of the background pictures. -
Click OK to close the Font Background dialog box. The A from your selected font now forms the background picture.
-
You can digitize over an existing picture instead of a character in one of the fonts on your computer. Click the View tab, then click Edit Background

to open mySewnet™ Draw & Paint.
-
Use Insert
 or Open to load your picture.
 -
To position the picture on the baseline, toggle between mySewnet™ Font Digitizing and mySewnet™ Draw & Paint. You will not be able to edit anything in mySewnet™ Font Digitizing, but you can preview adjustments made to the picture in mySewnet™ Draw & Paint.
-
Save your edited picture if you are ever likely to want to load to edit the character.
-
Close mySewnet™ Draw & Paint to return to mySewnet™ Font Digitizing.
-
Click Move Guidelines
 .
. -
Click and drag a guideline from the top of the work area to move a horizontal guideline to the top of the A to set the cap height.
-
Move vertical guidelines to each side of the A to set the character width.
-
When you have placed your guidelines as desired, right-click or click Move Guidelines again to deselect, then click Save
 .
. -
Click the Create tab.
-
Digitize the letter A (ASCII character 065) using the stitch types on Create page to the right of the work area.
-
Click an object to display its points and reshape the object as desired. Right-click it to show its properties.
-
Click the Font tab, then click Save
 . This saves the character you are working on, and other changes to the font.
 -
Digitize the A character (ASCII 065) using the stitch types on the Create tabs. The first version of the A character (ASCII 065) must start at the bottom left and end on the bottom right.
-
Click Save
 to save the first version of the letter A.
 -
In the Font page, click the second Nearest Point icon (Top Left to Top Right
 ). Notice that the background picture stays in place.
 -
Digitize each character version, ensuring that the start and end point are in the correct place.
-
Click Save
 to save the changes you have made to the character.
 -
Click an object to display its points and reshape the object as desired.
-
Click on the next character to digitize (the letter B). A picture of the letter B will be placed in the background.
-
Look at the letter A in the Font tab.
-
If you digitized all of the versions, the A in the Font tab will be a solid green. If only some of the versions have been digitized, it will be half green, half white.
-
If required, load or paste a picture, then size and position it.
-
Digitize the character as desired, then save it. You will be warned if you select another function without saving.
-
Click an object to display its points and reshape the object as desired.
-
If you are working on a nearest point font, work through each character version, ensuring that the start and end point are in the correct place. The currently selected Nearest Point icon shows the expected start and end points.
-
Click Save
 in the Font tab to save the changes you have made to the character.
 -
Repeat as desired.
-
Click Universal Properties
 to standardize the use of object types within a font, to change the object types used within a font, and to select which properties will be editable.
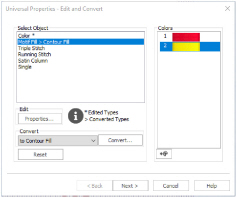
Universal Properties will make the properties of all characters in the font the same as the properties for the letter ’A’.
Use Universal Properties to correct any properties inconsistencies when creating a font. -
In Colors, select the colors to make consistent across the font, then click the Colors icon
 to change the selected color in the Color Selection dialog box.
When you have changed a color, there will be an asterisk (*) by Color in the Select Object pane. -
In ’Select Object’, select a line or fill type to be standardized, then click Properties to change the properties for that stitch type.
-
Make the desired changes in the Properties dialog box, then click OK. The edited stitch type is now marked with an asterisk (*), for example: Running Stitch *.
-
You can also change a stitch type for the whole font. Select the stitch type in the Select Object pane, then choose a new stitch type from the Convert drop-down list.
-
Click Convert to change it to the new stitch type.
-
Make any other desired changes to the colors and stitch types, then click Next. The Universal Properties - Finalizing dialog box appears.
-
In ’Allow Editable’, select the line and fill types to be made editable in other mySewnet™ Embroidery Software modules.
-
Click OK to standardize the font.
-
Click Save
 in the Font tab to save the changes you have made, then click Exit
  to close mySewnet™ Font Digitizing.
 -
Start mySewnet™ Font Digitizing and the Create or Edit Font dialog box appears.
-
In File, select Font.
-
Select ’Edit an existing’. The Category drop-down list becomes available.
-
In Category, select MyFonts, or the Category where you saved your font.
-
In the Name drop-down list, select the font that you want to continue working on.
-
Click OK to select the font.
-
Click on the character you would like to edit or digitize. The background font that you selected before will be loaded with the font.
-
Click an object to display its points and reshape the object as desired. Right-click it to show its properties.
-
Click Save
 in the Font tab to save the changes you have made to the character.
 -
Continue to select and digitize characters as desired.
-
When you are ready to end your session, save the font.
-
To remove unused space in the font file, click Universal Properties
 , then click Next.
 -
In the Universal Properties - Finalizing dialog box, select (check) Compress font. Then click Finish.
-
Click Exit
 to close mySewnet™ Font Digitizing.
 -
Browse to the folder ProgramData\mySewnet\Embroidery1\Fonts\MyFonts and select the fonts you want to back up.
-
If desired, browse to a different folder where you wish to keep backup copies of the font. For instance, you could create a folder in 'My Documents' called 'Font Backups' and use this for storing backup copies. This will also prevent the backup copies from appearing in the font list in mySewnet™ Embroidery.
-
Paste the copies into the destination folder.
-
Change the name for the backup of your font. For instance, include the date and time in the name to indicate when the backup was made.
The letter A must be digitized first. A warning message will be displayed if you select any other character.
There is a letter ’A’ in the background on the work area. This is the letter A from the first font on your computer (often Arial). This background font can be changed.
The background font and its position are stored with the font, so when you reload the font the background font is reloaded with the created letters.
mySewnet™ Draw & Paint opens with a work area the size of your work area in mySewnet™ Font Digitizing.
To digitize over a small part of an existing picture: in mySewnet™ Draw & Paint select, crop and resize the desired area of the picture, then return to mySewnet™ Font Digitizing.
The left edge of the character should be at or close to the left edge of the grid.
When you are sizing the first picture for the letter A (ASCII character 065), leave enough space above the top of the character to allow for accents above uppercase letters in the extended and super-extended Character Sets.
Digitize the Letter A for Baseline and Continuous Fonts
If you try to select another character without saving a warning message will be displayed. The letter A (ASCII character 065) must be digitized first because it is used to set the size of the font in mySewnet™ Embroidery. The size of all other characters is set relative to character 065.
Digitize the Letter A for Nearest Point Fonts
A nearest point font requires four versions of each character.
A warning message will be displayed if you select any other character to work on before the first version of the letter A (ASCII character 065) has been created.
Once you have digitized at least one version of the letter A (ASCII character 065), you can select other characters to work with. However, it is recommended to digitize all versions of a character before selecting the next character to digitize.
Standardize the Font (Optional)
Do not use Universal Properties on a font where complex properties were used, for example if more than one fill pattern or motif was used, or if fill areas of the same type are stitched at different angles. If you are not sure how using Universal Properties will affect your font, edit a copy, not the original.
If you make a mistake, use Reset to return to your original settings.
Reopen a Partially Completed Font
To work on a copy of a font, select ’Copy and edit an existing’, and select the font from the drop-down list. Give the copy a name.
System fonts must be copied to be tested or used.
Fonts are compressed automatically whenever they reach a certain size, however it is good practice to compress the font as a final step.
You should close the font file when you wish to test your font in mySewnet™ Embroidery.
An entire character set can take several days to digitize. It is recommended to make regular backup copies of the font file.
If you are not sure what the effects of an edit will be, edit a copy of your font, not the original.
You can delete unwanted fonts using the Font Manager in mySewnet™ Embroidery, or you could manually remove them from this folder.