Getting Started with mySewnet™ Font Digitizing
Adjust a Font Created in mySewnet™ QuickFont
Adjusting a font created in mySewnet™ QuickFont is a good way to get to know mySewnet™ Font Digitizing.
-
Open mySewnet™ Embroidery, click the Letter tab, click Font Manager

, and then click the QuickFont Wizard icon

. The Select Font page will appear.
-
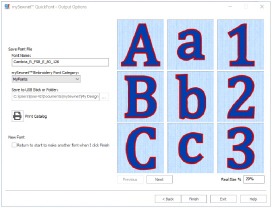
Click the drop-down arrow for Font and choose Cambria from the list of fonts. The previews will show the appearance of the 'ABC', ’abc’ and '123' characters in the font.
-
Ensure the Style is set to Regular, and File Type is set to ’For using in the mySewnet™ Embroidery’ System, and the character set is set to Extended.
-
Click Next and the Set Stitch Options page will appear.
-
Set the Stitch Type to Pattern Fill + Satin Border

. The previews now show a pattern fill with a border.
-
Click the Stitch Options button and the Pattern Fill dialog box will appear.
-
Ensure the Pattern is set to 3 from the Standard 1 Category, and that Density is set to 2. Click OK.
-
Click the Border Stitch Options button and the Satin Line dialog box will appear.
-
Set Width to 3.0mm and click OK.
The borders of the letters in the font are redrawn at the new thickness. -
Click the Thread Color icon

and the Color Selection dialog box will appear.
-
In the Quick Colors, set the color to a dark blue. Click OK.
The Pattern Fill in the font is now the dark blue that you selected. -
Click Next. The font is generated, and the Output Options page will appear.
-
Use Next and Previous to preview the other letters in the font.
-
Leave the Font Name unchanged.
-
Click Finish to close mySewnet™ QuickFont.
-
In the Windows Start menu, scroll down to the mySewnet folder and click the mySewnet™ Font Digitizing icon
 to launch mySewnet™ Font Digitizing.
 -
In the Create Or Edit Font dialog box, select Edit an existing.
-
In the Name drop-down menu, select the Cambria font that you just created.
-
Click OK to close the Create Or Edit Font dialog box, and open the font in mySewnet™ Font Digitizing. The font opens at the letter ’A’.
-
In the Font panel on the right, click the buttons to view some of the other characters, but come back to the letter A.
-
In the FilmStrip, click on the Satin Line for the outer border of the A. It uses a lot of points.
-
In the Font panel on the right, click Universal Properties

. The Universal Properties — Edit and Convert dialog box opens.
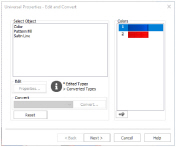
This dialog box is used to make changes to the objects of a particular type in all letters in a font. The colors and stitch types that you selected in mySewnet™ QuickFont can be seen.
For more information on Universal Properties, see Universal Properties. -
In Select Object, click Pattern Fill to select it, then click the Properties button.
-
In the Pattern Fill dialog box, change the Pattern for the fill to the first pattern in Squares 2 (number 205), then click OK.
-
Click Next.
-
In the Universal Properties — Finalizing dialog box, click Finish. The letter A shows the pattern that you selected.
-
In the Font panel on the right, click the buttons to view some of the other characters. All of them now use the same fill pattern as the letter A. Then click to return to the letter A.
-
In the Font panel on the right, click Universal Properties

and in the Universal Properties — Edit and Convert dialog box click the dark blue thread color for the fill. The Color Selection dialog box opens.
-
In the Quick Colors, click the orange square, then click OK.
-
Click Next, and then click Finish. The pattern fill for all letters is now orange.
-
With the letter A selected, click Universal Properties

.
-
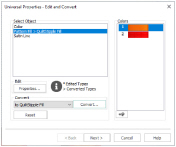
In the Edit and Convert dialog box, click Pattern Fill.
-
In the Convert drop-down list, select QuiltStipple Fill. Then click Convert.
The Pattern Fill is now flagged as being converted to QuiltStipple Fill. -
Click Properties. The QuiltStipple Fill dialog box opens.
-
Set the Gap to 3.5mm, then click OK.
-
Click Next. The Universal Properties — Finalizing dialog box appears.
-
In Allow Editable, Satin Line is selected (checked), but QuiltStipple Fill is not. Check the QuiltStipple Fill checkbox.
-
Click Finish. All of the letters in the font now use QuiltStipple Fill.
You could have created a new font using the new settings you chose above in mySewnet™ QuickFont, but you cannot use a fill type other than Pattern Fill. With mySewnet™ Font Digitizing you can customize a font created in mySewnet™ QuickFont to use other stitch and border types.
-
In the Font panel, click Save

to save the changes that you made.
-
Close mySewnet™ Font Digitizing.
-
In the Letter tab of mySewnet™ Embroidery, scroll to the MyFonts section in the font gallery.
-
Select the Cambria font that you just made.
-
In the Stitch Type

drop-down list select QuiltStipple Fill. You can adjust the settings for this fill in QuiltStipple Fill dialog box.
-
Create some lettering with your font.
-
In the Windows Start menu, scroll down to the mySewnet folder and click the mySewnet™ Font Digitizing icon
 to launch mySewnet™ Font Digitizing.
 -
In the Create Or Edit Font dialog box, select Copy and edit an existing.
-
In the MyFonts category, select your Cambria font in the Name drop-down menu.
-
In the New Font section, change the name to Cambria QuiltStipple. Then click OK.
-
In the Font panel, click Save

, then close mySewnet™ Font Digitizing.
Cambria is one of the standard Windows® fonts.
You can see this font in the MyFonts section of the Font Gallery in mySewnet™ Embroidery. The Font Gallery automatically detects and previews any new fonts you add to MyFonts.
The MyFonts Category is automatically selected.
The letter A (ASCII character 065) is digitized first because it is used to set the size of the font in mySewnet™ Embroidery. The size of all other characters is set relative to character 065.
Note that each letter has at least two objects, a separate Pattern Fill and Satin Line object.
When designing a font, points are needed for kerning (the spacing between the letters on a line) as well as for the outline itself. These points are used when placing lettering in mySewnet™ Embroidery.
There is now an asterisk by Pattern Fill. This indicates that its properties have been edited.
This time Color has an asterisk by it.
Use Universal Properties to change the thread colors and the stitch properties for the object types for all letters in a font.
Allow Editable makes the stitch type available for editing in mySewnet™ Embroidery, so you can change settings such as density, pattern, and so on.
In the title bar, your new font name is now used. The name there also indicates that you are viewing letter number 65, the large A.
This is a quick and easy way to backup the work on your font, before you make further changes.
Changing Fonts with Universal Properties
Universal Properties is a powerful tool for customizing fonts you created in mySewnet™ QuickFont, or drew in mySewnet™ Font Digitizing.
-
In the Windows Start menu, scroll down to the mySewnet folder and click the mySewnet™ Font Digitizing icon
 to launch mySewnet™ Font Digitizing.
 -
In the Create Or Edit Font dialog box, select Copy and edit an existing.
-
In the MyFonts category, select your Cambria QuiltStipple font in the Name drop-down menu.
-
In the New Font section, change the name to Cambria Echo Motif. Then click OK. The letter A of your font is displayed in the work area.
-
In the Font panel, drag the Preview Size slider to the right. The border and fill change as the letter size is increased.
-
Click Size Options
 to open the Size Options dialog box.
See Size Options.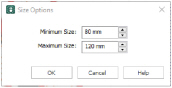
-
Set the Minimum Size to 3mm, and the Maximum Size to 12mm (they should currently be 80mm and 120mm). Click OK.
-
The Preview Size slider now shows the range 3mm to 12mm.
You can make any size changes that you like within the 3mm to 200mm size range for all fonts in mySewnet™ Font Digitizing. You choose whether the quality is acceptable. -
Look at the Font panel and Quick Access toolbar. There is no Undo button on the Font panel, and the one on the Quick Access toolbar is unavailable (grayed out).
-
Click Size Options
 to open the Size Options dialog box and set Minimum Size back to 80mm and Maximum Size back to 120mm.
 -
With the letter A selected, click Universal Properties

.
-
In the Edit and Convert dialog box, click QuiltStipple Fill.
-
In the Convert drop-down list, select Echo Fill. Then click Convert.
-
Click Properties to change the settings for the Echo Fill.
-
In Echo Area select External and Internal Lines and set gap to 2.0mm. Then click OK.
-
In Colors click the orange thread color for the fill. The Color Selection dialog box opens.
-
In the Quick Colors, click the yellow square, then click OK. The changed Color has an asterisk by it.
-
Click Satin Line and in the Convert drop-down menu select Motif Line. Click Convert.
-
Click Properties and in the Motif Line dialog box set Category to Hand Stitches 1, and select pattern 6.
-
Set Width for the motif to 2.0mm.
-
Click OK to close the Motif Line dialog box, then click Next.
-
In Finalizing, select (check) both Motif Line and Echo Fill to make them editable, then click Finish. Your font has been transformed.
-
In the Font panel, click Save

to save the changes that you made.
-
Close mySewnet™ Font Digitizing.

-
In the Letter tab of mySewnet™ Embroidery, scroll to the MyFonts section in the font gallery.
-
Select the Cambria Echo Motif font.
-
In the letters box enter the word "friends", then click Apply.
-
In the Stitch Type

drop-down menu note that both Echo Fill and Motif Line are editable. Adjust their settings as desired.
-
In the Windows Start menu, scroll down to the mySewnet folder and click the mySewnet™ Font Digitizing icon
 to launch mySewnet™ Font Digitizing.
 -
In the Create Or Edit Font dialog box, select Copy and edit an existing.
-
Open a copy of your Cambria Echo Motif font.
-
In the FilmStrip, right-click the Echo Fill area for the A and select Properties.
-
In the Fill Area and Line dialog box, select Satin Line in the Line drop-down list.
-
Click the Line tab, then select Insert Color Change.
-
Click Line Thread Color

to change the color of this line.
-
Change the color from the default blue to the yellow in Quick Colors, then click OK twice. There is now a satin line under the motif line.
-
In the Font panel, click Save

, then click Universal Properties

. There is now an entry for Satin Line in Select Object.
-
Click Next and select Satin Line to make it editable, then click Finish.
-
Select the letter B. No satin line has been added to the B.
-
In the FilmStrip, right-click the Echo Fill area for the B and select Properties.
-
In the Fill Area and Line dialog box, select Satin Line in the Line drop-down list.
-
Click the Line tab, then select Insert Color Change.
-
Click Line Thread Color

to change the color of this line.
-
Change the color from the default blue to the yellow in Quick Colors, then click OK twice. There is now a satin line under the motif line for the B.
-
Click Save

, click the A, then click Universal Properties

.
-
In Select Object click Satin Line, then click Properties.
-
In the Satin Line dialog box, change Width to 1.5mm, then click OK.
-
Click Next, then click Finish. The satin line on the A is much narrower.
-
Click the B. The satin line on the B is also much narrower.
If the stitch type is already there, and its settings are the same as those for the A, Universal Properties will change them all to the new settings. This is useful when customizing a font from mySewnet™ QuickFont, but more so when you design the letters individually in mySewnet™ Font Digitizing. -
Try adding a Satin Line to some of the other letters, and then changing them with Universal Properties. When you have finished, close mySewnet™ Font Digitizing.
-
Open the Letter tab of mySewnet™ Embroidery. You now probably have at least one font that you do not wish to keep. You can delete unwanted fonts in Font Manager

.
-
Alternatively, delete or copy font files in Windows® File Explorer.
-
Browse to the folder ProgramData\mySewnet\Embroidery1\Fonts\MyFonts.
-
If you want to delete a font, select all three files for any font you want to delete, and delete them. When you next open mySewnet™ Embroidery, the font will no longer be present in the Font Gallery.
The minimum and maximum size are those set by mySewnet™ QuickFont when you created the font. They are the recommended size range for a mySewnet™ QuickFont fill and border font.
Many functions in mySewnet™ Font Digitizing have no Undo. Take care, and make frequent backup copies.
When you create a font, test it at various sizes and select your desired Size Options based on those tests.
Select a small motif when creating a border for a letter.
Note that no Undo is available for Universal Properties. Your changes are permanent.
The external Echo Fill lines overlap, with a striking effect. The kerning for this font is based on the position of the points in the Motif Line, not on the echo lines outside. Some other stitch types such as Feathered Satin also go outside the object boundary. For example, this will affect a Satin Column font created in mySewnet™ QuickFont and converted to Feathered Satin.
mySewnet™ Font Digitizing does not recognize the Satin Line as being part of the Echo Fill area, so it does not add the line to the other existing fills.
Try creating other fonts in mySewnet™ QuickFont, then converting them in mySewnet™ Font Digitizing. It is easiest to obtain good results with bold fonts in Pattern Fill + Satin Border. Narrow fonts work better in Satin, but are challenging to convert to other column types.
Look carefully at how mySewnet™ QuickFont constructs the letters. This affects how they will convert to other stitch types, and how much you can change the settings. This knowledge will be useful when you come to draw your own font in mySewnet™ Font Digitizing.
There are three files for each font. The .efnt and .vsmres files describe the font, and the .png file is used to display the font in the Font Gallery.
To backup a font, copy these three files to your backup folder.
You can also delete fonts from within Font Manager in mySewnet™ Embroidery.
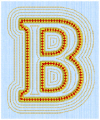
Design a Font Over Letter Graphics
Use any TrueType® or OpenType® font on your computer to design a font that you could not make in mySewnet™ QuickFont.
-
In the Windows Start menu, scroll down to the mySewnet folder and click the mySewnet™ Font Digitizing icon
 to launch mySewnet™ Font Digitizing.
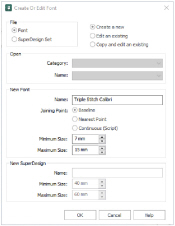
-
In the Create Or Edit Font dialog box, select Create a new.
The font will automatically be placed in the MyFonts Category. -
In the New Font section, change the name to Triple Stitch Calibri.
-
For Joining Point, ensure that Baseline is selected (checked).
This will create a font using separate letters rather than a handwriting style (Continuous) or running stitch connected (Nearest Point) font. See Joining Point. -
Set Minimum Size to 7mm and Maximum Size to 15mm.
You can change this size later using Size Options .
. -
Click OK. A letter A for your new font is displayed in the work area, but it is not from the font Calibri.
When mySewnet™ Font Digitizing is opened, the letters of the first font on your computer (often Arial) are automatically displayed. -
Click Font Background
 .
. -
A message is displayed, "The letter ’A’ must be created. Do you want to continue?" Click OK to select a different background font.
The Font Background dialog box appears, with the first font on your computer selected.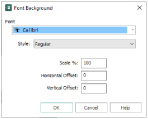 See Font Background.
 -
In the Font drop-down menu, select the font Calibri.
You will see many other fonts in the list, depending on what programs are installed on your computer. For instance, several decorative fonts are installed with Microsoft® Word.
Calibri is a plain unembellished font that will work well at small sizes using a single line of stitching. Use it for a quilt label or other small project. -
Ensure that Style is set to Regular, that Scale is set to 100%, and that both Offset options are set to 0.
These last options affect the size of the letters, and their position relative to the baseline. -
Click OK to select the font Calibri. The shape and size of the letter A changes in the work area.
-
Click the Point Create tab.
-
Deselect Fill, and in the Line drop-down menu select Triple Stitch
 .
. -
Click Create Area or Line
 to select it.
 -
Hold down the Shift key, and place two square points for the crossbar in the middle of the A.
-
With the Shift key still held, adjust the two points that you placed so that the line is straight.
-
Right-click to complete the line. The line appears at the top of the FilmStrip, below the default thread color.
-
Hold down the Shift key, and place three points for the sloping sides of the A. Right-click to complete the line.
-
In the Font panel, click Save

. The font is saved.
-
In the Font panel, select the letter B. The letter A is now green.
-
Ensure that Create Area or Line
 is still selected, and click at the top left of the lower part of the B.
 -
Holding down the Shift key to place square points at either end of the long stroke for the B, and for the other straight sections, place points for the outline of the B.
-
Right-click to finish, then click Save

in the Font panel.
-
Select the letter C and place points for the C. Right-click to finish, then click Save

in the Font panel.
-
Select the letter D, and place points to create the letter. Place square points for either end of the downstroke, and for the other straight sections.
-
Right-click to finish, then click Save

in the Font panel.
-
In the Letter tab of mySewnet™ Embroidery, scroll to the MyFonts section in the font gallery.
-
Select the font Triple Stitch Calibri.
-
Enter the text ABCD and DDBAC. It is likely that these letters are too close together.
If you used the minimum of points to create the letters, the outlines may be very smooth, but will not have enough points for successful kerning.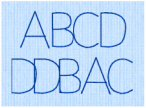
-
Return to mySewnet™ Font Digitizing.
You may get a Font error message. This happens if you try to edit a font in mySewnet™ Font Digitizing that is already open in mySewnet™ Embroidery. Create lettering in a different font in mySewnet™ Embroidery to unlock your font and try again, or close both programs and then reopen. -
In mySewnet™ Font Digitizing, click the View tab.
-
Adjust the Background slider so that you can see the embroidery lines better against the background letter, and click 2D View

to see the stitch line more clearly.
-
Return to the Point Create tab.
-
Select the sloping lines for the outside of the A.
-
Click Insert Points on Straight Lines

. Extra points are added to the sloping lines on the A.
-
Select the horizontal line across the middle of the A, then click Insert Points on Straight Lines

. Extra points are added to this line.
-
Click Save

in the Font panel, then select the letter B.
-
Select the line for the letter B.
-
If the downstroke is not completely vertical, hold the Shift key and adjust the square points to make the line vertical.
-
Adjust any other lines that should be vertical or horizontal.
-
Click Insert Points on Straight Lines

. Extra points are added to the straight lines on the B.
-
Click Save

in the Font panel, then select the letter D.
-
Adjust the straight line on the D as you did for the B, then use Insert Points on Straight Lines

to add points to that line.
-
Click Save

in the Font panel, and return to mySewnet™ Embroidery.
-
In the Letter tab recreate the text you created above.
-
Return to mySewnet™ Font Digitizing.
-
Use Insert Points

in the Home tab to add points to the curved lines for the B, then adjust the curves so they are smooth.
-
In the Font Panel, drag the Preview Size slider to view the letter B as it will be seen at the larger sizes. The larger the size, the more closely the stitch line follows the design line.
-
Adjust the points on the curves on the letter B for viewing at all sizes.
-
Click Save

in the Font panel when you have finished adjusting the letter B.
-
Select the letter C and add points to the curve, ensuring that there is a point at the leftmost part of the C.
-
Adjust the points so that the stitch line follows the design line, and that the C looks good at all sizes in the range. Then click Save

in the Font panel.
-
Adjust the straight and curved lines in the letter D so that it looks good at all sizes, then Save

it.
-
Select the letter E, and in the Point Create tab select Triple Stitch
 only, and create first the central horizontal bar with two square points, and then the top, vertical and bottom line with four square points.
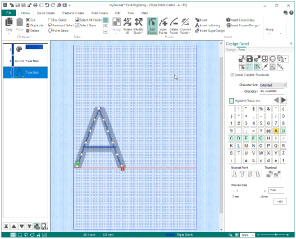
-
Adjust the lines so that they are vertical or horizontal, and then select the outer line and use Insert Points on Straight Lines

to add points for kerning.
-
Save

the letter E.
-
Create the letters F and G.
-
When creating the G, place sufficient points on the curved parts for good kerning as you design the letter, then use Insert Points on Straight Lines

to add points between the straight parts of the line after adjustment.
-
Click Save

in the Font panel, and return to mySewnet™ Embroidery.
-
Test letters A to G in the Letter tab of mySewnet™ Embroidery.

The letters may be close, but they do not overlap. Adding points has improved the kerning. -
Look at the Stitch Type

drop-down menu in the ribbon bar. Stitch Type is grayed out (unavailable).
This is because Triple Stitch is not editable in this font. -
Return to mySewnet™ Font Digitizing.
If you get a Font error message, create some lettering in a different font in mySewnet™ Embroidery to unlock your font, or close both programs and then reopen.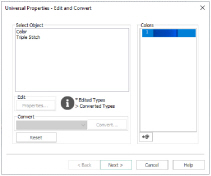
-
Select the letter A, then click Universal Properties

. The default color blue and Triple Stitch are the only Object types available. You have used these object types for all of the letters in the font.
If desired, you could now change the color of all of the letters in this font, or Convert to another line type. -
Click Next. The Universal Properties — Finalizing dialog box appears.
For more information on using Finalizing, see Universal Properties — Finalizing. -
Select (check) Triple Stitch to make it editable.
In the Digitized Characters box, only the letters that you have created so far are shown.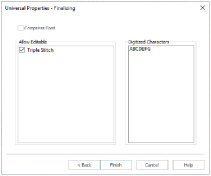
-
Click Finish to close Universal Properties.
-
Go to the Letter tab in mySewnet™ Embroidery.
-
Look at the Stitch Type

drop-down menu. Triple Stitch is now available. You can now edit the stitch properties for this font.
-
Return to mySewnet™ Font Digitizing and create the other letters for this font, or alternatively choose a different font on your computer and create letters using your own choice of color, stitch type and size.
When creating a font, use Navigation
to mark out the space needed for a Navigation object (a Space character). See Navigation.
Use Multiple Character Copy
to duplicate a range of characters in a font, for example if lower and upper case are identical, or to created accented versions of characters. See Multiple Character Copy.
Use Font Background to choose any of the TrueType® and OpenType® fonts installed on your computer as a background for creating a font.
The letter A is positioned on the orange baseline, with its left edge touching the left side of the grid. See Design Assistants for more information on the baseline, and the guidelines used when creating a font using pictures loaded with Edit Background

and mySewnet™ Draw & Paint.
In mySewnet™ QuickFont you can create fill, outline, and satin column fonts. You cannot create single line fonts. A Triple Stitch line creates a bold effect at a small size.
Use the grid points as a guide when placing the square points. If desired, use Snap to Grid  to force points to snap to the font grid spacing. See Snap to Grid.
For a smooth effect, follow the center of the lines making up the A character when placing points.
Plan the order of the lines used to create a character, so that the line ends are hidden under other lines.
Letters that have been digitized are marked in green. See Table of Font Characters.
You may need to select Edit Points in the Status Bar to view the points that make up your characters.
While the horizontal line in the A is not involved in kerning, it is used by the lettering envelopes in mySewnet™ Embroidery. Ensure that there are no large gaps between points when creating letters.
An angle on a stitch line is more visible in 2D View.
Use Zoom to Rectangle
and Zoom to Fit
to view the lines more clearly, and use Insert Points
to add an extra round point near a square point to create the desired curve.
The spacing around the straight lines has improved, but where the lines curve the letters are still too close together.
If you get a Font error message, create some lettering in a different font in mySewnet™ Embroidery to unlock your font, or close both programs and then reopen.
In particular, ensure that the outermost part of a curve has a point on it. If there is no point, the Letter tab in mySewnet™ Embroidery cannot detect that part of the curve.
Note that the stitch line does not always follow the points in the curve. This is because at small font sizes the curve points are closer together than the stitch points.
The default stitch length is 2mm. If this is changed to a smaller size, there may be machine problems when stitching out. This gives a bottom limit to the size for the letters in a font.
If needed, delete points as well as adding them, but ensure that you have enough points for good kerning.