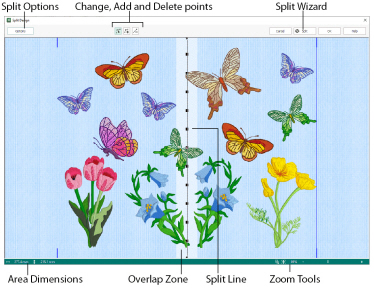
Use the Split Design window to move the points on the split line within the overlap zone, and to add and delete points on the line. Use the Split Options dialog to set the number of hoops, the width of the overlap zone, and the alignment stitches, compensation and connection. Use the Split Wizard ![]() to save the split sections, and print an overview and worksheets.
to save the split sections, and print an overview and worksheets.

When you first load an embroidery in Split Design the hoop, orientation and overlap are calculated automatically.
The pale bands across the work area are the overlap zones for the selected hoop. The size and directions of the overlap zones (horizontal and/or vertical) will depend on whether natural or rotated hoop orientation is selected.
If there is no overlap zone, then you have chosen an embroidery that does not need to be split for the selected hoop.
There is one split line for each overlap zone. The split lines show where the embroidery will be split.
Each split line has points along the line that can be used to adjust the split line. There are two types of points: the triangular end points and square mid-points. The end points can only be moved along the edges of the design area, and may not be deleted. The mid-points are initially placed about every 20mm, and they can be added and deleted as needed. All points are limited to the overlap zone to which they belong.
The embroidery will not be split if any split lines cross over themselves, or if a pair of horizontal and vertical split lines cross each other more than once.
Adjacent horizontal or adjacent vertical split lines cannot cross each other.
To move a point, move the mouse pointer over the desired point. The pointer becomes a two-headed arrow  over a triangular end point, or a four-headed arrow
  over a square mid-point. Click and drag the point to the desired position. The lines leading to the point will move as you move the point.
Points can only be moved within the overlap zone to which they belong. The end points can only be moved along the edge of the design area.
For finer adjustments to split lines, zoom in to the desired area.
Use Insert Point ![]() to add a new point into a split line.
to add a new point into a split line.
Click the Insert Point icon and the Insert pointer  appears. Then click the position on the split line where you want to add the point. Click to add any other points to split lines as desired. Click Move Point
 ![]() to finish adding points.
to finish adding points.
Use Delete Point ![]() to delete a point from a split line.
to delete a point from a split line.
Click the Delete Point icon and the Delete pointer  appears. Then click the point on the split line that you want to delete. Click any other points that you also want to delete. Click Move Point
 ![]() to finish deleting points.
to finish deleting points.
You may not delete the end points of a split line.
Use Move Point ![]() to adjust a point on the line, and to cancel Insert Point and Delete Point.
to adjust a point on the line, and to cancel Insert Point and Delete Point.
Click the Move Point icon and the move pointer

appears. Then drag the point on the split line that you want to move.