Preparing an Embroidery Composition
You can use Split Design to split a large overall design that you have put together as a composition in mySewnet™ Embroidery. It is recommended not to ColorSort before saving such a design. This will reduce the number of movement stitches that cross split sections that would otherwise not use that color. Instead, ColorSort the split embroidery sections when exporting them.
When preparing your composition, also consider how you wish traveling stitches to follow the edges created by the split lines. The Connection setting in the Split Options tab provides a choice of Trim or Running Stitch. Use the Trim option when it is possible to route split lines through gaps, with only a few or no cuts across stitch areas. Use the Running Stitch option when the split lines will cross large stitch areas.
For each embroidery, it is possible to vary the size of the overlap in combination with the number and orientation of the hoop areas. This may be desirable, for example, to split an embroidery without crossing any stitch areas. These choices must be balanced so that you have the fewest number of hoop areas with the largest possible overlap.
Keeping the number of hoop areas to a minimum saves the number of times you have to re-hoop, and also saves on changing colors. However, larger overlap areas are often helpful in minimizing the need to split design elements. A margin for adjustments on the embroidery machine is also desirable. To alter the overlap, simply use the Load Design Wizard again.
In the Hoop Options tab, an orientation and overlap is automatically selected for your chosen hoop. You can change this to obtain the desired hoop overlap and an optimal number of hoopings. Try changing the overlap, orientation and number of hoopings in Hoop Options.
Also remember that you can change the overall position of the embroidery on the work area. Click OK in the Split Design dialog, use Select All ![]() to select the whole embroidery in the mySewnet™ Stitch Editor work area, then click and drag it or use the nudge feature so that the embroidery is positioned over the overlap zones as desired.
to select the whole embroidery in the mySewnet™ Stitch Editor work area, then click and drag it or use the nudge feature so that the embroidery is positioned over the overlap zones as desired.
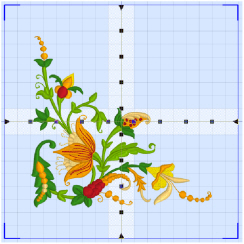
In this example, the embroidery 'Flower Corner Large' from Documents\mySewnet\Samples\Stitch Editor\Stitch has been selected in the Split Design dialog on a 100mm x 100mm hoop with a 20mm overlap.

It can be seen that it currently occupies all four hoop areas. Also, the overlap zones pass through some of the heavier stitch areas.
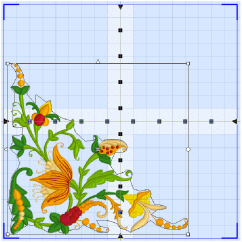
By moving the whole embroidery, it now fits within only three of the hoop areas, and the top right area can be ignored when stitching out.

Also, the split lines can be adjusted to split through lighter areas of stitching.
As well as moving an embroidery, you can rotate it so that fewer hoop areas are required to stitch it out.
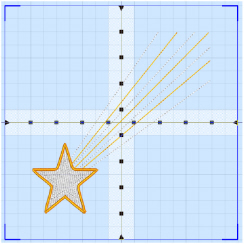
In this example, the embroidery 'Star Trails' from Documents\mySewnet\Samples\Stitch Editor\Stitch has been selected in the Split Design dialog on a 100mm x 100mm hoop with a 20mm overlap.

This embroidery could simply be moved so that it only needs three hoop areas for stitching out.
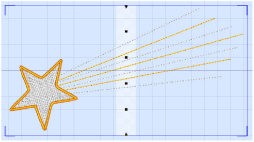
However, by also rotating the embroidery, it will fit in two hoop areas. The overlap has also been reduced to 15mm to increase the margin for adjustment on the machine.
