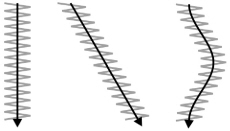
Use Horizontal ZigZag ![]() to draw stitches in a zigzag, horizontally to the left and right on the work area. The stitch points are placed alternately on each side as you draw along the center of the zigzag. Draw straight down to make a straight column of zigzag stitches. Move from side to side to skew the column to the left or right. Use the side-to-side motion to create horizon stitches.
to draw stitches in a zigzag, horizontally to the left and right on the work area. The stitch points are placed alternately on each side as you draw along the center of the zigzag. Draw straight down to make a straight column of zigzag stitches. Move from side to side to skew the column to the left or right. Use the side-to-side motion to create horizon stitches.

The stitches are drawn at the rate shown by the Free Motion Stitch Speed, at the current ZigZag Width.
Draw stitches on the work area by using the pen on the drawing tablet (or with click-and-drag with the mouse). Stitches are added continuously while the pen is in contact with the tablet (or until the mouse button is released). Move the pen faster to spread out the zigzags, or slower to add zigzags close together for a satin effect.
Add as many sections of zigzag stitching as desired. A Trim

will be added at the end of a section. Right-click to deselect the function, or simply select another tool.
Shortcut
-
Free Motion, Free Page:

Draw a Horizontal ZigZag Line
-
Click New

and in the Design Options page of the Load Design Wizard select Start a New Embroidery with no Picture, then click Next.
-
Select a hoop and click Finish.
-
Click the Free tab.
-
Click Horizontal ZigZag

.
-
Set the ZigZag Width to 2mm.
-
Draw a line downwards on the work area, then change direction to draw horizontally. The stitches run horizontally, so that the horizontal line is much thinner than the vertical line.