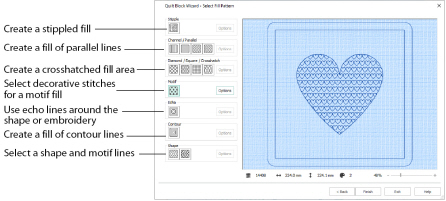
This page appears if you chose to use a fill for your quilt block in the Select Quilt Block Style page.

Choose a fill type for your quilt block, and set the options for it.
Stipple Fill
Use Stipple Fill
to create a stippled fill for an area.
When created, Stipple Fill areas do not have an outline.
Click the Options button to set the properties for the stipple fill. The QuiltStipple Fill Properties dialog box appears.
Channel/Parallel Fill
Use Channel/Parallel Fill to create a fill of parallel lines for an area. Four types are available:
Channel Fill Vertical
Channel Fill Horizontal
Channel Fill Diagonal Right
Channel Fill Diagonal Left
Click the Options button to set the properties for the fill. The Crosshatch Fill properties dialog box appears.
Diamond/Square/Crosshatch Fill
Use Diamond/Square/Crosshatch Fill to create a crosshatched fill for an area. Four types are available:
Diamond Fill
Square Fill
Crosshatch Fill
Curved Crosshatch Fill
Click the Options button to set the properties for the fill. The Crosshatch Fill or Curved Crosshatch Fill Properties dialog box appears.
Motif Fill
Use Motif Fill
to create a motif fill for an area.
Click the Options button to set the properties for the motif fill. The Motif Fill properties dialog box appears.
Echo Fill
Use Echo Fill
to place echo lines within an area.
Click the Options button to set the properties for the echo fill. The Echo Fill properties dialog box appears.
Contour Fill
Use Contour Fill
to create a contour fill for an area.
Click the Options button to set the properties for the contour fill. The Contour Fill properties dialog box appears.
Shape Fill
Use Shape Fill to create a shape fill for an area. Two types are available:
Shape Fill
Shape Fill with Motifs
Click the Options button to set the properties for the shape fill. The Shape Fill properties dialog box appears.
The design information boxes show the dimensions (Width
and Height
), Stitch Count
, and number of colors
for the embroidery. The design information may change when the embroidery is exported, depending on the Optimize for Sewing Options.
Back
Return to the Adjust Embroidery, Select Shape, or Select Size page.
Finish
Click Finish to close the Wizard.