Creating Motifs
Any drawing can be made into a motif, but for best results use a simple design with start and end points that are aligned horizontally to the left and right.

To save the design or selected area on the screen as a motif, use Export to My Motifs  .
.
To make a permanent copy of the motifs you create, use Save As  to save the design as an .ecq drawing file. This will save the precise position of the nodes that you used, and whether they were for curves or corners.
Create motifs manually, or by tracing an existing design loaded as a background picture.
When saving a partially complete drawing to finish creating a motif, save as an .ecq file, then reload the file to continue.
Create a Motif
-
In the Draw window, select Point Draw
 .
. -
Place points, using the Shift key to create corner or square points, to draw the outline of a tree from left to right. Right-click to finish the line.
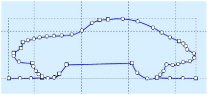
Start and finish on the same horizontal line.
The start and end stitches should always be aligned horizontally. If the motif is saved with start and end stitches that are not level, or are reversed, a stitch will be added, or the motif will be automatically rotated when it is used to make a motif fill area or a motif line. The rotation forces the start and end stitches to be aligned. -
Click Save As
 and save the motif design as Tree Outline.ecq.
 -
Ensure that the tree outline is selected.
-
Click My Motifs, Export to My Motifs
 .
. -
If the first and last stitches are not aligned horizontally, a message appears to give you the option to rotate the motif or add an alignment stitch.
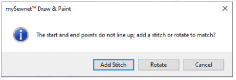
Click the desired option and then export the motif to the My Motifs database.
If you want to adjust the motif yourself, click Cancel to return to the work area, where you can align the start and end stitches as required. -
If the start and end points are the same, for example if a closed line or shape is used, a different message about start and end points will be displayed, and the design will not be exported to My Motifs. Edit the design to give suitable start and end points, then use Export to My Motifs again.
If there are more than 12 My Motifs, the number at the right-hand end of the slider bar will show how many pages of My Motifs there are. Use the slider bar to select the required page of My Motifs.
Motifs should be designed at the size they are most likely to be used, as this will match the detail in the motif to the scale at which it is used. If you are likely to use the same motif at different sizes, where one size is at least twice as big as the other, make two versions of the motif. Decreasing the size of a motif will create too much detail, and increasing the size of a motif will give an apparent loss of detail and smoothness.
The design size of a My Motif in mySewnet™ Draw & Paint is the default size it is set to when it is initially selected for use in a motif fill area or a motif line.
Motifs are generally used as a chain of motifs in a motif fill area or a motif line. Motifs should be designed so that when they are used they are connected in sequence at the start and end points. Generally, the first and last points should be on the left and right of the motif respectively. This is so the motif can be used without it overlapping itself. For some motifs, however, it may be desirable to overlap the motif if it is a shape that can be nested as it repeats.
It is desirable for the first and last stitches to be created on the same horizontal line of the grid. This is so that the motif will be used with the orientation that is shown on the design area. If the first and last stitches are not lined up, the motif will be rotated when it is used so that they do line up from left to right.
Corner (square) nodes will always be stitched. Curved (round) nodes indicate the line to be used, but the program will calculate the number of points (stitches) required to make the curve.
Always test your motifs on scrap pieces of the fabric you are going to use. Always use stabilizer to help prevent pull on the fabric.
You can only make a motif from an image that is entirely connected. If there is no direct connection between parts of the design, they cannot be exported as a motif. Add connecting lines to the design in the design area before using Export to My Motifs. Alternatively, delete any unconnected details, leaving an outline.
Add lines that lead in and lead out of your design before exporting.
To ensure that the motif is created to line up correctly, use the grid.
The example shows how you might use lead-in and lead-out lines; they have been added to give the illusion that the car is sitting on the road.
Notice that the lead-in and lead-out lines are the furthest left and furthest right parts of the design.
Simplifying the Design
There may be too much detail in a design. Use Edit Points  and Delete Points
  to remove extra details, and smooth outlines.
Use Edit Points  to change the position of the nodes on the currently selected line. Moving a round node affects the two sections of line to either side of that node. This ensures line smoothness. You can append one line to another by joining two end nodes. The line that is joined to will take on the characteristics of the line that does the joining.
Use Delete points  to remove the currently selected node. If a middle node is deleted, the line will be redrawn to follow the path between the nodes that are left. Use Add Points
  to add a node to the currently selected line.
Using Your Motifs in mySewnet™ Digitizing
The motif that you created will be in the My Motifs Category in Manage My Motifs.
You will also be able to see them in the Fill Area and Line Properties dialog box for any type of motif line or fill in mySewnet™ Digitizing, and other mySewnet™ Embroidery Software modules.
Use a Motif that you Created in mySewnet™ Digitizing
-
In mySewnet™ Digitizing select a line or fill area using Motif Line
 , Motif Fill
  , Tapered Motifs
  , Shape Fill
  , MultiWave Fill
  or Curved Crosshatch Fill
  .
. -
Right-click the object to open the Fill Area and Line Properties dialog box.
-
In the Group drop-down list select My Motifs. The My Motifs Category is selected automatically.
-
From the Pattern drop-down list select the desired motif.
-
Use Height and Width to set the size of your chosen motif.
-
Click OK to place the motif in your line or fill.
When checking a new motif in Fill Area and Line properties, increase the Vertical Gap to see the individual rows of the motif.