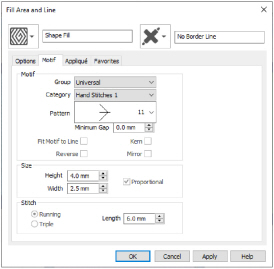
The selected Motif is only used by the Shape Fill if the Use Motifs option is selected on the Options tab.
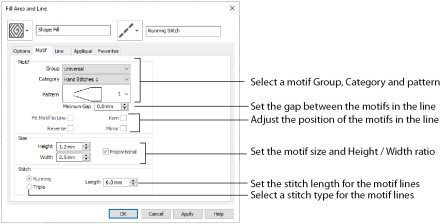
Group
Click the drop-down arrow to select the desired group of motif patterns.
Click the drop-down arrow to select the desired category of motif patterns.
Click the drop-down arrow to select the desired motif visually. Motifs are also numbered for convenient reference.
The Minimum Gap is the minimum amount of extra stitching that is placed between the motifs along the line. This is in addition to any spacing that is part of the selected motif.
Select this option to make the shape of the motifs follow the curves of the line.
|
|
|
|
When Fit To Line is off, the ends of each motif are placed on the line. |
When Fit To Line is on, each motif is adjusted to fit along the line. |

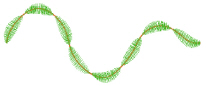
Use this option to reverse the direction of the motif along the line. This is useful, for instance, if you have placed a QuickStitch™ Motif Line and wish to reverse the motif direction. Some motifs are symmetrical and will have no apparent change when they are reversed.
Use Kern to automatically increase the space between adjacent motifs where necessary, so that the motifs fit along the line without overlapping.
Use this option to mirror the motif across the line of motif fill. Some motifs are symmetrical and will have no apparent change when they are mirrored.
The Height and Width are initially set according to the chosen motif. The maximum and minimum values for Height and Width are individual to each motif.
Proportional
Use this option to keep the relative Height and Width in proportion when either is changed.
Select Running or Triple stitch for stitching out the motifs. Set the maximum Length of stitches from 1 to 12mm in steps of 0.1mm. Length is initially set to the recommended value for each motif.
Use Shape Fills in Three Petals
-
Click File, New

, or File, New Window

, and in the Choose Design Type page of the ExpressDesign Wizard select Load Existing Design, then click Next. In the Open Existing design page, click Load a Design
 , browse to the folder Documents\mySewnet\Samples\Digitizing\Edo, and load the file 'PetalsBasicFill'.
 -
Click File, Preferences
 , and ensure that Color Tolerance is selected (checked), and that Tie Off Before and After Trims is selected.
 -
Click the View tab, and ensure that Grid size is set to 5mm.
-
Select the fill area for the petal on the right, then right-click to see the Fill Area and Line dialog box.
-
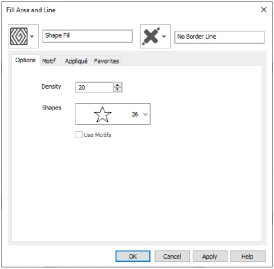
In the Fill drop-down menu at the top left, select Shape Fill
 . The Options tab of the shape fill properties is displayed.
 -
Set Density to 20. This will create a lightly stitched pattern.
-
Click the drop-down arrow for Shapes and choose the five pointed star (shape number 26).
-
Click OK to apply the changes.
-
Select the fill area for the middle petal, then right-click to see the Fill Area and Line dialog box.
-
In the Fill drop-down menu at the top left, select Shape Fill
 . The Options tab of the shape fill properties is displayed.
 -
Ensure the Density is set to 8.
-
Click the drop-down arrow for Shapes. Scroll down the list and choose the badge shape numbered 48.
-
Click OK.
-
Move the origin point
 straight up the vertical grid center line until it is just above the petal.
 -
Select the fill area for the petal on the left, then right-click to see the Fill Area and Line dialog box.
-
In the Fill drop-down menu at the top left, select Shape Fill
 . The Options tab of the shape fill properties is displayed.
 -
Ensure the Density is set to 8.
-
Click the drop-down arrow for Shapes. Scroll down the list and choose the curvy frame numbered 65.
-
Click the Use Motifs option so that it is selected, then click the Motif tab.
-
From the Universal Group, select the Hand Stitches 1 Category.
-
Scroll down the Pattern list and select pattern 11 (the closed fly stitch).
-
Click OK. The effect is displayed in the Create window.
-
Move the origin point
 up so that it is just within the top right area of the petal.
 -
Click Save
 and browse to the folder Documents\mySewnet\My Designs.
 -
Change the File name to 'PetalsShapeFill' and click Save.
-
Click Print
 to print the embroidery worksheet.
 -
Click Export Embroidery
 and ensure that .vp4 is set as the file format. Click OK.
 -
In the Save As dialog, browse to the folder Documents\mySewnet\My Designs and click Export. The embroidery is saved as PetalsShapeFill_Exported.
There is no need to change the file name, as it is taken automatically from the design file name.
Notice how the point of radiation changes.