Use QuickStitch™ Satin  to fill an area with satin stitches automatically, by clicking in a color area of the picture. If required, use Color Tolerance to select a larger area according to the similarity of adjacent colors.

Set stitch options before creating, or after satin areas have been created, right-click an area and use Fill Area and Line properties to change density, pattern and underlay, or change to another stitch type.
You can change all visible or selected satin areas with Global Properties, or by selecting the objects to change and changing one of them in Fill Area and Line properties. Stitch angle lines and start and end points can be adjusted on satin areas individually.
QuickStitch™ Satin works best with relatively simple areas of the picture that do not have any complex branches. For example, if the area has long branches or branches that double-back on each other, you may not get the best result.
For branching or other complex areas, use QuickStitch™ Multiple Satin. Alternatively, edit the picture to make separate areas of any extra branches.
|
|
|
|
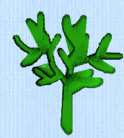
A tree with many branches |
Left as one color, a single QuickStitch™ Satin area is created |
|
|
|
|
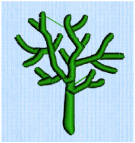
Use QuickStitch™ Multiple Satin areas |
Or split up the branches by using different colors |


Shortcuts
-
Quick Create Tab, Satin Area:

-
Keys: Alt, Q, K
Create a QuickStitch Satin Area
-
Set stitch options, then in the Quick Create tab click the QuickStitch™ Satin icon
 .
. -
Click in the color area you wish to fill with stitches.
-
If Color Tolerance is enabled then the Color Tolerance dialog box will appear. Adjust the Color Tolerance as required. The area selected by the Color Tolerance value will be previewed. Click OK to confirm.
-
Satin stitches will appear in the area.
-
Repeat to place as many satin areas as desired.
-
Right-click to deselect, or simply select another Create tool.
-
Right-click the Satin Area. The Fill Area and Line properties dialog opens.
-
Select each satin area in turn, right-click to change the satin properties of an area and click OK.
-
Alternatively, to change the properties of a selection of satin areas at one time, in the FilmStrip, hold the Ctrl key and click each of the satin areas to be changed. Then right-click one of the selected areas and select Properties. The Fill Area and Line dialog box will appear. All settings in the Fill Area and Line dialog box will be applied to your selected satin areas when you click OK.
-
Also in the work area, if desired, move the green start
 or red end
  and adjust angle lines for satin areas.
See Satin Area Options.