Use Freehand Satin Area  to draw outlines to define the edge of an area filled with satin stitch. Satin areas are best suited to shapes without branches. If there are branches that double-back on the main part of a satin area, the satin area may not give the desired result.
After satin areas have been created, right-click an area and use Fill Area and Line properties to change density, pattern and underlay, or change to another stitch type.
You can change all visible or selected satin areas with Global Properties, or by selecting the objects to change and changing one of them in Fill Area and Line properties. Stitch angle lines and start and end points can be adjusted on satin areas individually.
|
|
|
|
Satin Area created as a strip around the picture shape, so stitches are short enough to leave as plain satin |
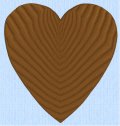
Large Satin Area covering the whole picture shape, with a pattern to break up long stitches |
|
|
|

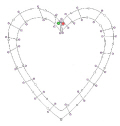
If the edge of the area does not match the background picture as closely as desired, you can move, delete and insert points on the work area.
Shortcuts
-
Freehand Create Tab, Satin Area:

-
Keys: Alt, R, T
Create a Freehand Satin Area
-
Set stitch options, then in the Freehand Create tab click the Freehand Satin Area
 icon.
icon. -
Draw a line around the edge of the desired area.
-
When the area is complete, lift the pen from the tablet (or release the mouse button). The area is closed with a straight line back to the start point, and filled with satin stitches.
-
Continue to draw as many satin areas as desired.
-
Right-click to deselect the function, or simply select another Create tool.
It is recommended to draw back to the start point. However, you can also adjust the shape of the area if it is not exactly as planned.
-
Select each satin area in turn, right-click to change the satin properties of an area and click OK.
-
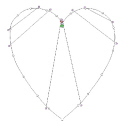
If desired, move the start
 or end
  and adjust angle lines for satin areas.
 -
To change the properties of a number of satin areas at one time, in the FilmStrip, hold the Ctrl key and click each of the satin areas to be changed. Then right-click one of the selected areas and select Properties. The Fill Area and Line dialog box will appear. All settings in the Fill Area and Line dialog box will be applied to your selected satin areas when you click OK.
See Satin Area Options.