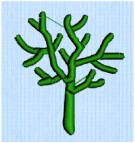
Use QuickStitch™ Multiple Satin ![]() to fill a branching or other complex area with satin stitches automatically, by clicking in a color area of the picture. If required, use Color Tolerance to select a larger area according to the similarity of adjacent colors.
to fill a branching or other complex area with satin stitches automatically, by clicking in a color area of the picture. If required, use Color Tolerance to select a larger area according to the similarity of adjacent colors.

Shortcuts
-
Quick Create Tab, Satin Area:

-
Keys: Alt, Q, M
Create a QuickStitch™ Multiple Satin Area
-
Set stitch options, then in the Quick Create tab click the QuickStitch™ Multiple Satin
 icon.
icon. -
Click in the color area you wish to fill with stitches.
-
If Color Tolerance is enabled then the Color Tolerance dialog box will appear. Adjust the Color Tolerance as required. The area selected by the Color Tolerance value will be previewed. Click OK to confirm.
-
Satin stitches will appear in the area.
-
Repeat to place as many satin areas as desired.
-
Right-click to deselect, or simply select another tool.