Use the Options tab to see and change the settings for fill angle, stitch type and length.
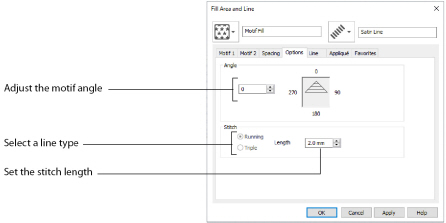
The angle of the motif fill pattern, as shown by the arrow. Set the Angle from 0 to 359 degrees.
Select Running or Triple stitch for stitching out the motifs. Set the maximum Length of stitches from 1 to 12mm in steps of 0.1mm.
-
Click File, New

, or File, New Window

, and in the Choose Design Type page of the ExpressDesign Wizard select Load Existing Design, then click Next. In the Open Existing design page, click Load a Design
 , browse to the folder Documents\mySewnet\Samples\Digitizing\Edo, and load the file 'PetalsBasicFill'.
 -
Click File, Preferences
 , and ensure that Color Tolerance is selected (checked), and that Tie Off Before and After Trims is selected.
 -
Click the View tab, and ensure that Grid size is set to 5mm.
-
Select the fill area for the middle petal, then right-click to see the Fill Area and Line dialog box.
-
In the Fill drop-down menu at the top left, select Motif Fill
 . The Motif 1 tab of the motif fill properties is displayed.
 -
Set the Group to Universal and the Category to Candlewicking 1. Pattern 1 is selected automatically, which is the desired Pattern.
-
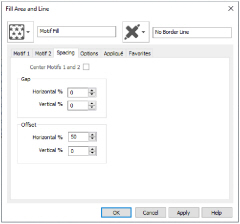
Click the Spacing tab.
-
Set the Horizontal Offset to 50%.
-
Click OK. The effect is displayed in the work area.
-
Select the fill area for the petal on the right, then right-click to see the Fill Area and Line dialog box.
-
In the Fill drop-down menu at the top left, select Motif Fill
 .
. -
Set the Group to Universal and the Category to General Motifs 1. Click the drop-down arrow for Pattern, scroll up the list and select Pattern 2.
-
Click Apply to preview the effect. If needed, move the Fill Area and Line dialog box to the left to view the effect.
-
Click the Motif 2 tab.
-
Click ’Use Motif 2’ so it is selected. The Motif 2 options become available.
-
Set the Group to Universal and the Category to General Motifs 1. Click the drop-down arrow for the Motif 2 Pattern, scroll up the list and select Pattern 2.
-
Click the Spacing tab.
-
Set the Vertical Offset to 30%.
-
Click the Motif 1 tab.
-
Click the Mirror option for Motif 1 so it is selected. The motif will be mirrored vertically.
-
Click Apply to preview the effect.
-
Click the Options tab.
-
Change the Angle to 200 and select Triple as the stitch type.
-
Click OK. Click Life View
 to see the effect, then click Cancel.
Add a motif line flower to the left petal in Create a Flower with Motif Lines.
Insert Motif Fill in an Appliqué Petal
-
Click File, New

, or File, New Window

, and in the Choose Design Type page of the ExpressDesign Wizard select Load Existing Design, then click Next. In the Open Existing design page, click Load a Design
 , browse to the folder Documents\mySewnet\Samples\Digitizing\Edo, and load the file 'PetalsApplique_Picot’.
 -
Click File, Preferences
 , and ensure that Color Tolerance is selected (checked), and that Tie Off Before and After Trims is selected.
 -
Click the View tab, and ensure that Grid size is set to 5mm.
-
Click the edge of the petal on the right. Its nodes (points) are displayed.
-
In the status bar the stitch type is displayed as Satin Line Appliqué.
-
Right-click the work area to see the Fill Area and Line properties for this Satin Line.
-
In the Fill drop-down menu at the top left, select Motif Fill
 .
. -
In the Motif 1 tab set the Motif Group to Universal, and the Category to Hand Stitches 1.
-
Click the drop-down arrow for Pattern and select Pattern 17, a tied cross.
-
Click OK to close the dialog box.
-
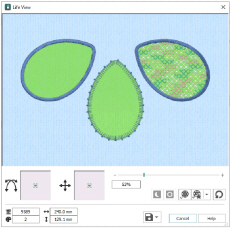
Notice that the motif fill in the petal on the right is the same color as the border stitches. The motif fill will look nice in variegated thread.
-
In the FilmStrip, right-click the petal in the middle (FilmStrip item number 2) and select Insert Color Change. The Color Selection dialog box will appear.
-
Click Show All Thread Ranges, then click the drop-down arrow for the Thread Range and select Robison-Anton Rayon Vari 40.
-
In the shade list, browse for 2370 (4CC Melody) or enter 2370 in the Find Thread box. Click OK.
-
Right-click the Motif Fill area to open Fill Area and Line properties.
-
Click the Line tab.
-
Click (check) Insert Color Change, and then click Line Thread Color
 . The Color Selection dialog box opens.
 -
Click the drop-down arrow for the Thread Range and select Robison-Anton Rayon 40.
-
Type 2275 in the Find Thread box to select 2275 (Slate Blue). Click OK.
-
The thread color is now a dark blue. Click OK to close the Fill Area and Line dialog box.
-
Click Life View
 . The motif fill in the petal on the right is now shown in variegated thread, with a blue border, but the petal on the left is variegated. It should be changed to blue. Click Cancel to close the dialog box.
 -
In the FilmStrip, ensure that the Motif Fill petal is selected.
-
Right-click on the FilmStrip, then click Insert Color Change and the Color Selection dialog box will appear.
-
Click the drop-down arrow for the Thread Range and select Robison-Anton Rayon 40.
-
Type 2275 in the Find Thread box to select 2275 (Slate Blue). Click OK.
-
Click Life View
 . The borders are now all blue, with a variegated thread motif fill area.
 -
Click Cancel.
Add a contour fill flower to the left petal in Create a Contour Fill Flower.
Alternatively, use the petals design that you created in Create Appliqué Areas with Express Border, and added a picot motif line to in Change Satin Line to Picot Motif Line.
In the FilmStrip the object should also be Satin Line Appliqué. You can select objects in the FilmStrip, or press the right and left arrow keys to step through the objects in the design.
It will currently be shown as No Fill.
This places the color change between the two petals.
This changes the color for the Motif Fill, but also changes the color of all the objects that follow it.
The border color change affects only the color of the border around the motif fill area. It does not affect any other objects. So a separate color change is needed.