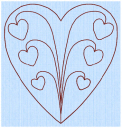
Use the QuickTrace ![]() functions Double Trace
functions Double Trace  , Quadruple Trace
  , Satin Line Trace
  , or Motif Line Trace
  to place double or quadruple lines of stitches, satin borders or motif lines by clicking lines in the picture. The traced design is created as a group.
All connected lines will be traced.
You can set stitch options before creation, or after.
Double Trace and Quadruple Trace use the stitch length setting for Running Stitch in Fill Area and Line ![]() properties, as does Running Stitch used in Satin Line Trace. The Running Stitch sections for Motif Line trace use a fixed length of 1.5mm. The Satin Line and Motif Line for tracing use the settings in Fill Area and Line.
properties, as does Running Stitch used in Satin Line Trace. The Running Stitch sections for Motif Line trace use a fixed length of 1.5mm. The Satin Line and Motif Line for tracing use the settings in Fill Area and Line.
To change stitch settings after the stitches have been created, right-click an object to change the properties in the Fill Area and Line dialog box.
To change multiple objects, click a single object in the Group for the traced design, then right-click and choose Select Similar from Group ![]() . Right-click the object again, and select Properties to choose settings for all objects of that type, e.g. Running Stitch, in the design.
. Right-click the object again, and select Properties to choose settings for all objects of that type, e.g. Running Stitch, in the design.
Alternatively, change all visible objects of one type with Global Properties, or hold the Ctrl key and click the desired objects in the FilmStrip, then right-click one of them and select Properties to change the properties for the selected objects.
-
Zoom In so that you can clearly see the line where you wish to create the QuickTrace. This will help with thin outlines that are difficult to select.
-
Set stitch options, then in the Trace
 drop-down menu on the Quick Create tab, select Double Trace
  , Quadruple Trace
  , Satin Line Trace
  , or Motif Line Trace
  .
. -
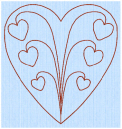
Click the outline you wish to trace.
-
If Color Tolerance is enabled then the Color Tolerance dialog box will appear. Adjust the Color Tolerance as required. The area selected by the Color Tolerance value will be previewed. Click OK to confirm.
-
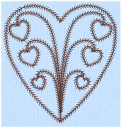
The stitch lines or satin border will be created as a Group, and the function is automatically deselected. For satin border, a running stitch is used underneath the border to stabilize and connect border sections.
-
Repeat as desired.
-
To edit the border, click an object in the group to select it, then right-click and choose Select Similar from Group
 . Right-click again and change the properties in the Fill Area and Line Properties dialog. Click OK to save the changes. All stitch lines of the selected type will use the new settings.