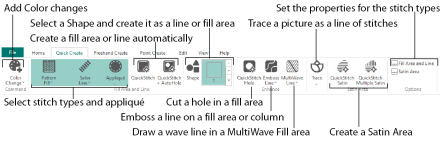
Creating with QuickStitch™, QuickTrace and Shape
Click in a defined color area, or on a defined color line, in the background picture to create a QuickStitch™ or QuickTrace line or fill. The area outline is filled or the line is followed automatically.
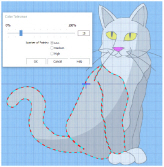
Use Color Tolerance to choose the color shades used when defining the area.
Select the desired QuickStitch™ or QuickTrace function, according to the type of stitches you want over the picture area you are about to select. Then, click in the desired area of the picture for QuickStitch™ functions or on the desired line for QuickTrace functions.
Using Color Tolerance with QuickStitch™ and QuickTrace
-
Select your stitch types, then select the desired QuickStitch™ or QuickTrace function, according to the type of stitches you want over the picture area you are about to select.
-
Click in the desired area (for example, on the cat’s left side) of the picture for QuickStitch™ functions or on the desired line for QuickTrace functions.
-
If Color Tolerance is enabled, the Color Tolerance dialog box will appear.
A red and cyan highlight shows the area of the picture that will be filled or traced. If you have chosen to detect holes, any holes in the area will be highlighted by green and yellow lines. Using Color Tolerance is recommended. -
Use the slider to adjust the Color Tolerance value until the required part of the picture is selected.
The Color Tolerance dialog box has a slider control, which is initially set to 0. This is the tolerance control. As the tolerance value is increased, this increases the possible range of colors, by similarity to the color clicked, that may be selected by the red and cyan highlight. -
Select the number of points to use for the outline; High will show more detail, while Low will be smoother.
-
Click OK to confirm the desired area is highlighted, and the line or area is created.
For example, if you have an area of your picture that is shaded in different shades of green, you can use color tolerance to select all the shades and make a single area.
Even when the tolerance is left at 0, the blue and white pattern gives a useful preview of the area that will be used for the new object.
When Color Tolerance is not enabled, the stitch object(s) are created immediately, using only the color area that was selected. You can use the Color Tolerance option in Preferences ![]() to turn Color Tolerance off, but this is only advisable if your picture has well defined flat color areas, and you have no need to select more than one color area to create new objects.
to turn Color Tolerance off, but this is only advisable if your picture has well defined flat color areas, and you have no need to select more than one color area to create new objects.