Any area can have a border, or no border. The border can be closed or open, and it can use any line type. Holes can be defined inside any fill area. Appliqué properties may be set for any area or line. Use Break Apart on the Edit tab to change an area with a border into separate fill area and line objects.
Any fill area can be converted into a Satin Area, however any holes in the fill area will be lost. (Any Border lines will be retained, including the borders of the holes.)
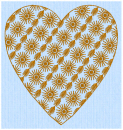
Pattern Fill areas ![]() contain small stitches with repeating patterns. Select from one of the themed categories, or import a picture as a My Fill pattern. A pattern fill area can have holes defined inside it. The stitches can be at any angle and the density can be constant, gradient or multicolor as desired. Constant density fill areas can also have automatic underlay, which is turned off automatically for gradient density areas.
contain small stitches with repeating patterns. Select from one of the themed categories, or import a picture as a My Fill pattern. A pattern fill area can have holes defined inside it. The stitches can be at any angle and the density can be constant, gradient or multicolor as desired. Constant density fill areas can also have automatic underlay, which is turned off automatically for gradient density areas.
|
|
|
|
|
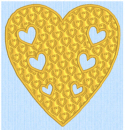
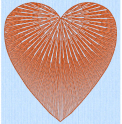
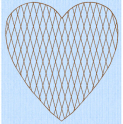
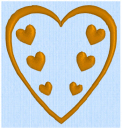
Fill Area with Satin border and holes using Pattern Fill 109 from Hearts |
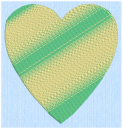
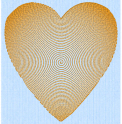
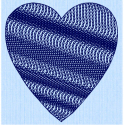
Pattern Fill Area with Multicolor Gradient |
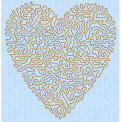
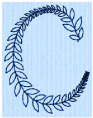
Motif Fill Area with two motifs, 13 and 19, from Hand Stitches 2 |
If you change a gradient density fill back to standard, then you should also select the desired underlay.
Shape Fill areas ![]() use one of 120 different shapes. Vary the stitch density, use running stitch or motif lines for the fill and add holes.
use one of 120 different shapes. Vary the stitch density, use running stitch or motif lines for the fill and add holes.
|
|
|
|
|
Shape Fill Area using Shape 66 and Motif 1 from Hand Stitches 1 |
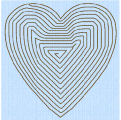
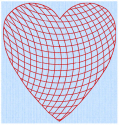
Radial Fill with origin moved to top of heart |
Spiral Fill using Gradient Density |
Motif Fill areas ![]() contain repeated small stitches placed using one of the Universal or machine motif patterns. A motif fill area can also have holes defined inside it. The motifs can be at any angle and at different sizes, and different motifs can be used on alternating lines.
contain repeated small stitches placed using one of the Universal or machine motif patterns. A motif fill area can also have holes defined inside it. The motifs can be at any angle and at different sizes, and different motifs can be used on alternating lines.
Radial Fill areas ![]() use a pattern of radiating lines from an origin point that can be moved. Vary the stitch density and add holes.
use a pattern of radiating lines from an origin point that can be moved. Vary the stitch density and add holes.
Spiral Fill areas ![]() use a spiral pattern from an origin point that can be moved. Use constant or gradient density, and add holes.
use a spiral pattern from an origin point that can be moved. Use constant or gradient density, and add holes.
QuiltStipple Fill areas ![]() use stipple stitch in curved or straight lines. Vary the gap between stitch lines, use running or triple stitch, and add holes.
use stipple stitch in curved or straight lines. Vary the gap between stitch lines, use running or triple stitch, and add holes.
|
|
|
|
|
QuiltStipple Fill using a curved style |
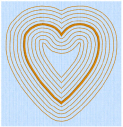
Contour Fill, using Triple Stitch and a 3.0mm gap |
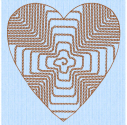
Crosshatch Fill, using Diamond style and an Angle of 75 degrees |
Contour Fill areas ![]() use contour stitch lines. Vary the gap between stitch lines and the length of the stitches, use running, double or triple stitch, and add holes.
use contour stitch lines. Vary the gap between stitch lines and the length of the stitches, use running, double or triple stitch, and add holes.
Crosshatch Fill areas ![]() use diamond, square and parallel crosshatch patterns, or select the angles for the crosshatch. Set the gap, style, line angle, stitch type and stitch length for the crosshatching, and add holes to the fill.
use diamond, square and parallel crosshatch patterns, or select the angles for the crosshatch. Set the gap, style, line angle, stitch type and stitch length for the crosshatching, and add holes to the fill.
Crosshatch fill is often selected for lace designs, typically using a Double Zigzag stitch type.
MultiWave Fill areas ![]() use a wave pattern defined by a line, or lines, drawn on the fill area. Vary the density, or use a motif for the stitch lines.
use a wave pattern defined by a line, or lines, drawn on the fill area. Vary the density, or use a motif for the stitch lines.
Echo Fill  places echo lines within and/or around a shape. Choose from rounded, square and diagonal corners, set the gap between the echo lines and the number of lines, and select the stitch type and length.
Curved Crosshatch Fill areas  use curving lines in the crosshatch, which can be used to create a feeling of depth. They are used in quilting, and to create free-standing lace.
|
|
|
|
|
Curved Crosshatch Fill, using Square style and a Gap of 5mm |
MultiWave Fill, using a density of 15, a MultiWave Line, and a Hand Stitches 1, Pattern 1 motif |
Echo Fill using Internal and External Lines, and rounded corners |
Satin Areas ![]() contain zigzag stitches that fill the area from one end to the other at the same density. The stitch angle changes with the shape of the area, and can be adjusted as desired. Choose automatic edge walk and/or zigzag underlay, and if desired select a pattern.
contain zigzag stitches that fill the area from one end to the other at the same density. The stitch angle changes with the shape of the area, and can be adjusted as desired. Choose automatic edge walk and/or zigzag underlay, and if desired select a pattern.
Satin Areas can be converted into any type of fill area. They cannot be created with a border, but a border can be placed around them using the Fill Area and Line properties dialog.
Columns
Create Columns by placing points, or on the Point Create tab by drawing Bezier lines. The Column functions are found both on the Freehand and Point Create tabs. Place alternate points to define a column of any length.
Columns may be converted into Satin Areas using the Convert to Satin Area ![]() option, but Satin Areas cannot be converted into any type of column.
option, but Satin Areas cannot be converted into any type of column.
Satin Column

Use Satin Column  to create a straight or curving column of parallel stitches. The column may be of any length. If desired, add a pattern. Choose from over 250 patterns, similar to Pattern Fill, or create your own My Fill patterns. The density can be constant, gradient or multicolor as desired.
The recommended maximum length for satin stitches is around 8-10mm, otherwise the stitches may be loose and not lie flat. To create satin wider than this, use a pattern, overlap satin columns, or use a satin area.
For lifelike realistic feathers or fur, use Feathered Satin  , where the start and end points of the stitches are random rather than all parallel. Feathered satin may also be created with only one side feathered – the side where the first (A) or second (B) point was placed.
|
|
|
|
|
Feathered Both Sides |
Feathered Side A |
Feathered Side B |


Richelieu Bars
Use Richelieu Bars  to create a column of short sections of satin perpendicular to the direction of the column. Choose the number of bars, and the width of the satin.
Richelieu bars are typically used for cutwork designs.
Tapered Motifs
Use Tapered Motifs  to create a line of motifs that vary in size according to the width of the column.
Tapered motifs are often used in lace designs.