Place the embroideries from left to right in one of 8 line types.
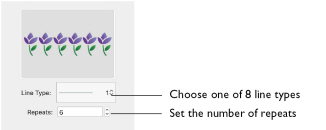
Line Type: Select a straight line, or one of seven types of curved line from the pop-up menu.
Repeats: Set the total number of copies of the selected embroidery(ies) that will form the line of repeated embroideries. Set the number of repeats from 2 to 360.
Note: If more than one embroidery is selected, the number of repeats of each embroidery is divided by the number of embroideries.
To Adjust an Encore Line
-
Drag the line using the four-headed arrow Move pointer

to position it.
-
Drag the square handle on the top or right side of the line, using the double-headed horizontal or vertical pointer, to change the spacing between the designs.
Create a Line of Repeated Embroideries
-
Place some small embroideries on the work area and select them.
-
Open the Encore window
 of the Control Panel
  .
. -
In Type, select Line
 . The Line options appear.
 -
Select the Position (standard
 or mirrored
  ).
). -
Choose a Line Type from the pop-up menu.
-
Set the number of Repeats as desired, from 2 to 360.
-
If desired, select Group and Arrange Similar.
-
Click Preview to view the repeated designs in the work area.
-
Drag the line of embroideries to position it.
-
Drag the square white handles on the top and right sides of the box to stretch or compress the box, and change the spacing.
-
Click Apply to place the repeated line as an embroidery.
The first option is a straight line. The other 7 line types are curved.
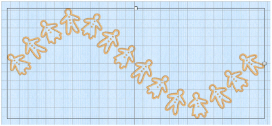
With a straight line, only the handle on the right is available.