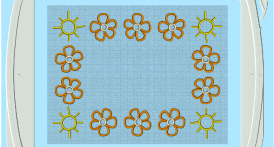
Place up to two selected embroideries around the edge of the hoop, to make a border or frame.
The maximum size limit for Encore Hoop is 2000mm.
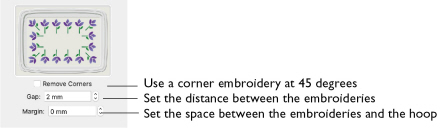
Remove Corners: The embroidery is repeated along the sides of the hoop, with one embroidery placed at 45 degrees in each corner of the hoop. Select Remove Corners if you do not want this embroidery in the corners.
Note: If two embroideries are selected, the embroidery that is first in the stitchout order is placed in the corners. Use the FilmStrip or Layout Order to change the order.
Gap: Set the minimum spacing between repeated embroideries.
Increasing Gap moves the embroideries further apart. Decreasing Gap moves the embroideries closer together. Negative Gap overlaps embroideries by up to 50%.
Note: The spacing will be increased if the Gap value would give a partial number of repeats on either side of the hoop. Thus, the spacing between the embroideries may differ on the long and short sides of the hoop.
Margin: Set the space between the line of repeated embroideries and the edge of the hoop. The maximum Margin is half of the shortest hoop dimension.
To Adjust Encore in a Hoop
-
Change the Gap between the individual embroideries.
-
Change the Margin between the embroideries and the edge of the hoop.
Use Repeated Embroideries in a Hoop
-
Place 2 small embroideries on the work area and select them.
-
Open the Encore window
 of the Control Panel
  .
. -
In Type, select Hoop
 . The Hoop options appear.
 -
Select the Position (standard
 or mirrored
  ).
). -
Ensure that Remove Corners is not selected.
-
Set the Gap between the embroideries.
-
Set the Margin between the line of embroideries and the hoop.
-
If desired, select Group and Arrange Similar.
-
Click Preview. The Encore forms a frame around the inside edge of the hoop.
-
Adjust the Margin and Gap as desired.
-
Click Apply to place the Encore as an embroidery.
The embroidery that you loaded first is in the corners.