Use Life View  to show how an embroidery exported from the project will look in 3D with real-world perspective. Zoom in to see detail, and move and rotate the embroidery in a three-dimensional view. All parts of the embroidery that are within the hoop area are shown, whether or not they are selected.
Use Life View  at any time when you want to see the design with no grid, stitches selected, or markers displayed, and when you want to see the effects of glow in the dark and solar reactive threads.
-
Any background garment, quilt block or fabric is shown, together with appliqué fabric, if present.
-
Decorations are shown, but not their placement stitches.
To Select Life View
-
Click the Life View button

on the toolbar.
-
Choose View > Life View.
-
Press ⇧⌘Y
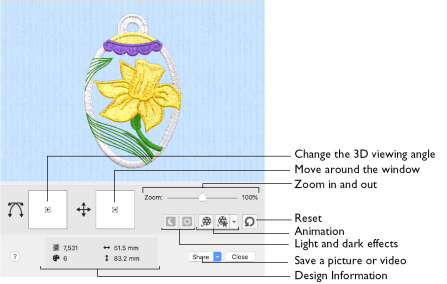
Position
Use the position ![]() slider to move to another part of the Life View window.
slider to move to another part of the Life View window.
-
Drag the cross marker in the center of the box to view the desired part of the embroidery, using the zoom slider to control the magnification.
Rotation
Use the rotation ![]() slider to view the stitching in the embroidery in 3D.
slider to view the stitching in the embroidery in 3D.
Note: Use the zoom and position sliders to select the part of the embroidery to view.
-
Drag the cross marker in the center of the box to change the angle at which the embroidery is viewed, and allow you to visualize the project in varying real-world views.
-
Alternatively, drag directly in the embroidery preview area to change the angle of view.
Zoom
Use the zoom slider to change the magnification of the embroidery. The box below the zoom bar displays the current magnification.
Note: When zoomed in, use the position slider to move around the embroidery.
-
Drag the slider to the right to magnify the view of the embroidery, and to the left to shrink the view of the embroidery.
-
Click the marker in the center of the zoom bar (100%) to view the embroidery at a magnification as close as possible to the Real Size setting you chose in mySewnet™ Configure.
Design Information
View the dimensions (Width ![]() and Height
and Height ![]() ), the number of stitches
), the number of stitches  and the number of colors
 ![]() in the embroidery.
in the embroidery.
Glow in the Dark
Use Glow in the Dark ![]() to view the effect of using glow in the dark threads. The preview darkens to simulate the lights dimming, and the glow in the dark threads are shown in their luminescent colors.
to view the effect of using glow in the dark threads. The preview darkens to simulate the lights dimming, and the glow in the dark threads are shown in their luminescent colors.
Note: Glow in the Dark is only available if glow in the dark thread colors are present in the design.
-
Click Glow in the Dark
 to view the effect of luminescent threads.
Solar Reactive
Use Solar Reactive ![]() to view the effect of using photochromic threads. The preview simulates the sun shining on the design, and the photochromic threads change shade to show the colors they become in sunlight.
to view the effect of using photochromic threads. The preview simulates the sun shining on the design, and the photochromic threads change shade to show the colors they become in sunlight.
|
|
|
|
Photochromic threads change color in sunlight. |
|

Note: Solar Reactive is only available if photochromic thread colors are used in the design.
-
Click Solar Reactive

to view the effect of photochromic threads.
Play Demo
Use Play Demo ![]() to animate the preview and show the embroidery at different angles automatically.
to animate the preview and show the embroidery at different angles automatically.
-
Click Play Demo
 to start and stop the animation.
Play My Demo
Use Play My Demo ![]() to animate the preview using your own demo. Use the menu options to add the current position as a point in the demo, or reset to create a new demo.
to animate the preview using your own demo. Use the menu options to add the current position as a point in the demo, or reset to create a new demo.
The My Demo animation is used for Life View in all mySewnet™ Embroidery Software apps. It is stored in the AnimationPath.txt file in the /[User] folder.
Note: Copy this file to another location as a backup before creating additional My Demo animation paths for Life View.
-
Click Play My Demo
 to start and stop your saved animation.
 -
Choose Play My Demo > Store Demo Point to save a point for your demo.
Create Your own Demo
-
Adjust the window to the desired position and rotation.
-
In the Play My Demo pop-up menu, choose Store Demo Point.
-
Adjust the window again, and store more demo points.
-
When complete, select Play My Demo to see a preview animation between the stored positions.
-
Click Play My Demo

to start and stop the saved animation.
Note: To start again from the beginning, in the Play My Demo pop-up menu, choose Reset My Demo.
Reset
Use Reset ![]() to set Rotation, Position and Zoom back to the default settings.
to set Rotation, Position and Zoom back to the default settings.
Share
Use Share to save a picture or video of your design. See Share Picture and Share Video.
-
Choose Share > Share Picture to share a picture.
-
Choose Share > Share Video to share a video.