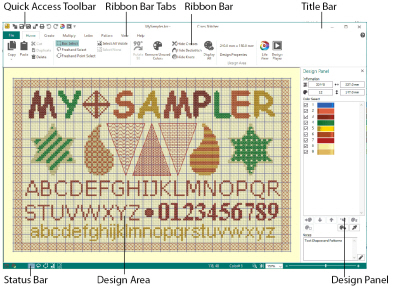
The title bar at the top of the window is highlighted if mySewnet™ Cross Stitcher is active. The title bar shows the module name and the name of the currently loaded cross stitch design.
The Quick Access toolbar gives icons for the following frequently used features: Insert, Save, Save As, Export, Print, Undo, Redo, Life View and Design Player. If more than one instance of mySewnet™ Cross Stitcher is open, each open window will show the name of the cross stitch design file.
Ribbon Bar
There are 8 tabs on the ribbon: File, Home, Create, Multiply, Letter, Pattern, View and Help.
An alternative way to access ribbon options is to press the Alt key, then the highlighted letter of the tab, followed by the highlighted letter of the tab item, e.g. Alt, H, U to remove unused colors in the design. Some functions are available by pressing the Ctrl key and another key at the same time. These shortcuts are shown in the tooltip for the relevant function.

Use the Home tab to select, copy, move and rotate parts of a design; to view and hide crosses, backstitch and knots, and to display the design with Life View and Design Player.
Use the Create tab to draw and erase crosses, backstitch and French knots, to flood fill areas with crosses or a pattern, and to draw shapes.
Use the Multiply tab to repeat stitch placement or edit actions automatically by reflecting across, down or rotating.
Use the Letter tab to add lettering using Fixed or TrueType fonts. Create new fonts from most TrueType® or OpenType® fonts on your computer.
Use the Pattern tab to choose fill patterns for use with shapes and lettering, and to create new patterns from a small stitch design.
Use the View tab to adjust the Grid, measure a design, show and hide the background picture, and change the view mode.
The work area is the area where the design is displayed and edited.
The design area is the area within the work area where stitches can be placed and edited. Use View Mode to switch between 3D ![]() , 2D
, 2D ![]() and Block
and Block ![]() stitch views.
stitch views.
When the grid is shown, this shows the extent of the design area. When the Grid is on, the design area shows grid lines with uniform spacing. If chosen, there may be dark grid lines every five or ten grid squares. Each grid square corresponds to one cross in the design.
If there is a background picture, this is only shown within the design area.
To the right of the work area is the design panel.
The Design Information shows the dimensions (Height ![]() and Width
and Width ![]() ), Stitch Count
), Stitch Count ![]() , and number of colors
, and number of colors ![]() for the active design.
for the active design.
The Color Select area shows all the currently available thread colors. Thread colors can be added as desired or added automatically. Use the Move and Merge color buttons to change the thread order. Use the Notes box to enter details about the design.
The status bar is found at the bottom of the window. Starting from the left, the status bar shows:
-
The selection tools.
-
The pointer coordinates.
-
The zoom tools and Zoom Bar.