Hints on Planning Cross Stitch Designs
The Design Area is determined by the Width x Cross Size and Height x Cross Size. It is shown on the Design Size page of the Cross Stitch Design Wizard and in Design Properties.
The Width and Height in the design Information in the Design Panel gives the size of the actual embroidery that will be created from the current cross stitch design.
If there are French knots at the edges of a design, the embroidery Width and Height may be greater than the Design Size.
When an area is flood filled, the fill does not relate to the background picture. An empty area can be flood filled until it meets existing crosses and/or backstitch. A connected area of the same colored crosses can be flood filled until it meets an empty area, backstitch or crosses in a different color.
Sometimes it may help to hide the background picture so that you can clearly see the area you wish to flood fill; for example, if there are lines in the background picture that are similar to backstitch.
Stitch Layers and Movement Stitches in the Embroidery
When you create an embroidery from a cross stitch design, mySewnet™ Cross Stitcher generates crosses in the color order in the palette. Then the palette order is repeated for backstitch and French knots.
If there are backstitch and French knots in the same color, the backstitch is stitched out and then the French knots, all as a single color block. To ensure French knots are stitched after a different backstitch color, use the Color Select area to change the order of thread colors in the palette.
Movement stitches are automatically placed between each color area, and between crosses of the same color if they are not connected. Minimize movement stitches, and therefore the trims required after embroidery, by linking crosses of a color to at least one other cross in that color.
For a neat finish to your cross stitch embroideries, trim the movement stitches before each color change.
Standard Backstitch and Freehand Backstitch
Standard Backstitch ![]() is drawn in short sections that snap to the sides and diagonals of grid squares. This means the end points for Standard Backstitch are the corners of the grid squares.
is drawn in short sections that snap to the sides and diagonals of grid squares. This means the end points for Standard Backstitch are the corners of the grid squares.
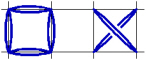
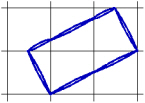
Freehand Backstitch ![]() is drawn as a separate layer to Standard Backstitch. Freehand Backstitch is placed using end points that snap to half grid spacing anywhere on the design. This means that a single section of Freehand Backstitch can be any length that will fit within the design.
is drawn as a separate layer to Standard Backstitch. Freehand Backstitch is placed using end points that snap to half grid spacing anywhere on the design. This means that a single section of Freehand Backstitch can be any length that will fit within the design.
Although the screen shows Standard Backstitch and Freehand Backstitch as separate layers, they are stitched out together when they are the same color. There will be movement stitches between sections of backstitch if they do not connect at an end point. Freehand Backstitch will not join to other backstitch without a movement stitch if it simply crosses over without the end points connecting. To reduce movement stitches, place Freehand Backstitch so that the end points connect to Standard Backstitch sections or other Freehand Backstitch sections.
It is possible to place Freehand Backstitch directly on top of Standard Backstitch and both sections will be stitched. This can be used for special effects, such as thickening a line without having to change the number of threads in Color Properties ![]() .
.
French Knots and Movement Stitches
French knots are stitched individually. They are not connected to other stitches. Therefore, there are movement stitches to and from all French knots. Use French knots to add decorative details to your designs.
The number of stitches shown in the Design panel and printouts is an approximation and may not match the number of stitches shown when the embroidery is copied or loaded into other mySewnet™ Embroidery Software modules.
Use the print options on the File menu or the Print icon ![]() to print a worksheet for the embroidery created from the design.
to print a worksheet for the embroidery created from the design.