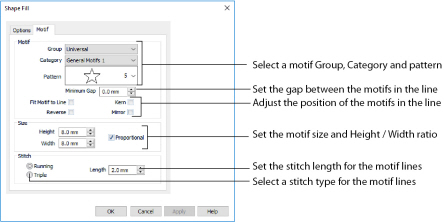
The selected Motif is only used by the Shape Fill if the Use Motifs option is selected on the Options tab.

Click the drop-down arrow to select the desired group of motif patterns.
Click the drop-down arrow to select the desired category of motif patterns.
Click the drop-down arrow to select the desired motif visually. Motifs are also numbered for convenient reference.
The Minimum Gap is the minimum amount of extra stitching that is placed between the motifs along the line. This is in addition to any spacing that is part of the selected motif.
Select this option to make the shape of the motifs follow the curves of the line.
|
|
|
|
When Fit To Line is off, the ends of each motif are placed on the line. |
When Fit To Line is on, each motif is adjusted to fit along the line. |
Use this option to reverse the direction of the motif along the line. This is useful, for instance, if you have placed a QuickStitch™ Motif Line and wish to reverse the motif direction. Some motifs are symmetrical and will have no apparent change when they are reversed.
Use Kern to automatically increase the space between adjacent motifs where necessary, so that the motifs fit along the line without overlapping.
Use this option to mirror the motif across the line of motif fill. Some motifs are symmetrical and will have no apparent change when they are mirrored.
The Height and Width are initially set according to the chosen motif. The maximum and minimum values for Height and Width are individual to each motif.
Use this option to keep the relative Height and Width in proportion when either is changed.
Select Running or Triple stitch for stitching out the motifs. Set the maximum stitch Length from 1 to 12mm in steps of 0.1mm. Length is initially set to the recommended value for each motif.

