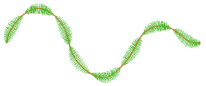
Tapered Motifs form columns of motifs that vary in size according to the width of the column. Tapered motifs are often used in lace designs.
Use the Tapered Motifs Options to set the motif type, stitch type, and placement method.
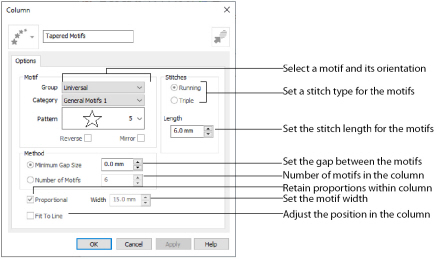
Click the drop-down arrow to select the desired group of motif patterns.
Click the drop-down arrow to select the desired category of motif patterns.
Click the drop-down arrow to select the desired motif visually. Motifs are also numbered for convenient reference.
Select Running or Triple stitch for stitching out the motifs. Set the Length of stitches from 1 to 20mm in steps of 0.1mm. Length is initially set to the recommended value for each motif.
Method
The Minimum Gap is the minimum amount of extra stitching that is placed between the motifs along the line. This is in addition to any spacing that is part of the selected motif.
Number of Motifs
Set the number of Motifs from 2 to 50. The initial number is 6.
Select this option to make the shape of the motifs follow the curves of the line.
|
|
|
|
When Fit To Line is off, the ends of each motif are placed on the line. |
When Fit To Line is on, each motif is adjusted to fit along the line. |

Use this option to keep the relative height and width of the motif in proportion when the column width is changed. This option is selected by default.
The Width is initially set according to the chosen motif. The maximum and minimum values for Width are individual to each motif.
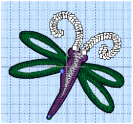
Create Textured Antennae for a Dragonfly Embroidery
-
Click File, New
 to open a new window.
 -
In the Quick Access toolbar, click Insert
 .
. -
In the folder Documents\mySewnet\Samples\Stitch Editor\Stitch, open the Perky Dragonfly embroidery to load it.
-
Click the Object tab.
-
Use Ctrl + click to select both of the antennae.
The main stitch type in the antennae is Satin Column. -
In the Convert drop-down list, select "Satin Column to Tapered Motifs". The Tapered Motifs properties dialog box appears.

If any stitch type other than Satin Column is listed as the stitch type to convert from, deselect and select again. -
Set the Motif Group to Universal and the Category to Hand Stitches 1.
-
Set the Pattern to 4, a blanket stitch.
-
Leave the other settings unchanged, and click OK to close the dialog box.
-
Click outside the dragonfly to view the changed antennae.
Some of the underlay lines may still be present. However, this is not a problem as it adds a texturing effect.