Use Insert Color Command ![]() to add a new color change at the point where you click.
to add a new color change at the point where you click.
Click the icon and the pointer changes to the insert color pointer  . Then click on the stitch where you want the color change. The Color Selection dialog box is displayed for you to select the thread color for the new color change.
After you have selected a thread color, the new Color Change command  is shown by a blue circle with a C.
The Color Change command marker will become smaller when Insert Color Command is deselected.
The stitches in the embroidery are displayed in the new color after the new color change and up to the next color change. When you select the Design Panel you will see the new color block in sequence in the color worksheet according to where you inserted the Color Change command.
To cancel the function, right-click on the work area, or click Cancel in the Color Selection box.
Shortcuts
-
Modify Stitch, Modify Tab:

-
Keys: Alt, M, IC
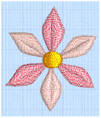
Change Alternate Petal Colors in a Flower
-
Click File, New
 to open a new window.
 -
In the Quick Access toolbar, click Insert
 .
. -
In the folder Documents\mySewnet\Samples\Stitch Editor\Stitch load the 'Flower Pink’ embroidery.
-
Ensure that the Design Panel is available.
-
Double-click the first color in the worksheet and the Color Selection box appears.
-
Click Show All Thread Ranges, then click the drop-down arrow on the Thread Range box and scroll up to select Robison-Anton Rayon Twist 35.

-
Browse for thread number 79020 (Baby Pink) in the list and select it.
Alternatively, enter 79020 in the Find Thread box. -
Click OK to close the Color Selection box, and the thread color of the petals will change.
-
Change the second color in the worksheet to Robison-Anton Metallic J 40, thread number 1001 (Gov’t. Gold), then click OK. The center color changes.
-
Click Draw Next Color Block
 to show only the first color in the worksheet.
-
Click Zoom To Rectangle
 . The mouse pointer will change to the zoom pointer
  .
. -
Click and drag to draw a rectangle inside the flower, a little way inside the tips of the petals, then release the mouse button to zoom in.
-
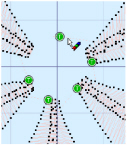
In the View tab, click 2D View with Stitch Points, so that the flower is shown in 2D, and you can see the black dots that represent the stitch points in the embroidery.
-
Move the Draw From Start slider bar so that the first petal is hidden, leaving only the Trim command
 at the end. There should be a stitch point at the center of the Trim command marker. The start stitch is shown as 280.
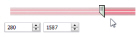
Stitch numbers are given as guides only. It is more important to ensure that the correct stitches are hidden or left showing than to follow the exact stitch numbers. -
Click the Modify tab.
-
Click Insert Color Command
 . The Trim command markers become much larger, and the mouse pointer changes to the insert color command pointer
  .
. -
Click on the pale pink line showing the stitch to the right of the Trim command at the end of the hidden petal. The Color Selection box will appear.
-
Choose Show All Thread Ranges, then set the Thread Range to Robison-Anton Rayon Swirl 35.
-
Select thread number 017 (Soap Stone), then click OK to close the Color Selection box. The thread color of the visible petals will change.
The Trim command is replaced, as it is not necessary to have a Trim and Color Change adjacent to each other. -
Move the left Draw Range slider bar so that the start stitch is shown as 537. This will hide the next petal, leaving only the Trim Command and its stitch point at the end.
-
Ensure that Insert Color Command
 is still selected, and click on the stitch below the Trim Command at the end of the hidden petal.
 -
In the Color Selection box select thread number 79020 (Baby Pink) from Robison-Anton Rayon Twist 35 and click OK. The thread color of the visible petals will change.
-
Move the left Draw Range slider bar so that the start stitch is shown as 794.
-
Ensure that Insert Color Command
 is still selected, and click on the stitch below the Trim Command at the end of the hidden petal.
 -
In the Color Selection box select thread number 017 (Soap Stone) from Robison-Anton Rayon Swirl 35 and click OK.
-
Look at the Design Panel.
-
Move the left Draw Range slider bar so that the start stitch is shown as 1062.
-
Ensure that Insert Color Command
 is still selected, and click on the stitch to the left of the Trim Command at the end of the hidden petal.
 -
In the Color Selection box select thread number 79020 (Baby Pink) from Robison-Anton Rayon Twist 35 and click OK.
-
Move the left Draw Range slider bar so that the start stitch is shown as 1330.
-
Ensure that Insert Color Command
 is still selected, and click on the stitch above the Trim Command at the end of the hidden petal.
 -
In the Color Selection box select thread number 017 (Soap Stone) from Robison-Anton Rayon Swirl 35 and click OK.
-
Right-click to deselect Insert Color Command.
-
Click Draw All Stitches
 on the Control Strip.
 -
In the View tab, click 3D View
 and then click Zoom to Fit
  .
. -
Look at the Design Panel.
-
Click the Home tab, and in the Tools area click ColorSort

. The colors are sorted, and then the design information and slider bar shows how the number of color changes has been reduced.
-
Click File, Save As and the Save As dialog box will appear.
-
In the Save As Type box, ensure .vp4 is selected. Browse to the folder Documents\mySewnet\My Designs and in the File Name box change the name to 'Flower Pink Twist'. Then click Save.
It may be easier to visualize the design if you enable Ghost Mode ![]() .
.
To get to the desired stitch number quickly, drag the slider to a nearby stitch number, then click the arrows in the stitch number boxes to adjust the number in single steps. Alternatively, type in the stitch number in the box below the slider bar.
Notice that the new color blocks are shown in the color worksheet and Control Strip as they are added, alternating between the Swirl and Twist colors.
Notice the number of colors in the design Information is seven.
Notice on the color worksheet that there are now only three colors in the embroidery.