Use Export ![]() to save the embroidery in the current window as a flattened .vp4 file, or in an alternative embroidery format. The embroidery must fit in the currently selected hoop. Use the Design Player to see how the embroidery will be exported according to the current options.
to save the embroidery in the current window as a flattened .vp4 file, or in an alternative embroidery format. The embroidery must fit in the currently selected hoop. Use the Design Player to see how the embroidery will be exported according to the current options.
You can customize the initial Export options in mySewnet™ Configure.
To export appliqué pieces, see Export Appliqué Pieces.
The preferred file format for exporting embroideries is Husqvarna Viking / Pfaff .vp4, as this will preserve background and appliqué information, thread color information and notes.
You can also export embroideries as Brother/Baby Lock/Bernina PEC (.pec), Brother/Baby Lock/Bernina PES (.pes), Compucon/Singer PSW (.xxx), Husqvarna (.hus ,.shv), Husqvarna Viking /Pfaff (.vp3, .vip), Janome (.jef and .sew), Melco Expanded (.exp), Pfaff (.pcs), Tajima (.dst) or Toyota (.10o).
The initial name will be the current file name with "Exported" added. The text "Exported" may be changed in mySewnet™ Configure.
Shortcuts
-
Quick Access Toolbar; File Menu:

-
Keys: Ctrl + E; Alt, 4
Optimize for Sewing Options
All of these options are initially selected when saving as a .vp4 file, or in any other format.
Combine: Merge the embroideries into a single embroidery during Export.
Combine is not enabled if there is only one design, and for embroidery formats that are automatically combined.
Remove Overlap: Prevent areas of stitches building up where embroideries overlap. Remove Overlap is not used if any of the designs contain appliqué.
Remove Overlap is not available when Combine is not enabled.
Only deselect this option if, for example, your embroideries are low density and you wish to have a blend effect where they overlap.
ColorSort: Reduce the number of thread colors during Export. See ColorSort.
Optimize Stitch Length: Automatically remove small and insignificant stitches. See Stitch Length Optimizer Options.
Cutwork Needle lines in the Inspira Cutwork Needle "thread range" and Felting Needle Colors in the Inspira Felting Needle "thread range" are unaffected by Optimize Stitch Length.
Decoration
Create Center or Line placement stitches for Decorations added in mySewnet™ Embroidery, or remove all decorations and their associated placement stitches.
Center placement stitches are recommended when most decorations are individual and symmetrical. Line placement stitches are recommended when most decorations are individual and asymmetrical (such as bugle beads) or lines of closely spaced beads or sequins.
Create Center placement stitches: Create a small cross shape in stitches to show where the decoration is to be placed.
Create Line placement stitches: Create a single stitch that runs along the length of the decoration.
Remove all decorations and placement stitches: Remove all decorations and placement stitches from the exported version. This may be desired to create an embroidery with a complementary crystal transfer template (made using the Export Decoration Template dialog box in mySewnet™ Embroidery).
Hoop Orientation
Set the hoop orientation.
Rotate to fit natural hoop position: Rotate the embroidery if needed to fit with the default hoop orientation for the machine. This option is only available if the hoop on the main screen is in the rotated orientation. It is useful if you prefer to create a "landscape" shaped project in the rotated orientation.
Flip design for felting or reverse embroidery: Flip the embroidery for being stitched in reverse. If an embroidery contains a Felting Needle color effect this option is selected initially. See Felting Needle.
Splitting options
Click the button to open the splitting options dialog box. See Splitting for Multipart Hoops.
Splitting for Multipart Hoops is available if .vp4, .vp3, .pes or .jef is chosen.
Additional Sections
Additional dialog options are available, depending on the chosen file format.
-
If .pes is chosen, you can select your machine type, file version, hoop size and rotation.
-
If .jef is chosen, you can select your machine type, hoop size and rotation.
OK
View the Save, or Saving As dialog, depending on the selected file format.
Export an Embroidery
-
Create an embroidery project.
-
Save the embroidery. See Save.
-
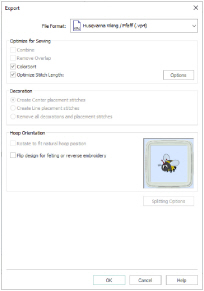
Click Export
 . The Export dialog box appears.
 -
Select an embroidery format from the drop-down list.
-
Select your optimization options.
-
If you are using a multipart hoop, click Splitting Options and set Intelligent or Straight Line split.
-
Click OK.
-
The Save As dialog will appear. Save the embroidery as desired.