Select and Move Individual Stitches
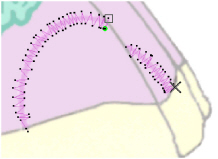
The default action in mySewnet™ Sketch is to select and edit single stitches. This is possible when you have no group of stitches selected in the embroidery and no functions are active. It may be helpful to switch to 2D view by clicking the 3D  icon and zoom in close enough to see the separate stitch points. Ensure Stitch Points is turned on in Screen Preferences
  .
.
Simply click a stitch point and a box appears around the point to show that it is selected. (Alternatively, step through the stitch points one at a time with the left and right arrow keys until the desired stitch is selected.)
You can now move the stitch point by dragging it, or you can Delete  it.
it.
Also, if Insert Mode  is on (highlighted), the selected stitch point will be used as the insertion point for the next function you select or embroidery you paste. For instance, click a stitch and then use Rotational ZigZag
 ![]() . The new stitches will be placed between the selected stitch and the one immediately following it.
. The new stitches will be placed between the selected stitch and the one immediately following it.
If Insert Mode is off  , the stitch is deselected when you draw stitches, insert an embroidery or add a color change.