Draw Free Motion and Zigzag Stitches on the Party Doll Dress
-
Click New
 and in the Design Options page of the Load Design Wizard click Next to accept the default choice of Load Picture for a New Embroidery.
 -
In the Hoop Size page select 150mm x 150mm - Universal Square Hoop 2, click OK, then click Next.
-
In the Choose Picture page load Documents\mySewnet\Samples\Sketch\Pics\PartyDressDoll.png, then click Next and in the Rotate and Crop Picture page click Select All.
-
In the Picture Size page, change the thread color to the dark pink used for the semicircles around the bell of the dress (Sulky Rayon 40 1033 - Dark Orchid).
-
In the Add Alignment Stitches page place one cross alignment stitch at the tip of the finger on the left, and one at the tip of the shoe on the right. Then click Finish.
-
Click Preferences
 . Click the Stitches tab and ensure Allow Variable Stitch Speed is deselected (unchecked). For ZigZag Width, ensure the Minimum is set to 0.1mm and the Maximum is set to 9.0mm. Click OK.
 -
Click the Background icon
 . The icon will change to the Fade Background icon
  and the picture will be shown faded. Fading the picture display makes it easier to see the stitches over the background picture.
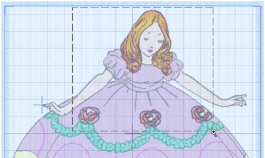
The picture will not be faded when it is printed out for stitching over unless you choose that option in Page Setup. -
Click Zoom To Rectangle
 . The pointer will change to the zoom in pointer
  .
. -
Click and drag around the top part of the doll, then lift the pen or release the mouse button to zoom in.
-
Click the Free tab, and then click Free Motion
 .
. -
Ensure the Free Motion Stitch Speed slider is in the middle of the slider bar.
If you prefer to draw more slowly, move the slider bar two or three steps to the left. You may adjust the Free Motion Stitch speed at any time to suit your drawing speed. -
There is a curved line across the dress that marks the waist. Start at the left end of this line, and draw stitches along the line to the right end of the line.
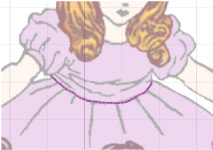
When stitching out, use this single line of stitching as a final check that the picture and embroidery are aligned correctly. -
From the end of the line across the waist, trace over the outlines for the right sleeve. Follow the main outline of the sleeve to the top of the shoulder, but draw in and back to the main outline for the additional details.
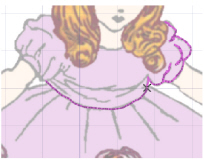
If you need to stop, lift your pen (or release the mouse button) then start drawing again from the point where you stopped. -
Follow the main outline of the sleeve, back over the stitches you just placed, and return to the waist.
-
Trace over the folds in the bodice to travel to the left sleeve.
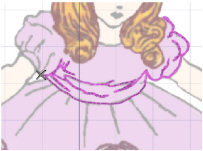
The pictures are examples only. Your own embroidery does not have to be identical to the pictures. -
Trace the left sleeve, tracing over most areas twice, to return to the waist.
-
Trace along the line of the waist again, from left to right, but this time also draw down and back along each of the gather lines of the skirt.
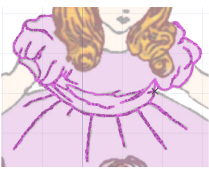
An alternative method, to create lines with a set stitch length, would be to use Running Stitch
on the Standard tab.
-
Click Zoom To Fit
 .
. -
Set the ZigZag Width to 2.0mm.
If you previously reduced the Free Motion Stitch Speed, move the slider back to the middle. -
Click Rotational ZigZag
 .
. -
Trace over each of the dark pink semicircles. Move the pen (or mouse) at a steady medium speed, so that the zigzag stitch is open and evenly spaced.
-
Right-click to deselect the function.
The steps above are described in detail in Load the Party Doll Picture.
These are the default Minimum and Maximum settings for mySewnet™ Sketch, and they are needed to ensure the desired ZigZag Width can be selected.

If you wish to try again with a line of zigzag you have just drawn, right-click, then click Undo. Only the last line of zigzag will be undone. Then click Rotational ZigZag
and draw the line again.
An alternative method, to create semicircles of constant width, would be to use 2mm Satin Line
on the Standard tab.
To add motifs to this picture, see Decorate the Party Dress with Motifs.
Decorate the Party Dress with Motifs
-
Click New
 and in the Design Options page of the Load Design Wizard select Load Sketch Embroidery, then click Next.
 -
In the Load Embroidery page, click Open Embroidery and load Documents\mySewnet\Samples \Sketch\Stitch\PartyDressDoll_Free motion 1 done, then click Finish. The embroidery is aligned with the picture in the work area.
-
Click the Background icon
 to set Fade Background
  and the picture will be shown faded.
 -
Right-click to deselect the box selection tool.
-
Click Pick Color
 . The pointer will change to the eyedropper
  .
. -
Click the light green inside the swag (the decorative green band) and the Color Selection dialog box will appear. If needed, change the thread range to Sulky Rayon 40 and color1046 (Teal) will be selected. Click OK.
-
On the Standard tab, click Motif Line
 , then click the Options button.
 The Motif Line properties dialog box appears.
 -
Ensure the Group is set to Universal. Click the drop-down arrow for Category and select Hand Stitches 2.
-
Click the drop-down arrow for Pattern and select the feather motif numbered 12.
-
Ensure Minimum Gap is set to 0.0mm, and that Fit to Line, Reverse and Mirror are all deselected (unchecked).
-
Leave the Size, but ensure Stitch is set to Running.
-
Click OK to close the Motif Line options dialog box.
-
Ensure Draw is set to Freehand
 .
. -
Starting at the right side of the dress, draw along the center of the first small loop of swag until two motifs have appeared, then stop (lift the pen or release the mouse button).
-
Drawing motifs and other Standard stitches is not affected by the Free Motion Stitch Speed.
-
With Motif Line
 still selected, click Options
  .
. -
Click the drop-down arrow for Category and select General Motifs 1, then click the drop-down arrow for Pattern and select the motif numbered 3.
-
Click the small down arrow on the Height box until the Height is reduced to 7.0mm.
The Width is changed at the same time, to keep the original shape of the motif, as selected by the Proportional option. -
Change the Stitch type to Triple, then click OK.
-
Starting at the right side of the skirt, draw a row of motifs along the centre of the yellow band at the hem of the skirt. Draw the whole line, without stopping until the end.
-
Right-click to deselect motif line drawing.
-
Click Add Color Change
 and the Color Selection dialog box appears. Click Show All Thread Ranges, then click the drop-down arrow for the Thread Range, scroll up the list and select Sulky Metallic 30. Select 7055 (Cranberry) and click OK.
 -
Click Motif Line
 to select it, then click Options
  .
. -
In the Motif Line properties dialog box, set the motif Height to 8.0mm. Click OK.
-
Start a little to the left of the rose furthest to the left, then draw across the rose until a single motif appears, and stop.
-
Draw single motifs over the other two roses, in the same way.
-
Right-click to deselect the function.
Alternatively, you could create this embroidery by following the steps in Load the Party Doll Picture and Draw Free Motion and Zigzag Stitches on the Party Doll Dress.
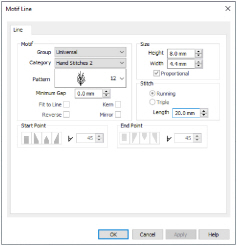
Notice that the motifs only appear once you have drawn far enough to create a whole motif.
Continue to draw along the center of each loop of swag, and stop at the end of each loop. This prevents the motifs from overlapping too much at the top of each loop. The motifs may slightly overlap the semicircles.

You may change motifs and motif settings while Motif Line is still selected.


If you have drawn any motifs out of position, you can Undo
and draw them again.
To adjust the motifs later, use the Select functions. Click the Design tab, then hide all the colors except the metallic red. Click Box Select
, then click and drag to draw a box around the desired motif. A selection box will appear. Move the motif over the rose, then right-click to deselect the function. Click Draw All Stitches
.
To use thread blending in the doll’s hair, see Draw Free Motion Hair with Thread Blending.
Draw Free Motion Hair with Thread Blending
-
Click New
 and in the Design Options page of the Load Design Wizard select Load Sketch Embroidery, then click Next.
 -
In the Load Embroidery page, click Open Embroidery and load Documents\mySewnet\Samples \Sketch\Stitch\PartyDressDoll_with_roses, then click Finish. The embroidery is aligned with the picture in the work area.
-
Click the Background icon
 to set Fade Background
  .
. -
Use the slider on the Zoom Bar to zoom in.
-
Then click and drag in the Overview window until the top part of the doll is shown.
-
Click Add Color Change
 and the Color Selection dialog box appears. Click the drop-down arrow for the Thread Range and select Sulky Rayon 40. In Find Thread, enter the number 1238. Thread 1238 (Orange Sunrise) is selected. Click OK.
 -
Click the Free tab, and then click Free Motion
 .
. -
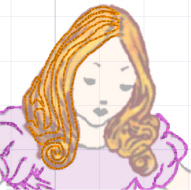
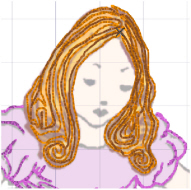
On the left side of the hair, draw strands from the parting down to the curls, swirl around the curls and draw back up to the parting. Do this several times so that the left side is loosely filled.
Draw continuous lines. If you need to stop, start again from where you stopped. -
Draw strands of hair on the right side, using the same method, and end at the parting.
-
Right-click to deselect Free Motion.
-
Click Add Color Change
 and the Color Selection dialog box appears. Select Sulky Rayon 40, 1126 (Tan), then click OK.
 -
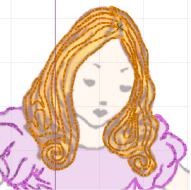
Draw hair on the left side and then the right side, using the same Free Motion
 method. Use fewer lines and try to fill some of the gaps between lines of the previous color.
 -
Finish in the hair curls on the right.
The blended colors give a more natural look to hair. Use similar techniques for fur and feathers. -
Right-click to deselect the function.
-
Click the drop-down arrow next to the Background icon
 and select Background On
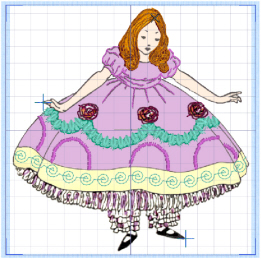
  to preview the result when the embroidery is stitched over the picture.
 -
Click Zoom To Fit
 .
. -
Click the Notes tab in the control panel and then click Edit.
-
In the Notes dialog add the text 'Motifs; Natural Hair'.
-
Click OK to save the changes to the notes.
-
Click the Settings tab, and then click Edit. You will notice that the Motifs are already shown.
-
Motif settings are added for each line of motifs drawn. It is recommended to edit the settings to leave only one copy of the information for each motif used, and to remove other duplicate information.
-
Click OK to save the changes to the settings.
-
In the Quick Access toolbar, click Save
 and save the embroidery as 'PartyDressDoll'.
 -
Click Export
 to export the doll embroidery.
 -
In the Export dialog box, ensure that .vp4 is selected and click OK.
-
In the Save As dialog box, browse to Documents\mySewnet\My Designs, and save the embroidery as ’PartyDressDoll Exported’ (a .vp4 file extension is added automatically).
-
Click File, Page Setup and the Page Setup dialog box appears.
-
Ensure Print Worksheet and Print Plan View are selected (checked) and Print Picture is deselected (unchecked).
-
In the Worksheet Options, set the Design Scale to 50% and ensure the Grid is selected. Also ensure that all the Print Information options are selected.
-
In the Plan Options, select Print Whole Embroidery. This will print the whole embroidery over the picture, including the alignment stitches, on the printed plan view page.
-
Click OK.
-
Click File, Print Preview. The main screen will be replaced with the Print Preview.
-
Click Two Page to see the plan view with the worksheet.
-
Click Print and print the worksheet and plan view.
-
Click File, Page Setup and the Page Setup dialog box appears.
-
Deselect Print Worksheet and Print Plan View (uncheck) and select Print Picture.
-
If you wish to print onto transfer paper, select the Flip Picture for Iron-On Tee Shirt Transfer option. Otherwise, ensure it is unchecked if you wish to print directly onto fabric.
-
Ensure Fade Picture is not selected (unchecked). Ensure Align Picture is set to Center, as this will make hooping up easier.
-
Click OK.
-
Load your printer with the transfer paper or printable fabric.
-
Click Print

and print the picture.
-
If you have printed on transfer paper, transfer the picture to your fabric.
-
Hoop up your fabric, with the picture as straight as possible in the hoop.
-
Transfer 'PartyDressDoll' to your embroidery machine, and select it for embroidering on the machine.
-
Use the step stitch-by-stitch function on your embroidery machine, and step forward to the center of the first alignment stitch, over the tip of the finger on the left.
-
Compare the needle position to the position of the cross on the plan view. If they do not match, use the position buttons on the machine to move the needle to the correct position.
-
Step forward through the stitches in the cross until the machine moves to the center of the second cross, which should be over the tip of the shoe on the right.
-
Compare the needle position to the position of the cross on the plan view. If they do not match by more than one or two millimeters, this is probably because the fabric is not straight enough in the hoop. Adjust the fabric in the hoop and repeat from step 45.
-
When the alignment is correct, select the next color in the embroidery (the first 'drawing color') and start to stitch out the embroidery.
-
Use the line around the waist as a final check that the alignment is correct.
Alternatively, you could create this embroidery by following the steps in Load the Party Doll Picture, Draw Free Motion and Zigzag Stitches on the Party Doll Dress, and Decorate the Party Dress with Motifs.
Stitching Out the Party Doll Dress
Print Alignment Stitches Only is used when stitches in the embroidery will obscure the alignment stitches on the plan view.
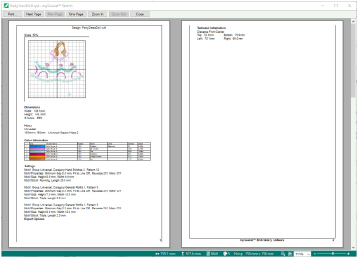
The Top and Bottom settings provide the option to use the transfer paper or printer fabric for more than one picture.