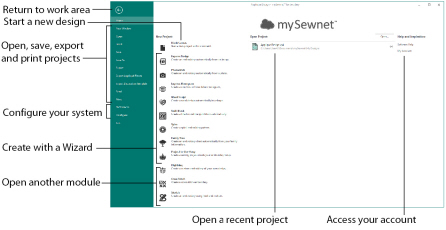
The Welcome Screen appears when you open mySewnet™ Embroidery, and when you click the File menu.

In the Welcome Screen, start a new design from a blank screen, open an existing design, create a design with one of the Wizards, or use the mySewnet™ Cross Stitch, mySewnet™ Digitizing or mySewnet™ Sketch modules.
ExpressDesign Wizard
mySewnet™ Embroidery also includes the ExpressDesign Wizard
. Use it to automatically create embroideries from a picture, either to fit the current hoop or to fit an area you select. Choose from three design types:
|
Express Embroidery |
Express Trace |
Express Border |
|
|
|
|
|
Create a standard embroidery using satin, fill areas and outlining. |
Trace outlines in a picture to create, for example, redwork, quilt stencils and so on. |
Create satin line, appliqué, running stitch, triple stitch or motifs around the edges of solid color areas in the picture. |
PhotoStitch Wizard
Use the PhotoStitch Wizard
to create unique embroideries automatically from your own photos. Generate a linear pattern of stitches, or a Maze or Spiral effect, using one thread for a single color result.
|
Color PhotoStitch Embroidery |
Sepia PhotoStitch Embroidery |
Monochrome PhotoStitch Embroidery |
Color Tile PhotoStitch Embroidery |
Linear PhotoStitch Embroidery |
|
|
|
|
|
|
|
Create an embroidery from a color photo, using multiple threads for a full color result. |
Create a sepia embroidery from a photo to give a heritage look, similar to old photos. |
Create a grayscale embroidery from a black and white photo. |
Create an embroidery from a color photo, generating small blocks of stitches with a tiled effect. |
Create a single thread embroidery from a photo, generating a linear pattern of stitches, or a Maze or Spiral effect. |
Spiro Wizard
Use the Spiro Wizard ![]() to create intricate spiral designs in multiple colors, using Running, Double or Triple stitch lines.
to create intricate spiral designs in multiple colors, using Running, Double or Triple stitch lines.
Quilt Block Wizard
Use the Quilt Block Wizard
to create a filled or outline quilt block automatically. Place a quilting fill around an embroidery!
|
Filled Quilt Block; Inner Embroidery |
Outline Quilt Block; Filled Inner Shape |
Filled Quilt Block; Outline Inner Shape |
Filled Quilt Block; No Inner Shape |
Outline Quilt Block; No Inner Shape |
|
|
|
|
|
|
|
Create a filled quilt block surrounding an embroidery. |
Create an unfilled quilt block containing a filled shape. |
Create a quilt block with an unfilled shape, surrounded by a fill. |
Fill a quilt block with a motif or pattern. |
Create a quilt block without any internal shape or fill. |
Audition Features
Use the Background Wizard ![]() to view your embroideries on real garments, fabrics and quilt blocks. Also view, reposition and store an unlimited number of appliqués and decorations for your designs.
to view your embroideries on real garments, fabrics and quilt blocks. Also view, reposition and store an unlimited number of appliqués and decorations for your designs.
Split Project Wizard
Use the Split Project Wizard
to split your embroidery automatically for your preferred hoop.
Family Tree Wizard
Use the Family Tree Wizard  to create an embroidery chart of your family’s history quickly and easily.
The Reference Guide shows how to start the module and provides a quick tour of the main screen. This is followed by information on key features, with short ’How-To’ examples, which will help you learn how to use the module. It contains full reference information. The Reference Guide is supplied in PDF format
, ready for printing.
To learn about a function, position the arrow pointer over its icon. A tooltip with the function name and some information will appear.
The online help contains the ’How-To’ examples and full reference information. Use the Help icon
, press F1 or click the Help button. Where available, a help topic will appear that is relevant to the item where help was requested.
The Sample Guides show examples of the Fonts, Motifs, and Stitch Types that are available in the mySewnet™ Embroidery Software. The Sample Guides are supplied in PDF format
, ready for printing.
The Fonts Guide shows the keystrokes used to produce the alternative alphabets used in some fonts in the National category.
Viewing and Printing PDF Guides
To find all the Reference and Sample Guides for your mySewnet™ Embroidery Software software, in Windows® 10 select the Desktop tile on the start screen. Then double-click the mySewnet™ Embroidery Software shortcut on your desktop, and double-click Reference Guides or Sample Guides. Select the desired PDF guide.
To view and print the PDF Guides, you will need a PDF reader such as Windows® Reader (included in Windows® 10) or Adobe® Reader (available from adobe.com).
The most up-to-date details about the mySewnet™ Embroidery Software are in the Readme.rtf file

. (Double-click on a Readme file to open it in WordPad or Microsoft® Word.)
Samples are provided for your use. Download the sample files from the Downloads page: download.mysewnet.com. Copy the samples folder to the folder of your choice.
For the exercises in this manual, the mySewnet folder is used.


