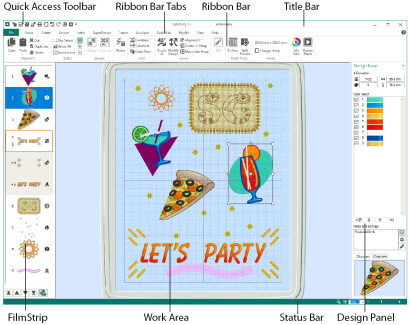
The title bar at the top of the window is highlighted if mySewnet™ Embroidery is active. The Quick Access toolbar gives icons for the following frequently used features: Insert, Save, Save As, Export, Print, Change Hoop, Undo, Redo, Life View and Design Player. 
If more than one instance of mySewnet™ Embroidery is open, each open window will show the name of the embroidery file.
There are 12 tabs on the ribbon of mySewnet™ Embroidery: File, Home, Create, Encore, Letter, SuperDesign, Frame, Appliqué, Embellish, Modify, View and Help.
An alternative way to access ribbon options is to press the Alt key, then the highlighted letter of the tab, followed by the highlighted letter of the tab item, e.g. Alt, H, R to change between scale and resize modes. Some functions are available by pressing the Ctrl key and another key at the same time. These shortcuts are shown in the tooltip for the relevant function.
Use the Home tab to select, copy, group designs, resize, align and rotate, change threads with Color Tone, change the hoop and use the multi-hoop Endless  and Split Project
 ![]() wizards, and display embroideries with Life View and Design Player.
wizards, and display embroideries with Life View and Design Player.
Create Tab
Use the Create tab to access the wizards. These are: the ExpressMonogram Wizard ![]() , the ExpressDesign Wizard
, the ExpressDesign Wizard ![]() , the PhotoStitch Wizard
, the PhotoStitch Wizard ![]() , the Word Sculpt Wizard
, the Word Sculpt Wizard ![]() , the Quilt Block Wizard
, the Quilt Block Wizard ![]() , the Spiro Wizard
, the Spiro Wizard ![]() , the Family Tree Wizard
, the Family Tree Wizard  , and the Project-in-the-Hoop Wizard
 ![]() . You can also access mySewnet™ Digitizing, mySewnet™ Cross Stitcher and mySewnet™ Sketch here.
. You can also access mySewnet™ Digitizing, mySewnet™ Cross Stitcher and mySewnet™ Sketch here.
Use the Encore tab to repeat embroideries along 8 different line types, in a circle, around one of 28 shapes, or to border your hoop.
Use the Letter tab to add lettering using single or multicolor fonts, fonts using puffy foam or special color effects, and fonts with alternative alphabets. Use the font gallery to choose a font visually from the font categories. Place characters with 35 different lettering shapes, 31 of which can be used with multi-line lettering, and 29 can be used with individual lettering. Select the size, line formatting and adjust stitch types and settings in most fonts. Use the Font Manager to search for fonts by name and size, and to create and delete user fonts. Use the QuickFont Wizard ![]() to create new fonts for mySewnet™ Embroidery from most TrueType® or OpenType® fonts on your computer, and use Import Font from Embroideries
to create new fonts for mySewnet™ Embroidery from most TrueType® or OpenType® fonts on your computer, and use Import Font from Embroideries ![]() to create a font from embroideries of letters.
to create a font from embroideries of letters.
Use the SuperDesign tab to add SuperDesigns, and adjust their size and appearance.
Use the Frame tab to surround a design with over 700 beautiful decorative frame and flourish options, including frames designed for puffy foam. Place flourishes above, below, or as a duo. Create a border automatically (optionally with appliqué fabric and placement stitching), or individual decorative motifs, or a motif underline.
Use the Appliqué tab to view and adjust appliqué pieces. The appliqué fabric is shown under the embroidery, as it would appear when stitched out.
Use the Embellish tab to decorate your chosen background and embroidery with beads or sequins, and hotfix crystals or nailheads.
Use the Modify tab to edit and insert stitches, or select a block of stitches for editing. Hide stitches by color or by using the draw range, to help with selecting the desired stitches. Cut and copy blocks of stitches or whole embroideries and paste to attach them to the last visible stitch. Insert new color changes and Stop commands with stitchout hints, change the order of colors and merge color blocks.
Use the View tab to adjust the Grid, measure a design, show and create garment, quilt block and fabric backgrounds with the Background Wizard ![]() , and change the view mode or hoop.
, and change the view mode or hoop.
The work area is the area where embroideries are loaded. The work area includes the area surrounding the selected hoop. It is where you make changes to an embroidery. The stitch area is the available area inside the selected hoop.
Stitches are drawn in the appropriate colors. The embroideries are shown in either 3D or 2D. The background color and texture can be changed using mySewnet™ Configure ![]() .
.
A background garment, fabric or quilt block may be displayed.
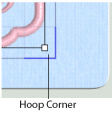
In Standard 3D view ![]() the real hoop is shown, with blue corners showing the stitch area within the hoop. The background is shown.
the real hoop is shown, with blue corners showing the stitch area within the hoop. The background is shown.

In Realistic 3D view ![]() the embroidery and background are shown without selection boxes, grid or hoop.
the embroidery and background are shown without selection boxes, grid or hoop.
In 2D view ![]() , the hoop size is shown by a blue outline with bold corners. Stitches are drawn in plain colors only, and stitches using multicolor threads are drawn using only the first color in the thread definition. The background does not use texture in 2D view.
, the hoop size is shown by a blue outline with bold corners. Stitches are drawn in plain colors only, and stitches using multicolor threads are drawn using only the first color in the thread definition. The background does not use texture in 2D view.
The work area has a grid, which can be turned on or off in the View tab, and the grid size changed. Zooming in or out makes the grid squares look bigger or smaller. The grid size can be changed from 2mm to 50mm using the View tab.
To the right of the work area is the Design Panel. Use the Design Panel to change colors, and to add or edit the Notes and Settings.
The Design Information shows the dimensions (Height ![]() and Width
and Width ![]() ), Stitch Count
), Stitch Count ![]() , and number of colors
, and number of colors ![]() for the active embroidery.
for the active embroidery.
Color Select
The Color Select area shows the order of the color blocks in the color worksheet and any notes that are included in the embroidery. Click on a color block to change thread colors, and to add thread effects. In the Modify tab, use the color worksheet to show or hide stitches by color block, and move color blocks up  or down
  and merge
 ![]() them. Edit or add information to the Notes and Settings as desired.
them. Edit or add information to the Notes and Settings as desired.
Color Select is blank if no embroidery is selected.
The Clipboard Block shows the embroidery that can be pasted into the work area.
Click in the clipboard to remove the current Clipboard Block.
The overview window gives a small overview of the whole work area for the embroidery.
The status bar is found at the bottom of the window. The status bar shows:
-
The zoom tools and Zoom Bar.