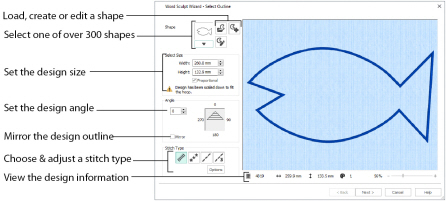
Use the Select Outline page to select a shape for your word design, set its size and angle, choose a stitch type for the outline and adjust its settings.

Shape
Select one of over 300 shapes from the drop-down list, load a shape with Open Shape
, or use New Shape
or Edit Shape
to create or edit a shape in mySewnet™ Draw & Paint.
If you might want to use a shape created in mySewnet™ Draw & Paint again, Save it there before returning.
Enter the desired size for your design.
The default dimensions will depend upon the shape selected, and the current hoop. The minimum size for a design is 20mm and the maximum size is 2000m.
Angle
Use Angle to change the angle at which the outline shape is created and displayed.
Enter an Angle from 0 to 359 degrees. The initial setting is 0.
Alter the Angle by typing a number in the box, or use the up and down arrows to change the number.
Changes in Angle are visible in the preview pane.
Mirror
Select the Mirror checkbox to reflect the design from left to right.
Select the type of outline to create around the word design from one of the following:
After selecting the type of outline, click the Stitch Options button to show the properties for that outline type. If desired, adjust the properties and click OK.
Preview
A preview of the design, and its stitch count
, width
, height
and number of color blocks
is displayed.
Use the zoom bar at the bottom of the screen to zoom in or out from the center of the design.
Use the slider to zoom in or out of the design, or click on the Zoom Out
or Zoom In
icons. The current magnification is displayed to the left of the zoom bar.
Click the center of the zoom bar to view the design at a magnification as close as possible to the Real Size setting you chose in mySewnet™ Configure.
Next
Go to the Select Words page.