Examples of Endless Embroidery Hoop Orientation and Fabric Direction
These pictures show how a heart-shaped embroidery (for example) could be repeated as an endless embroidery.
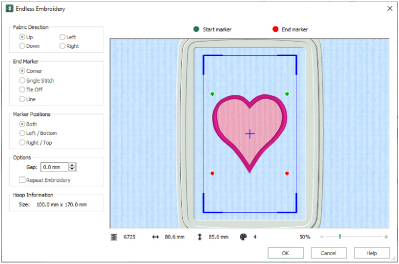
Natural Orientation Hoop with Fabric Moving Up
A hoop with natural orientation is selected, then the Fabric Direction is Up in the Endless Embroidery dialog box:
|
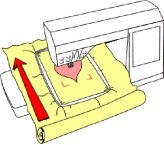
The fabric is hooped and moved in the machine like this: |
This results in a sequence of hearts, stitched in this order: |
|

|
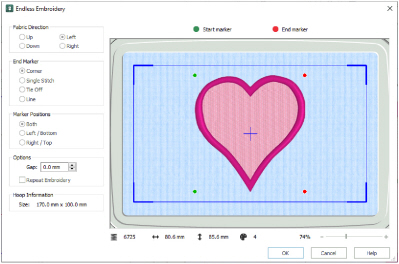
Rotated Orientation Hoop with Fabric Moving Left
A hoop with rotated orientation is selected, then the Fabric Direction is Left in the Endless Embroidery dialog box:
|
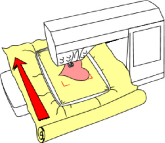
The fabric is hooped and moved in the machine like this: |
This results in a sequence of hearts, stitched in this order: |
|

|
Stitch Out an Endless Embroidery
-
Load the endless embroidery.
-
Click File, Print.
-
In the print preview, set the Design Scale to 100%.
-
Click Print

and print a worksheet of the endless embroidery.
-
If the fabric does not have a straight cut edge you can follow, you may wish to mark a center line on the fabric. Make a crease, a chalk line or a line with light-reactive marker down the full length of the fabric where the endless embroidery will be stitched.
-
Load the endless embroidery on your embroidery machine and hoop up your fabric.
-
Start by stitching out one copy of the embroidery. When the first copy stitches out, ignore the start marker movement stitches.
-
At the end of the stitchout, the end marker stitches will be stitched out last. Note where they are.
-
Re-hoop your fabric, moving it in the direction you chose in the Endless Embroidery dialog box.
-
Use the printed worksheet to confirm that the next copy of the embroidery will fit in the stitch area when the start and end markers are aligned.
-
Tighten the hoop and ensure the existing embroidery is straight, so that the next copy will stitch in a straight line from it. If you marked a center line, this will help to ensure that the fabric is straight.
-
Load the hoop back into the embroidery machine and thread the first color.
-
Instead of starting straight away, use stitch navigation on the embroidery machine to step forward by one stitch to the start marker. Then use the needle position controls to align the needle exactly over the end marker.
-
If you chose to use Both markers on the endless embroidery, step forward by one more stitch to the second start marker to confirm it is over the second end marker.
-
After confirming the alignment is correct, start embroidering.
-
Repeat from step 8 until you have stitched out the desired number of copies.
This is so you can print a worksheet of the endless embroidery at full size to use as a template.
If you marked your fabric with a line, align the center marks on the edges of the hoop with the line.
It is recommended to always make a test stitchout of your endless embroidery on a sample of the final fabric. Stitch out more than one copy to check that the spacing and marker type give the desired result.
For example, if you had a horizontal hoop on screen and chose Left, lay your hoop in front of you horizontally as it would appear on screen and move the fabric to the left in the hoop.
The stitches for the end markers (or single marker if you only used one), must be inside the stitch area so that the start marker for the next stitchout can be aligned.
If you have a hoop template that was supplied with the hoop, use this as a guide to positioning the end marker stitches inside the stitch area.
This is particularly important if you are stitching an endless embroidery with a negative Gap, as you may need to bring the end marker stitches further into the hoop than seems obvious.
If the needle will not move far enough to align correctly with the end marker, this means the fabric is not hooped up with the end marker far enough inside the hoop. You will need to adjust your fabric in the hoop and try again.
If the second marker is not aligned then the fabric may not be straight in the hoop, in which case you should adjust it and try again. Alternatively, there may be pull on the fabric and you may need to choose a compromise position that gives the best fit between the two markers.
Create an Endless Sewing Tools Border
-
Click Change Hoop

. From the Universal Hoop Group, set the Hoop Size to 240mm x 150mm - Universal Large Hoop 2, Rotated orientation. Click OK.
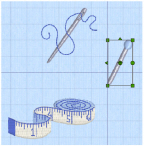
-
Click the SuperDesign tab in the ribbon bar.
-
Select the Home Category from the drop-down menu.
-
Click to select the needle (2 - Needle), then click Apply to load it in the work area.
-
Select the Pin and Tape Measure SuperDesigns (numbers 3 and 6) and load them in the work area.
Use the three designs at their default size. -
Drag the three designs apart, with the Needle at the top, and the Pin and the Tape Measure below, as in the picture.
-
Select the Pin design, and click the

flip horizontal handle to make it face the other way.
-
Ensure that the Pin is between and to the right of the other designs.
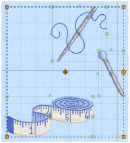
-
Move the designs close together as in the picture. Use Select All

to check the relative positions of the selection boxes around each design.
The designs are positioned so as to show the features of the Endless Wizard.
While the relative positions of the designs are important, their position within the hoop is not. Designs are positioned in the middle of the hoop when they are made Endless. -
Save the design as Sewing Tools.vp4.
This will make it easier to recreate your Endless Design later. -
Click the Home tab in the ribbon bar.
-
Click Endless

to use the design in the Endless Wizard.
All designs that are entirely within the hoop are used for the Endless design. Any designs that are partially or fully outside the hoop will be removed. -
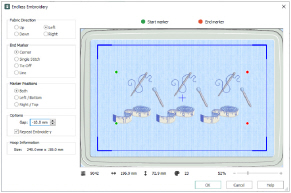
Deselect (uncheck) Repeat Embroidery. Your three SuperDesigns form an individual Endless Design.
-
For this design we will use multiple design sets. Check Repeat Embroidery to view the three sets of designs again.
-
Click OK to view the Endless embroidery section in the work area.
-
Click outside the Grouped Endless design to see the gray stitched Start and End Markers.
-
In the Create tab, click Endless

again to reload the design in the Endless Wizard.
-
The original Start and End Markers were removed, and new ones added when you reopened the design.
-
Deselect (uncheck) Repeat Embroidery. This time there are three sets of designs.
-
Click Cancel to close the Endless dialog box, then click Undo

in the work area to view your original three designs.
-
Click Endless

, and in the Endless dialog box click to select (check) Repeat Embroidery to view the repeated designs.
-
Set Gap to -10.0 mm. The set of designs move closer together, and to the left and right they overlap the Start and End Markers.
-
Click OK to view your Endless design again in the work area.
-
Save your design as Sewing Tools Endless.vp4, and then Export it in a format for your embroidery machine.
-
Click File, Print and preview the worksheet for the Endless design.
The settings that you used for your Endless design can be seen at the top of the Settings area, below the threads. You can use these to recreate the design later. Underneath are the settings for the SuperDesigns that you used. -
In the print preview, set the Design Scale to 100%, then click Print

to print a worksheet for the embroidery.
-
Load the endless embroidery on your embroidery machine and hoop up your fabric.
-
Check the alignment of your fabric, then stitch out the first section of your endless embroidery.
-
Re-hoop your fabric, with the end marker stitches for your first design towards the left of the hoop.
-
Use stitch navigation on your embroidery machine to step forward by one stitch to the start marker.
-
Use the needle position controls to align the needle exactly over the end marker.
-
When the alignment is correct, embroider the second section.
-
Repeat for all of the other sections.
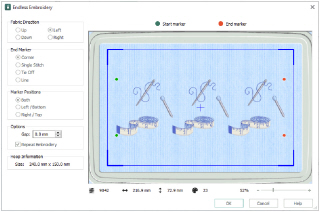
The hoop is in the Rotated position, and the green Start markers can be seen to the left. The design will be stitched from left to right. The red End Markers show where the End marker stitches will be placed after the rest of the design has been stitched.
For a Natural hoop position, Up would be initially selected in Fabric Direction. This creates a vertical line of designs, rather than the horizontal border we are creating here.
Use single designs of this type to add an extra design at the end of a series of Endless embroidery sections.
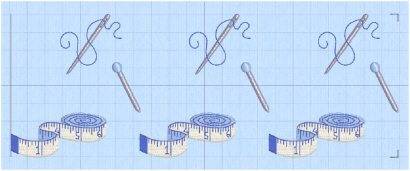
The straight line on the left is the Start Marker, and the corners at the right are the End Marker. The markers are immediately to the left and right of the Grouped designs.
When you reloaded the design the Start and End Markers were removed, however the design was saved as a single Group. To adjust the space between the sets of three SuperDesigns, we need to go back to the original set of three.
Use a negative Gap to overlap the position of designs, or to create a continuous line of adjoining designs.
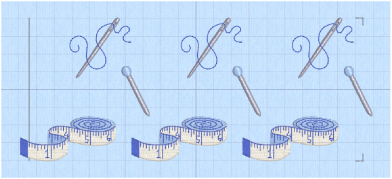
To view how the Endless design will be used, Copy the design, then use File, New Window and in this window set up a very large Custom Hoop (for example, 500 mm x 150 mm). Paste in two copies of your endless design. Place the Start Marker (the gray line) of the second design over the End Markers (the gray corner stitches) for the first design. This is how you will align your designs on your embroidery machine.
You can use this full size worksheet as a template.
An Endless hoop makes life easier, but you can use any hoop with suitable dimensions.
The end marker stitches are stitched out last. Note their position.
Remember that the first part of the Tape Measure will overlap the Start Marker. Leave room for it when hooping up and aligning on your embroidery machine.
If the needle will not align correctly, check the position of the fabric in your hoop before trying again.
For more details on stitching out, see Stitch Out an Endless Embroidery.