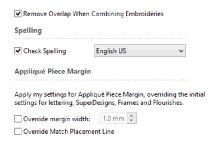
Use Preferences ![]() to choose overlap options and adjust spelling checker settings. When these are changed, the new settings will be remembered when mySewnet™ Embroidery is closed and reopened.
to choose overlap options and adjust spelling checker settings. When these are changed, the new settings will be remembered when mySewnet™ Embroidery is closed and reopened.

Shortcut
-
File Menu:

Remove Overlap When Combining Embroideries
When this option is selected, overlapping areas of embroidery are removed, so that there is no build-up of stitching where embroideries overlap. This is used for the Combine All and Combine Selected functions.
This option is initially selected.
Remove overlap is not used if any of the designs contain appliqué.
When Check Spelling is selected, text entered in the Letters box on the Letter tab is checked for unrecognized words in the selected language. Spelling is also checked in the Letter Properties dialog box that appears when you right-click lettering on the work area. Additionally, new sentences are capitalized. To change the language, click the drop-down arrow and choose the desired language from the list.
Deselect Check Spelling if you prefer not to check spelling.
Unrecognized words may be added to the dictionary when they are underlined in red.
Check Spelling is initially selected, and the language is initially set to English US.
Use the Appliqué Piece Margin settings in Preferences to override the initial appliqué placement settings for lettering, SuperDesigns, Frames and Flourishes.
See Appliqué Selection for more information on using appliqué placement margin and Match Placement Line.
Override the appliqué placement margin for the selected design, using the width set here instead. Set the margin for appliqué placement relative to the selected shape from -10mm to 10mm. The initial value is 1.0mm.
If you prefer always to use a certain value margin width for your automated cutter, set it here.
Override the setting for Match Placement Line in the selected design.
If you prefer always to match the placement line to the appliqué margin (for example, to ensure the placement line is visible when positioning precisely cut pieces), choose this setting.