Use the Appliqué tab of the Fill Area and Line properties dialog box to select an Appliqué Method for appliqué placement, and set the Appliqué Piece Margin. See Fill Area and Line Properties.
Appliqué Placement
When appliqué is created, additional stitches are added at the beginning of the appliqué piece for placing the appliqué fabric. Use these options to determine how these stitches are added. The border used to finish the appliqué is the chosen line type in the Line tab of the Fill Area and Line properties dialog box.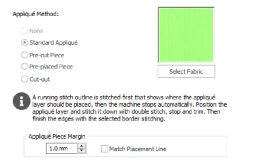
Appliqué Method
Select the appliqué method before or after creating an area or line. Choose from:
-
None
-
Standard Appliqué
-
Pre-cut Piece
-
Pre-placed Piece
-
Cut-out
Standard Appliqué
Stitch a running line to show where appliqué fabric should be placed, then stop to position the fabric. Stitch down the appliqué fabric with double stitch, then stop so the fabric may be trimmed. Finish the edges with the selected border stitching.
Pre-cut Piece
Use a pre-cut appliqué piece; created, for example, using an automatic cutter or cutwork needles.
Stitch a running line to show where the pre-cut appliqué piece should be placed, then stop to position the appliqué piece. Stitch down the appliqué piece with double stitch, then finish the edges with the selected border stitching.
Place the appliqué fabric before stitching.
Place the appliqué layer in position, then stitch down the appliqué fabric with double stitch. Stop so the fabric may be trimmed. Finish the edges with the selected border stitching.
Cut-out
Use the appliqué placement line as a guide to where the fabric should be cut; for example for reverse appliqué.
Stitch a double stitch line. Stop so the fabric may be cut to form a hole defined by the stitched outline. Finish the edges with the selected border stitching.
Select Fabric
Use Select Fabric to choose a fabric for your appliqué in the Appliqué Selection dialog box.
Click Select Fabric and the Appliqué Selection dialog box appears. See Appliqué Selection.
Appliqué Piece Margin
Set the margin for appliqué placement relative to the drawn border shape from -10mm to 10mm. The initial value is 1.0mm.
Use a positive value when trimming the appliqué fabric before the border is stitched, for example with Standard Appliqué and Pre-placed Appliqué. A negative value is recommended for cut-out and reverse appliqué.
Placement stitches are set to 2.0mm initially. To alter the stitch length for individual lines, use the Break Apart function for the area.
Adjust the position of the first running stitch line for either Standard Appliqué or Pre-cut Piece so that it matches the outline of the appliqué piece after the Appliqué Piece Margin has been applied.
This may be useful for precise positioning of appliqué pieces that have been pre-cut with an automated cutter, to ensure the placement line is visible.
Export Appliqué
Use Export Appliqué Pieces  in the File menu to save or print appliqué outlines ready for cutting.
There are five export methods: save as SVG, DXF or FCM files for use in fabric cutters, save as VP4 or VP3 stitch files for use with Inspira Cutting Needles, print as an outline template to cut around, print directly onto printable fabric or an iron-on transfer (this prints the image of the appliqué piece), or save as SVG files with the fabric image placed as the fill for each shape (for use with fully customized layouts).
See Export Appliqué Pieces for more information.