You can add or customize your own Quick Colors themes in the Color Selection or Appliqué Selection dialog box in most mySewnet™ Embroidery Software modules.
-
Open a dialog box with the Quick Colors area such as the Color Selection dialog box.
-
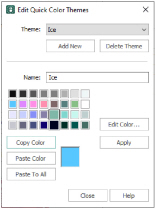
Click the drop-down menu to the right of the Quick Colors and select Edit Themes. The Edit Quick Color Themes dialog box opens.
Note that if one of the system Themes is selected, the editing options will be unavailable (grayed out). -
Select a Theme from the drop-down menu at the top.
Your new Theme will be based on the colors in this theme. -
Click the Add New button. A new theme ’Untitled’ appears.
-
Give your new theme a name, then click Apply.
You can now select your new theme from the drop-down list at the top. -
Select a color in the palette.
-
Click the Edit Color button. The Colors dialog box appears. See Colors Dialog Box.
-
Choose a new color from the Standard or Custom tab, then click OK. Your chosen color will replace the original color.
-
To copy a color, select a color in the palette, then click Copy Color. Your selected color will appear in the Color Box.
-
To paste the color in the Color Box, select a color in the palette, then click Paste Color. The color in the palette will be replaced.
-
To replace all colors in the palette, click Paste To All.
-
Click Apply to save the changes to your new Quick Color Theme.
-
Click Close to finish editing your new Theme.
To make further edits to your theme, select Edit Themes in the Quick Colors Theme menu.