Select TrueType Font on the Letter tab to convert TrueType® or OpenType® characters to crosses, crosses with backstitch outlines or a backstitch outline only. If a fill pattern is selected, it will be used in place of crosses when the text is applied.
Create TrueType Text
-
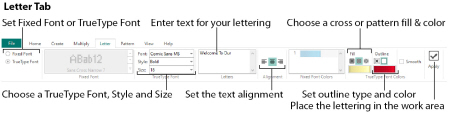
Click the Letter tab on the ribbon bar.
-
On the left of the Letter tab, click TrueType Font.
-
Enter the desired text in the Letters box. Press Enter for extra lines of text.
-
In the TrueType font area, click the Font drop-down menu and choose the desired TrueType® font.
-
Choose the desired text Style from the drop-down menu. The text style is Regular if no other style is selected.
-
If there is more than one line of text, choose Left
 , Center
  or Right
  Alignment.
 -
Adjust the Size as desired. It is recommended to use a minimum Size of 12. The maximum is 200.
-
In Fill type, select Cross Fill
 , Pattern Fill
  or No Fill
  .
. -
In Outline type, select Backstitch Outline
 or No Outline
  .
. -
To select a fill pattern, click the Pattern tab, choose any available fill pattern, then click the Letter tab.
-
If you have selected Cross Fill, click the Cross color and Color Selection dialog box appears. Choose a new cross color for the body of the text and click OK.
-
If you have selected Backstitch Outline, click the Outline color and the Color Selection dialog box appears. Choose a new color for the standard backstitch outline around the characters and click OK.
-
If desired, click the Smooth option so it is selected, to smooth the edges of characters.
Smooth uses three-quarter crosses rather than full crosses to smooth the edges. It is recommended to only use this for large characters. -
Click Apply. The text will appear on the design in a selection box, and Box Select is automatically activated.
-
Click and drag inside the selection box to move the text to the desired position.
-
If desired, change the text or any text options (including fill pattern) and click Apply again to change the text before it is fixed in place.
-
Click outside the selection box to set the text in place.
If colors are used that are not in the palette, they are automatically added to the palette when the text is fixed in the design.
You must do this for each section of text if you are placing several sections of text.
Click the drop-down arrow and choose any TrueType® or OpenType® font installed on your computer.
Shortcut
-
Keys: Alt, E, FO
Click the drop-down arrow and select a Style, for example Regular, Bold or Italic.
Shortcut
-
Keys: Alt, E, ST
Use Size to set the height of the text. Use a minimum of 12 for simple fonts such as Arial, and larger sizes for fonts with more detail.
The maximum Size is 200. It is recommended to place only one character at a time at sizes above 100.
Shortcut
-
Keys: Alt, E, SI
Click in the Letters box and enter the desired text. Press Enter to start a new line of text.
If multiple lines of text have been entered, use the Alignment to change how the lines are placed relative to each other. Choose Left

, Center

or Right

alignment.
Shortcuts
|
Letter Tab: |
Keys: Alt, E, AL |
|
|
Letter Tab: |
Keys: Alt, E, AC |
|
|
Letter Tab: |
Keys: Alt, E, AR |


These options control the way the text is converted to crosses and backstitch.
Select Cross Fill

to use the currently selected Cross color for the characters.
To use a cross type other than Full Cross inside the characters, select the desired cross type from the Cross Basic Category of Fill Patterns.
Shortcut
-
Letter Tab:

-
Keys: Alt, E, CC
Select Pattern Fill

to use the currently selected fill pattern for the characters.
Shortcut
-
Letter Tab:

-
Keys: Alt, E, CP
Use No Fill

to create an outline without a fill.
If both No Outline and No Fill are selected, Apply is grayed out (unavailable).
Shortcut
-
Letter Tab:

-
Keys: Alt, E, CN
Click the Cross color and the Color Selection dialog box appears, so you can choose a new cross color for the text.
Shortcut
-
Keys: Alt, E, CT
Select Backstitch Outline

to place the characters as an outline of standard backstitch in the currently selected Outline color.
Shortcut
-
Letter Tab:

-
Keys: Alt, E, OB
Select No Outline

to place the characters as a fill without an outline.
If both No Outline and No Fill are selected, Apply is grayed out (unavailable).
Shortcut
-
Letter Tab:

-
Keys: Alt, E, ON
Click the Outline color and the Color Selection dialog box appears, so you can choose a new color for the standard backstitch outline around the characters.
Shortcut
-
Keys: Alt, E, OT
Select Smooth to make the edges of characters smooth by using three-quarter crosses rather than full crosses. It is recommended to use this only for large characters.
Shortcut
-
Keys: Alt, E, Sm
Click Apply
and the text will appear on the design in a selection box, and Box Select is automatically activated. Click and drag inside the selection box to move the text to the desired position. The text is not fixed in place until you click outside the selection box.
Shortcut
-
Letter Tab:

-
Keys: Alt, E. Y