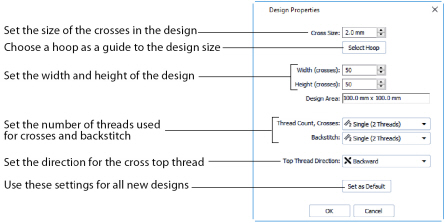
Use the Design Properties dialog to set the cross size, the design size, the number of threads, and to set the direction of the top thread for crosses.
Shortcuts
-
Home Tab; View Tab
-
Keys: Ctrl + D; Alt, H, DP; Alt, V, D
Set the Cross Size for the design from 1.0mm to 30.0mm in steps of 0.1mm.
To create cross stitch designs at the same sizes as real counted fabrics, set the Cross Size as shown:
|
11 |
2.3mm (0.091") |
|
14 |
1.8mm (0.071") |
|
16 (also 32 on Linen) |
1.6mm (0.063") |
|
18 |
1.4mm (0.055") |
|
22 |
1.2mm (0.047") |
Click Select Hoop to choose a hoop in the Hoop Selection dialog. The new design area will be a best fit to the selected hoop, with the current Cross Size. See Hoop Selection.
Set the Width and Height in crosses (grid squares) for the design from 5 to 400.
When the Width and Height are increased, grid squares are added to the edges of the design. When the Width and Height are reduced, grid squares are removed from the edges of the design.
Stitches at the edges of a design may be lost when the design size is reduced. Any freehand backstitch that has an end point outside the new design size is removed.
This is the size of the whole design area, which is the Width x Cross Size and Height x Cross Size. This is shown in millimeters or inches, according to the setting in mySewnet™ Configure.
Change the number of threads used for crosses and backstitch throughout the design, and the top thread direction for crosses.
Note: To make new settings the default settings for all new designs, click Set As Default.
Change the number of threads used to stitch out crosses in the design. Click the drop-down arrow and select the desired number of cross threads.
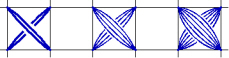
Increasing the number of threads will increase the stitch count in the final embroidery.
This is initially set to Single (2 Threads).
Use Single for small cross sizes. Increase the number of Cross Threads at larger cross sizes to give different density effects.
-
Change the number of threads used for individual design colors in Color Properties.
-
The number of cross threads does not affect the display of crosses on the mySewnet™ Cross Stitcher screen.
Change the number of threads used to stitch out backstitch in the design. Click the drop-down arrow and select the desired number of backstitch threads.
Increasing the number of threads will increase the stitch count in the final embroidery.
This is initially set to Single (2 Threads).
-
Change the number of threads used for individual design colors in Color Properties.
-
The number of backstitch threads does not affect the display of backstitch on the mySewnet™ Cross Stitcher screen.
Change the direction of the top thread for crosses in the design. Select Forward or Backward from the drop-down menu.
This corresponds to the half of the stitch that would be placed by Half Cross Backward or Half Cross Forward respectively.


Use this to change the texture, with light reflecting differently off the threads than for the standard crosses. Top Thread Direction is initially set to Backward.
-
Change the top thread direction used for individual thread colors in Color Properties.
-
The top thread direction does not affect the display of crosses on the mySewnet™ Cross Stitcher screen.
After adjusting the design properties in this dialog, click Set As Default to use these settings for all new designs.