Create a Fill for a Triangle in a Sampler
-
In the Appearance tab of mySewnet™ Configure

, set the Background to RGB 255, 255, 204, and set the Texture to Aida.
-
Open mySewnet™ Cross Stitcher

. The Cross Stitch Design Wizard opens at the Design Options page.
-
In the Design Options page select Load Existing Cross Stitch Design, and then click Next.
-
In the Open Existing Design page, click Load a Design

and browse to Documents\mySewnet \Samples\Cross Stitch\Krz\MySamplerShapesDrawn.krz. Click Finish to close the wizard.
-
Click Zoom To Rectangle

and the arrow pointer changes to the zoom in pointer

.
-
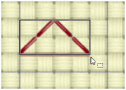
Click and drag around the space in between the triangle and teardrop on the left to zoom in.
-
Click the Create tab on the ribbon bar.
-
Click the Standard Backstitch icon

.
-
In the Design Panel, click the dark red in the Color Select area (color 7, Robison-Anton Rayon 40 2263 Foxy Red).
-
Draw a backstitch triangle inside the area of empty space. Click and drag to place four horizontal sections of backstitch, then two diagonal sections up above the center of the line, then two diagonal sections back down to the end of the line.
-
Click the Home tab on the ribbon bar.
-
Click Box Select

.
-
Click and drag a selection box that exactly fits around the triangle.
-
Click the Pattern tab on the ribbon bar.
-
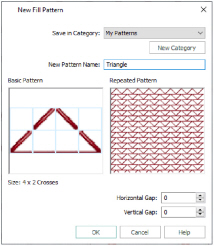
Click Create New Pattern

and the New Fill Pattern dialog box appears. The Basic Pattern shows the area you have selected. The Repeated Pattern shows a preview of how the pattern will look when it is used.
-
Leave Save In Category set to My Patterns. Click in the New Pattern Name box and type Triangle, then click OK. The New Fill dialog box closes.
The pattern is added to MyPatterns, and it is automatically selected as the current Fill Pattern. -
The triangle used to create the pattern is no longer needed. Click on the selection area on the design, click the Home tab on the ribbon bar, then click Delete

to remove the triangle from the design.
-
Click Zoom To Fit

.
-
Click the Create tab on the ribbon bar.
-
Click the Click the Pattern Flood Fill icon

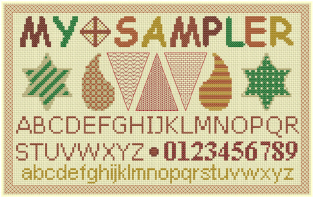
then click inside the triangle on the left. The triangle will be filled with the Triangle pattern you created.
-
Click the View tab on the ribbon bar.
-
Click No Grid

to turn the grid off so that the backstitch can be seen more easily.
-
Click Edit Notes

on the Design Panel. The Notes dialog box opens.
-
In the Notes text box enter 'Text Shapes and Patterns', then click OK to save the notes.
-
In the Quick Access toolbar, click Save As

and the Save As dialog box appears.
-
In the Save As dialog, change the folder to Documents\mySewnet\My Designs if necessary.
-
Change the file name to 'My Sampler' and click Save.
-
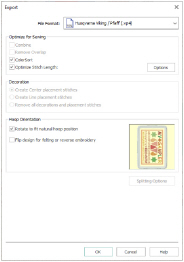
In the Quick Access toolbar, click Export

. The Export dialog box appears.
-
In the Export dialog select .vp4 as the embroidery format and click OK. The Save As dialog box appears.
-
In the Save As dialog box, in the Save In box browse to the folder Documents\mySewnet\My Designs. In the File Name box, leave the name as 'MySamplerExported', then click Export.
-
If desired, in the Quick Access toolbar, click Print

and the Print dialog box appears. Click OK to print a worksheet for the embroidery.
Alternatively, use the design you created in Draw Filled Shapes for a Sampler.
This will be temporary, you could use any area of empty space.
The Create New Pattern button is only available when an area is selected that may be saved as a new fill pattern.
After completing this exercise, use the Appearance tab of mySewnet™ Configure

to set the Background Color back to the default blue (RGB 211, 233, 255), and to change the texture to Woven.