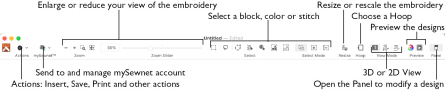
The mySewnet™ Stitch Editor toolbar gives one-click access to many of the features you will use as you work in mySewnet™ Stitch Editor. You can add, remove, or rearrange toolbar buttons as desired.
The default set of toolbar buttons is shown below.
To Customize the Toolbar
-
Choose View > Customize Toolbar. Alternatively, Control–click in the toolbar and choose Customize Toolbar.
-
Make changes as desired: drag items to add or remove them, to return to the defaults drag the default set, choose an icon/text type from the Show menu, and select the size.
-
Click Done.
Control Panel
Use the Control Panel to design and edit embroidery designs.
To Open the Control Panel
-
Click the Control Panel button
 in the toolbar.
 -
Choose View < Show Control Panel.
There are 5 windows in the Control Panel:
|
Design |
Change and merge colors and embroidery designs, select blocks and colors, rotate, resize and ColorSort. See Design Window. |
|
Modify |
Optimize and morph embroidery designs, and add color changes, trims, stitches, ties, cutwork and embossed lines. See Modify Window . |
|
Border |
Add a satin border to your design, optionally with appliqué fabric. See Create Borders and Appliqué Areas. |
|
Appliqué |
Adjust appliqué areas within your designs. See View and Adjust Appliqué Pieces. |
|
Object |
Edit areas and lines as objects, adding and deleting points in the outline, and changing the stitch type for the object. See Editing Objects. |
Menu Bar
The mySewnet™ Stitch Editor menu bar is visible if mySewnet™ Stitch Editor is the active window. Each open embroidery or group of embroideries also has its own document window showing its name.
There are eight menus in addition to the Apple (![]() ) menu and the application menu: File, Edit, View, Filter, Design, Object, Window and Help.
) menu and the application menu: File, Edit, View, Filter, Design, Object, Window and Help.
-
To access the menu options, use the mouse to pull them down from the menu bar.
Work Area
The work area is the area where embroideries are loaded. The work area includes the area surrounding the selected hoop. It is where you make changes to an embroidery. The stitch area is the available area inside the selected hoop.
Stitches are drawn in the appropriate colors. The embroideries are shown in either 3D or 2D. The background color and texture can be changed using mySewnet™ Configure.
In all modes including 3D View Mode ![]() the real hoop is shown, with blue corners showing the stitch area within the hoop.
the real hoop is shown, with blue corners showing the stitch area within the hoop.

In 2D View without Stitch Points ![]() , stitches are drawn in plain colors only, and stitches using multicolor threads are drawn using only the first color in the thread definition.
, stitches are drawn in plain colors only, and stitches using multicolor threads are drawn using only the first color in the thread definition.
In 2D View with Stitch Points ![]() , the embroidery is shown in 2D with the stitch points shown as black dots.
, the embroidery is shown in 2D with the stitch points shown as black dots.
Background Grid
The work area has a grid. Zooming in or out makes the grid squares look bigger or smaller. You can also number the grid.
Select the Grid and its Size
-
To turn the Grid on or off, choose View > Grid and choose one of the grid options.
-
To change the size of the grid squares, choose mySewnet™ Stitch Editor > Preferences (or ⌘,), General
 and set the size.
Control Strip
Use the Control Strip to view the colors in the selected section of the embroidery, and to select stitches by number, by color block, or with the handles on the slider bar. Stitches can be hidden for ease of editing or to protect them from being changed by other functions.

Hoop
By default, the hoop is shown at a size so that the hoop fills the window, as if you had clicked Zoom To Fit ![]() .
.
To Select a Hoop
-
Click Hoop
 in the toolbar, or choose Edit > Hoop to open the Hoop dialog. See Hoop Selection.
Note: In mySewnet™ Stitch Editor the handles of the selection box do not change from square to round to indicate that a design, or part of it, is outside the selected hoop.
Design Select
The Design Select area of the Design window shows the different sections of a multipart design. See Design Select.
Design Information
The stitch count ![]() , dimensions (height
, dimensions (height  and width
  ) and number of colors
  for the selected embroidery are shown in the Information area of the Design window.
Color Select
The Color Select area of the Design Window shows the colors used in the selected embroidery. See Color Select.
Zooming In or Out
You can enlarge (zoom in) or reduce (zoom out) your view of the work area.

Zoom To Fit shows the hoop so that it fills the window. This is the default size. Click the center marker on the zoom slider to see the embroidery at 100% or real size. See Zooming In or Out.
Using Text and Number Boxes
To view changes made in a text or number box, click in another text/number box, or press the Return key.