Frame one or more embroideries, or use a frame with appliqué.
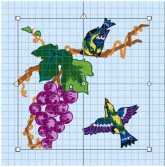
Grapes and Birds in a Frame
Frame an embroidery and change the frame properties.
-
Choose File > Insert. See Insert.
-
Browse to mySewnet/Samples/Embroidery/Stitch.
-
Scroll down to "Grapes and Birds.vp4".
-
Click to load the embroidery into the work area.
The embroidery has white or blue handles on its selection box, depending on the Resize mode.
mode. -
Open the Frame window
 , and in Type select Corners
  .
. -
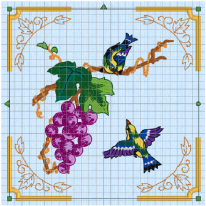
Scroll down the Corners window to Ornamental 2 MC, and click the corners in row 1, column 1.
These corners are designed to frame a square embroidery. The corners in rows 2 and 3 are for portrait and landscape formats. -
In Surround, select Margin and ensure that it is set to 2.5 mm. (This is the default size.)
-
Deselect Group.
-
Click Apply. The set of corners is placed around the embroidery as a frame. It has green handles.
-
Drag the frame a short distance. It moves separately from the embroidery.
If the embroidery moves with the frame, Group was selected. Group treats the embroidery and frame as a unit. If Group is not selected, the frame can be immediately nudged into place. Only deselect Group when you want to move the frame after placing it.
Note: If you grouped the embroidery and frame, use Reveal Groups to adjust them separately. -
The frame would look better if it fitted a little more snugly. Delete the frame.
-
In the Frame window, click the down arrow to change Margin to 0.5 mm.
-
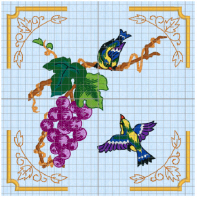
Ensure the design is selected, then click Apply. The frame now fits closely around the embroidery, but does not overlap it.
-
Control–click the frame and select Satin Line from the context menu. The Satin Line properties dialog appears. See Satin Line.
-
In the Satin Line properties dialog, click the down arrow to change Width to 2.5 mm.
-
Click OK. The frame is now more delicate.
-
Click outside the frame to view the design without the selection box.
Alternatively, click Realistic 3D mode or Life View
  to see the design without the selection box and grid.
 -
To keep the embroidery and frame together as a unit, select both and in the toolbar click Group
 .
.
Note: To merge the embroidery with the frame, fixed as stitches, choose Design > Combine All.
Note: If the viewer is set to Icons Only, hover the pointer over a design thumbnail to view its name.
The satin line on the outside of the corners is a little heavy. Its width can be changed.
Alternatively, you could have used Stitch Type to change the satin properties before placing the frame.
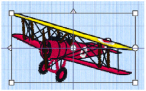
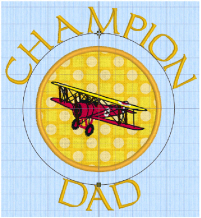
Create a Framed Badge: Champion Dad
-
Click Hoop

and in the Hoop Selection dialog select 180mm x 130mm - Universal Large Hoop 1.
-
Set Orientation to Natural and click OK.
-
Choose File > Insert.
-
Browse to mySewnet/Samples/Embroidery/Stitch.
-
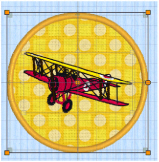
Scroll down until you see "Biplane", and click to select it.
-
Click Open to load the embroidery into the work area.
Note: The embroidery has white handles on its selection box, showing that it is initially in Scale rather than Resize
mode (blue handles).
-
Open the Frame window

of the Control Panel

, and in Type select Frames

.
-
Select the second (round) frame in Applique Shields 1 (the top set in the list).
-
In the Stitch Type pop-up menu select Appliqué Fabric to view the Appliqué Selection dialog.
-
Click Load Previously Saved Fabric

. The Picture Viewer opens.
-
Browse to the folder General/Checkerboard.
-
Scroll down and select the fabric Checkers Round 1 - 18, then click OK to close the viewer.
-
Click OK to close the Appliqué Selection dialog.
-
Ensure that the embroidery is still selected and click Apply to place the frame around the embroidery.
-
Open the Design window

of the Control Panel

.
-
In the Color Select area, Control–click the top color in the list. This is the blue for the frame.
-
Click Colors

to open the Colors window and select the Colored Pencils

.
-
Click the Cantaloupe color pencil on the bottom row.
-
Click OK to close the Color Selection dialog. The frame border is now a gold color.
-
Open the Letter window

.
-
Click the displayed font in the Letter window, and in the Font Viewer enter the word "Carlton" in the Search box.
-
Click OK to select the font Carlton UC 15-45mm.
-
Enter the word "Champion" in the Letters text box.
-
Press Option–Return for a new line and in the line below enter the word "Dad".
-
Set Gap to 10.
-
Click the current Lettering Shape, and in the pop-up menu, select Full Circle

.
-
Ensure that ColorSort is selected (checked).
-
Click Apply. The lettering appears around the embroidery. Its handles are green.
Note: If the lettering does not surround the embroidery, the embroidery was not selected. Choose Edit > Undo, click to select the embroidery, then click Apply again. -
Drag the square green handle at the top of the circle of lettering downwards so that it fits well around the framed embroidery.
-
Click Design Player

to view the embroidery as it will be stitched out.
-
Click Close to close the Design Player.
-
Choose File > Save and save the embroidery as "Champion Dad".
Note: The various parts of this multipart embroidery will be stored separately, making further adjustment easier.