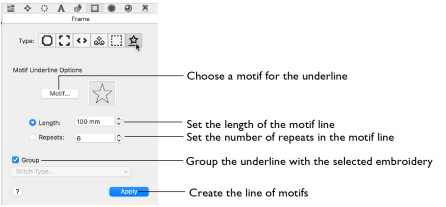
Create a motif line of a chosen length or a selected number of repeats below the currently selected embroidery. Alternatively, place a single motif. The motif line is created below the selected embroidery or embroideries, or in the center of the work area if no embroidery is selected.
Motifs are relatively small single-color designs similar to machine stitches, created using single, running and triple stitches. Motifs are created from the motif sets available in mySewnet™ Embroidery, including any My Motifs you made in mySewnet™ Draw & Paint.
Note: The Motif underline settings are remembered for the current mySewnet™ Embroidery session. Otherwise the system default star motif is selected.
Create Lines of Butterfly Motifs
Create a Motif Underline
-
Select the length of the motif line, or select the number of repeats. Use the Motif button to select a motif, its stitch type and its size.
Note: The stitch properties may only be adjusted before the motif underline is created.
Create a Single Motif
-
Use the Motif button to select a motif, its stitch type and its size. Set Repeats to 1, and click Apply. A single motif is placed in the work area.
Length
Set the Length of the line of motifs.
-
Click the arrows to set Length from 10mm to 1000mm.
Repeats
Set the total number of copies of the selected motif in the line.
-
Click the arrows to set the number of repeats from 1 to 100.
Note: If motifs are designed to overlap each other the calculation for number of repeats may not be exact.
Motif
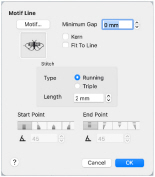
Use Motif to select the motif and stitch type for the underline in the Motif Line dialog. See Motif Line.
-
Click the Motif button to select the line properties and motif.
Apply
Use Apply to place the line of motifs in the work area as a motif underline.
Create Lines of Butterfly Motifs
-
Open the Frame
 window.
 -
In Type, select Motifs
 to create a motif underline.
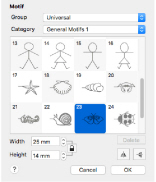
-
In the Motif Underline section, click the Motif button. The Motif Line selection dialog opens.
See Motif Line. -
In the Motif Line selection dialog, click the Motif button. The Motif dialog opens.
See Motif Selection. -
Select Universal from the Group pop-up menu.
-
Select General Motifs 1 from the Category pop-up menu.
-
In the Pattern pop-up menu, select motif 23, a butterfly.
The Height and Width are initially set according to the chosen motif. -
Check that Proportional
 (lock closed) is on.
 -
Set Height to 14mm.
-
Click OK to set the motif.
-
In the Motif Line selection dialog, ensure that stitch type is set to Running.
-
Set Length to 2.0mm.
Note: Length is initially set to the recommended value for the motif. -
Click OK to select the butterfly motif line type.
-
In the Motif Underline section of the Frames window, click Length to select it.
-
Set the Length to 100mm.
-
Click Apply. A line of four butterflies is placed on the work area.
-
Set Length to 120mm and click Apply again. There are still four motifs, but they are more widely spaced.
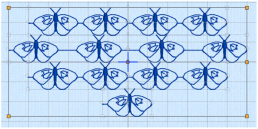
Only complete motifs are used when placing a motif line with Motif Underline.
Note: The second motif line forms a Group with the first line. Use Reveal Groups or Ungroup to use the lines independently. -
In the Motif Underline section, select Repeats.
-
Click the arrows to set the number of repeats to four, then click Apply.
The motif line is the same size as the first line you created. -
Click the arrows to set the number of repeats to one, then click Apply. This places a single motif in the work area.
The width of the butterfly motif is 25mm, so the line contains four motifs.
Note: You can resize or rescale this line of motifs, or change its color, in the same way as for any other design.
Note: Use Encore to create curved motif lines, circles and shapes using single motifs, and to mirror motifs within a line. See Encore.